Watermarks on images are not desirable, but most of the time, you have watermarks. In such cases, you cannot use the images for personal or any other purpose. It is important to get rid of the watermark before you use the images.
People usually find the best tool to remove watermark from photo. There are dozens of tools available on the market, which is why it is difficult to select the best one. For you ease, we are going to tell you how you can remove watermark from picture using different tools. We have picked some of the best tools on the market, and we will take you through each. We will explain the tool and the complete method of using it.
Every watermark remover tool has a different result. Therefore, we have explained the results of each tool and attached the images. You can easily decide which tool is perfect for your needs. From free to paid tools, we will discuss everything. Let’s begin.
Part 1. How to Remove Shutterstock Watermark With iMyFone MarkGo
Shutterstock is a famous and vast library of stock images. You can find almost any image you need. The problem with most of the images is their watermark. People try to use those images for their personal use or any other purpose, but the watermark creates a hindrance.
The Shutterstock watermark can be removed using various tools; however, we recommend MarkGo. It is an exceptional tool that can remove the unwanted objects resulting in a minimal blur effect. Whether you have an image, you can use iMyFone MarkGo for watermark removal or addition.
If there are multiple watermarks on a single image, you can add more rectangles to select the area. Moreover, there are undo, redo, and reset tools available, so you can remove the unwanted objects with perfection and save time. Download iMyFone MarkGo now.

The best feature of MarkGo is batch watermark removal. Usually, such tools take one image and remove its watermark, but MarkGo can remove watermarks from multiple files, and it only needs one click. You just need to select the area in one image, and it will be applied to all images if you want.
Watch the video tutorial to learn more about MarkGo
Steps to Remove the Shutterstock Watermark
Step 1: Open MarkGo on your PC. You will have options to remove and add watermarks in videos and images. Click on Remove Image Watermark.
Step 2: You need to add images to remove the watermark. Click on the Add Image button. Select the image from your computer and open it. You can also upload multiple images for batch watermark removal.
Step 3: After opening the image in MarkGo, you need to use the selection tool. Click on the selection tool button on the right. You will have a rectangle on the image. Adjust its position and size by dragging it.

Step 4: If there are multiple images and you need to do batch watermark removal, check the Apply to all radio button. Click on Remove Now. The watermark will be removed within a blink of an eye. If you are not satisfied with the results or you need some changes, use redo, undo, and reset tools.

Step 5: When you are ready, click on the Export button to export the image.
iMyFone MarkGo
Start to Remove Watermarks from Videos and Images Now.

Part 2. How to Remove Watermark from Photo Online With Apowersoft
Sometimes, it is better to use online tools and save time. There are many online watermark removers available, and here, were going to focus on Apowersoft because of its commendable results.
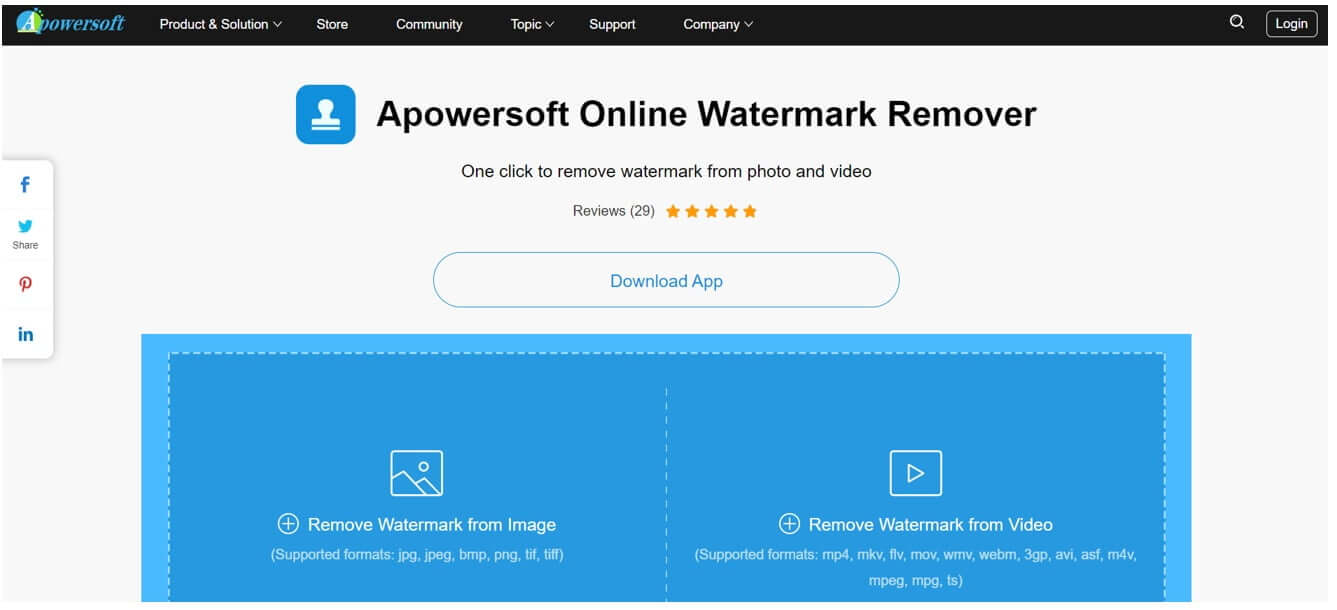
Apowersoft is an online tool, but it also has a desktop app that can help you remove unwanted objects in one click. You just need to upload the file and click on the button to erase the watermark. The best part is that it can remove watermarks from multiple files in one go.
Note: Apowersoft watermark remover is a quick tool, but the quality of watermark removal is quite low. It makes the watermark area blur. So, if you have no issues with a blurred watermark, you are good to go.
Steps to Remove a Watermark Using Apowersoft
Step 1: Open your browser and follow the link.
Step 2: You will see a blue rectangle where you can upload your files. You can drag the files to the area or click on it to upload files. Keep in mind that this tool is used for images and videos, so drop your files in the image or video column.

Step 3: It will take a few moments to upload the file. If you want to add more files, you can click on Add Files. This tool can remove the watermark from multiple files at a time.
Step 4: You will see a rectangle on the screen. Move it and place it over the watermark. Adjust its size accordingly. If you want more rectangles for other watermarks, click on Add Boxes.

Step 5: Click on Erase. The tool will start removing the watermarks. It will take a few moments. Click on the Download Files button.

Part 3. How to Remove Watermark from Photo On iPhone/Android
You can also remove watermarks using mobile applications; you don’t need a computer. You can do it on your iPhone or Android. There are dozens of applications available on the Play Store and App Store.
Video Eraser is a tool available for both Android and iPhone. The name of the tool is the same, but they are different on Android and iOS; however, both have almost the same steps to use.
Here, we will explain and review the steps of Video Eraser for Android. You can also use the iOS app in a similar way.
Video Eraser is a watermark removal tool, and it can also add a watermark. It is suitable for both images and videos. Other than that, you can use this tool for video reversal, trimming, video cover, background editing, and canvas setting. It only needs a tap to remove the unwanted objects, and you can also remove multiple watermarks in go. The final image/video can either be downloaded or shared on social media.
Steps to Use Video Erase on Android
Step 1: Install and open Video Eraser on your mobile.
Step 2: Tap on Remove Watermark from Image/Video. Select the image/Video that requires watermark removal.

Step 3: You will see a rectangle on the image/video. Position the rectangle over the image and adjust its size by dragging the corners. You can also add more rectangles by tapping on the image. When you are ready, tap on Done.
Step 4: Now, you can either save the image to any album or share it on social media.

Part 4. How to Remove Watermark from Picture in Photoshop
Photoshop is an advanced graphics editor, which is specially created for industry experts and professionals. The features that it provides are worth praise; however, a beginner needs to learn a lot before using it.
You can remove watermarks on any image using Photoshop. It might seem a bit difficult to the beginner, but if you follow the right steps, you can easily remove the unwanted objects without any hassle. Surprisingly, even if there are multiple watermarks and lines on the image, you can remove everything in one go. Keep in mind that Photoshop is an expensive and advanced tool. If you just want to remove the watermark, you should go for another tool that is solely created for the purpose. Let’s have a look at a very simple method of removing watermark from images.
Steps to Remove Watermark from Image in Photoshop
Step 1: First, open Photoshop on your PC. You need to start a new project, so click on Create New. Select a suitable size of the image; you can also go with the default one. Click on Create.

Step 2: Click on File > Open. Select an image that has a watermark.

Step 3: You will have the image. Now, it is time to select the watermark. First, go to the Layers panel, and click on the “+” button to add a new layer. It will instantly add a new layer. You can also rename the layer by double-clicking on the name, but it is not necessary.

Step 4: Select the brush tool from the toolbar. You need to adjust the brush size according to the size of the watermarks and lines. Moreover, increase the hardness of the brush tool to 100%; it will make everything solid.

Step 5: Cover the watermark using the brush tool. Similarly, you can cover the lines. If you need to draw a straight line, press the Shift key while drawing.

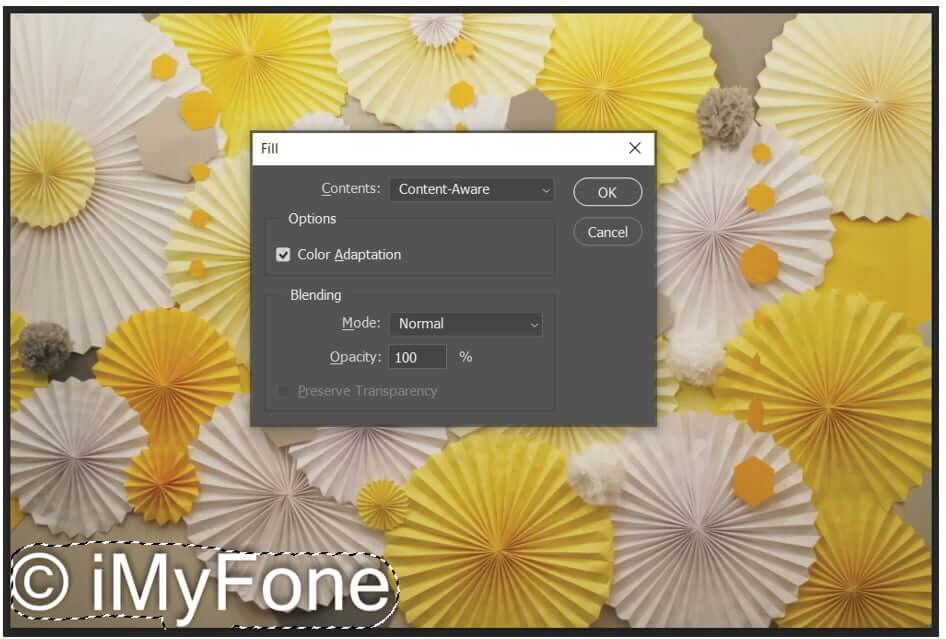
Step 6: Press Ctrl and click on the brush layer to select it. You will see the selection boundary around the watermark. Now, make the brush layer invisible by click on the eye button. Click on the image layer.

Step 7: Go to the Edit menu and click on Fill. You will see a new window. Make sure Content-Aware is selected in the Contents. Click on OK.

Step 8: You have successfully removed the watermark. You are ready to save the image. Click on File and then Save As. Select the JPEG format and save the image on your computer.

Part 5. FAQ about How to Remove Watermark from Photo
1.How can I remove a watermark from an image for free?
You can remove the watermark from an image for free. There are dozens of online tools and desktop software programs available. However, we recommend MarkGo as it is solely created for this purpose. You can remove watermarks from your videos and images and add watermarks as well. The best part is that it requires only one click to remove the watermark. If you have made any mistake or you need to change something, it has redo, undo, and reset tools.
MarkGo is completely free. You can remove one watermark or add one watermark without any charges. There is no limitation on the number of images; you can remove the watermark from unlimited images.
2.Why do most of the tools blur the watermark instead of removing it?
Usually, watermark removal tools blur the area of the watermark. It is because they cannot remove the watermark without disturbing the background. The only way is to make the image blur. Thus, if there are multiple colors in the background, the blur effect will be more visible.
3.Can I do batch watermark removal?
Yes, you can do batch watermark removal in MarkGo. You can import as many images as you like. You only need to select an area in one image, and the same area will be applied to other images. With one click, you can convert a complete batch. There is no limitation on the number of files; you can import unlimited files at a time.
4.Can you remove multiple watermarks along with lines?
Yes, it is possible to remove multiple watermarks along with lines. We have already discussed how you can remove one watermark using MarkGo, and you can do that same with other lines and watermarks. You can also use Adobe Photoshop to remove the watermarks and lines. We have explained the step-by-step method. In MarkGo, you just need to select an area using the selection tool. The watermark and the lines in the area will be removed. In Adobe Photoshop, you need to select each line and every watermark. This is a bit time-consuming and difficult.
Conclusion
We have seen four ways to remove watermark from pictures. There are different tools in every part, and we have seen the step-by-step method so that you can use the tools easily. All tools have distinct results; some make the area blur while some copy the parts of the background to replace the watermark. We have attached the images of all tools along with the results, so you can easily pick the best one.
iMyFone MarkGo and Photoshop are the best tools for watermark removal. Photoshop is commendable, but it is quite expensive and difficult. Moreover, it masks the background of your photo over the watermark. On the other hand, MarkGo removes the watermark, and it does it exceptionally well. Sometimes, you will see a slightly blurry effect. We hope you have a clear idea of how to remove the watermark from image and use different tools.
iMyFone MarkGo
Start to Remove Watermarks from Videos and Images Now.


