Would you like to watch your picture album/slideshow in a slow-motion mode? Probably, Never!
Sometimes we need to speed up a video or some of its portion to keep the viewer engaged. It depends on the type of video, but in most cases, speed control makes your video more attractive. Today, we are going to explore different ways to speed video with DaVinci Resolve. Or you can free download and try iMyFone Filme to speed up videos faster and easiler.
Part 1: 4 Ways to Speed Up Video on DaVinci Resolve
DaVinci Resolve is an amazing application that can help you speed videos in various ways. We will show you how to speed up video in DaVinci Resolve. Let's start.
Common Steps for All Four Methods
Step 1: Open DaVinci Resolve. Click on Untitled Project.
Step 2: Go to the File menu and click on Import Media. Now import the file in which you want to adjust the speed. Drag the clip to the timeline.
1) Using Change Clip Speed in the Edit Page
Step 3: Open Edit Page. Go to the timeline and right-click on the clip. Click on Change Clip Speed.
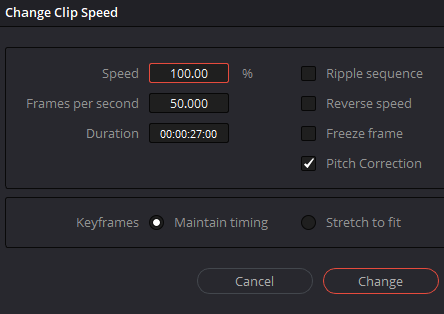
Step 4: Enter the speed in percentages. 200% means twice the speed of the original speed. You can enter any speed you want. You will also see the corresponding duration and Frames Per Second (FPS).
Step 5: Click on Change.
2) Using the Speed Adjustment Tool
Step 3: Go to the cut page, you will see an equalizer icon. Click on the icon, and then you will see a speedometer icon. Click on the icon to enter the speed options.
Step 4: You can enter the speed of the video; it can be 2, 3, or anything you want. It will also show you the duration according to the speed. You can also select the speed curve.

3) Using Retime Control
Step 3: Go to the Edit page and right-click on the clip. Click on Retime Controls. You can also press Ctrl+R.
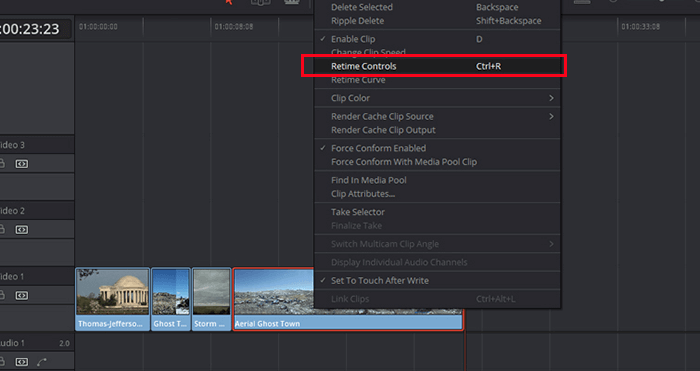
Step 4: After clicking on the Retime Control or using the shortcut keys, you will see a percentage at the bottom of the video in the timeline.
Step 5: Open the drop-down menu of the percentage and go to Change Speed. Select any speed you want.
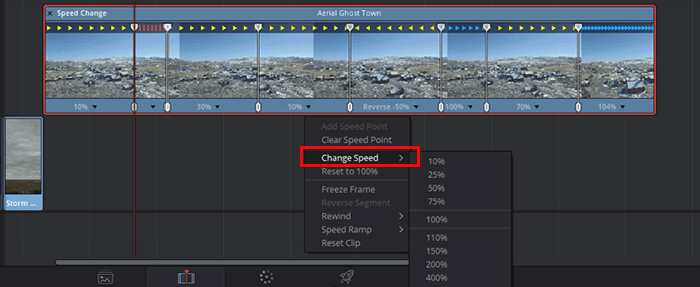
Step 5 (Alternate): Move the Playhead where you want to create a speed point. In the drop-down menu, click on Add Speed Point. Now, you can drag the speed point left and right to change the speed of a portion of the video.
4) Using the Retime Curve
Step 3: Right-click on the video in the timeline and click on Retime Curve.
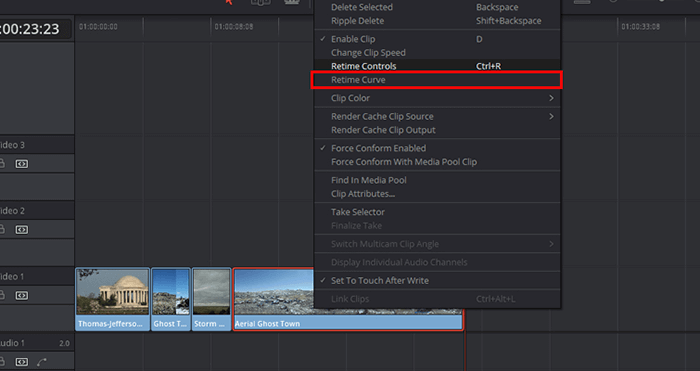
Step 4: You will see a curve on the timeline. You will see a Retime Frame option on the timeline, click on the down arrowhead and click on Retime Speed. Now the curve will show you the relation of time and speed. You can move the curve up and down to change the speed of the video.

Final Verdict of DaVinci Resolve
Pros of DaVinci Resolve:
-
DaVinci Resolve is an amazing software for professionals. It has powerful tools for adding text on videos, color correction, audio editing, transitions, and effects.
-
DaVinci Resolve offers the best colour grading that you will not find in other applications.
Cons of DaVinci Resolve:
-
Most of the users think that DaVinci Resolve is very complicated. It is difficult to use as a beginner, and it also creates problems in installation.
-
Some people have experienced DaVinci crashing while using it. It doesn't run smoothly.
You may want to read:
How to Add Text to Video in Davinci Resolve >>
Part 2: 3 Alternative Tools to Speed Up Video
No doubt, DaVinci Resolve is a fantastic video editing software, but it is very complicated, especially for beginners. Many people think it creates many problems for new users. Moreover, it is very expensive. Therefore, it is not in the reach of everyone. We are going to share some alternative ways to speed a video. We will guide you on how to use other software/tools to speed video with ease.
1 iMyFone Filme [Windows & Mac]
iMyFone Filme is the easiest tool for video editing, allowing you to adjust speed within a few seconds or minutes. Filme comes with a user-friendly interface. That means you don't need prior experience of video editing and you can quickly edit your videos like a professional while this video editor is friendly to beginners.
Below are the simple steps to speed up video using Filme.
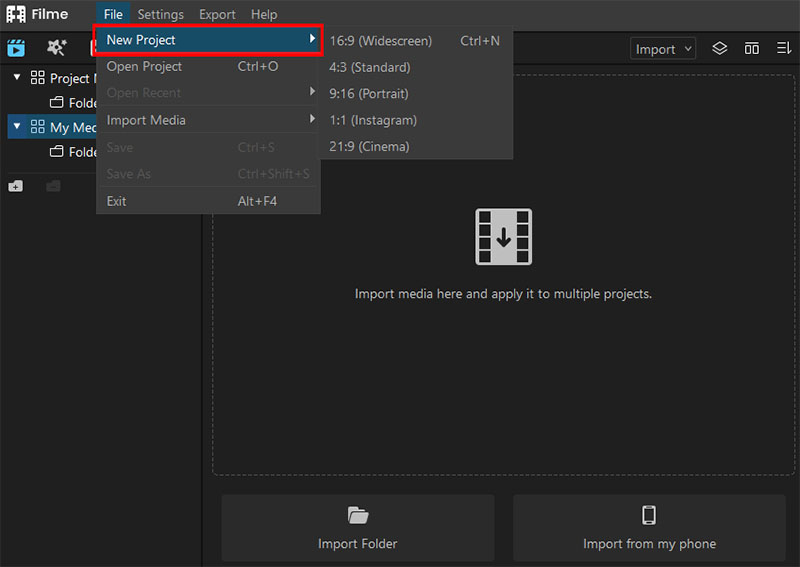
Step 1: Open Filme. Go to the File menu and create a New Project.
Step 2: You will see an Import option on the top right corner of the window. Open the drop-down menu and click on Import Files.
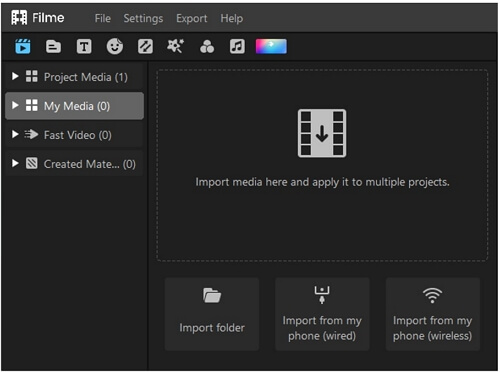
Step 3: Add the video to the timeline by dragging it from the media library to the timeline.
Step 4: On the toolbar above the timeline, click on the speedometer icon. The icon is for changing the speed. This will open a window in which you can select the desired speed. After selecting the speed, click on OK.
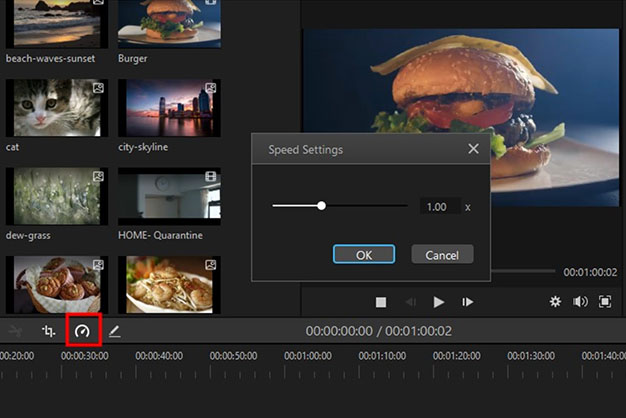
Step 5: After changing the speed, see the preview. You can change the speed again if there is any problem. Export the file when you are done with editing.
Note
iMyFone Filme is a simple tool that can allow you to do quick editing. You can also do other basic editing using this tool, including rotation, splitting of video, and cropping. It has other advanced features, such as animations, transitions, effects, and fonts, to make the video stunning.Watch this video to learn how to use Filme to change video speed:
2 QuickTime Player [Mac]
QuickTime Player is a fantastic application for running visual media. You can watch movies and enjoy them without any hassle. The best thing about the software is its easy interface. It allows users to do everything within a few steps. If you want a hassle-free software to watch videos on Mac, there is nothing better than QuickTime Player.
QuickTime Player can be used to change the playback speed as needed. You can slow down or speed up the video without any hassle.
Step 1: Open QuickTime Player and play the file you want in the fast mode. For opening the file, go to the File menu> Open File.
Step 2: You will see Playback controls on the screen. There will be a fast forward button, but if you click it, the speed of the video will be 10X. For more precision, hold the option key and then click the fast forward button.
Within two simple steps, you can get the desired speed of the video. The problem with QuickTime Player is that it creates a disturbance in the sound. The sound quality degrades when you increase the speed.
Of course, you can change the video speed on Final Cut Pro on Mac for good.

3 EZGif [Online]
EZGif is an online web-based application that can speed up your video in no time. It is the simplest way of changing video speed. You don't need to download any software to change the speed. Just open the link, and you are ready to go. It is perfect for people who convert video files once in a blue moon.
Step 1: Open EZGif.
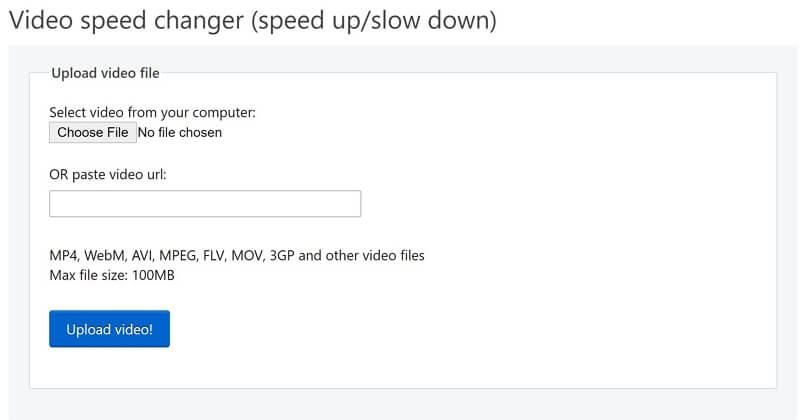
Step 2: Click on Choose File. Select the file you want to edit. Click on Upload Video
Step 3: After uploading, you can enter the multiplier. If you want to speed up the video, the multiplier should be greater than 1. Enter the multiplier and click on Change Video Speed.
Step 4: You need to wait for some time to get the final video file. Once the file is ready, you can download it.
EZGif is a web-based application, so it saves you from many hassles. You can edit videos in no time. But it has a limit; you cannot upload a file over 100MBs. You need to purchase a plan for larger files.
Final Words
DaVinci is an advanced tool, and we have explained the step-by-step guide on how to speed video in DaVinci Resolve using four different methods. However, some people find it a bit complicated. Moreover, it is very expensive.
Therefore, we have introduced some of the best alternatives that can speed your videos quickly. Our recommended software is iMyFone Filme because it has a user-friendly environment, and you can do any kind of editing without any hassle, including changing the speed.


 iMyFone MagicMic
 Free Download


