


Looking for how to remove text from a photo in Photoshop? Good! We are going to give details on some methods to remove text from a photo in Photoshop!

How to Remove Text in Photoshop Using the Rasterize Function
Photoshop
Using Photoshop can be tricky as there are so many tools, and for one thing, you can use multiple methods to do one type of editing!
However, once you get the hang of Photoshop, you will know how easy it is to use Photoshop for editing any type of text from an image. Let's start with using the rasterize function to remove the text from a photo in Photoshop.
Step1: Import File
Let's start with the basics! Open Photoshop and once it is opened, go to the top-left corner and click on 'File.' A panel will open and select the second option, 'Open.' A Window will popup, and you can select the image you want to remove the text from. This will import the file/image/photo you want to do editing.

Step2: Make a Copy
Once the image is imported, now you will have to make a copy of it so that you don't make any changes to the original file. To make a copy of the photo, go to the layers and right-click on the image that you want to remove text from. A panel will open after right-clicking; you can select the option of 'Copy.' A copy of your original photo layer will be seen on top of the original layer. It will be named as 'Copy' after the original name of the photo.
Step3: Rename the Copied Layer
To make it easier to remember your file, you can rename it whatever you want. To rename the file, right-click on the copied layer, and a panel will open. From the panel, select rename. Once the option is selected, a window opens where you are required to rename the image. You can give any name you want, or you can simply add the 'TEXT REMOVED' after the original name of the file. Now, click on the 'Save' option given at the end of the Window! And here you go with the renaming of your file.

Step4: Rasterize Layer
Now, you will see two layers with the same image in the 'Layers' on the right side of the toolbar. You just have to select the copied layer and right-click on it to open the tools panel. From the panel, select the option of 'Rasterize Layer,' and your layer will be rasterized. Rasterizing the layer means that you are now making it active for editing.

Step5: Remove the Unwanted Text
Once the layer is selected and rasterized, you can start up with the removal of unwanted text.
One of the tools to remove text is the 'Lasso' tool. It is the easiest tool to use and understand. Once you have selected this tool from the left corner of the interface or press 'L' to activate the tool, you can simply click on the area around the text and move your cursor around the text to select it. Once you have selected the text area you want to remove, press 'Delete,' and it will disappear.
Other than the lasso tool, you can also select the 'Eraser' tool or press 'E' to activate the tool. Once you have activated the tool, on the top-left corner of the interface, you will see some options to increase the size or decrease the size of the eraser. You will also see an option of opacity. Make the opacity at 95% for the starting as you can change it to your liking! Now, move the eraser by your mouse cursor over the area of the text that you want to remove. By left-clicking on the mouse, you will see that the text area is removed where the eraser tool hovered.
Step 6: Save the Changes
Now that you have successfully removed the text, you can save the changes in the file by clicking on the 'File' on the top left of the interface. A panel will open up. You can select the option of 'Save' to save the changes. Or, you can simply press 'Ctrl+S' to save it with these shortcut keys.
How to Erase Text in Photoshop Using Content-Aware Fill
How to use Content Aware Fill?
Next, to remove text from the Photoshop, we have another way. It is referred as the Content Aware Fill Method. Let us have a systematic look at the process using Content Aware Fill.
Step 1. Head to Images in Photoshop
In your Photoshop Dashboard, open your images. Next, create a copy of a specific image. The aim of copying is to not make any change to the original image. By doing this, you can mitigate risk. For copying, you can do this by pressing Ctrl + J on Windows or Command + J on Mac.

Now, observe the layers panel. You will notice that you have two layers with that same image. However, the original image will be designated with the background layer. On the other hand, the copied image stays as Layer 1.
Step 2. Select the Layer 1
As mentioned earlier, the copied image stays as Layer 1. Now, you can rename that layer. Because, we have to be smart. Otherwise one can easily get mixed up between the two layers. For instance, you can rename the layer as "for text removal" or "with text removed".

You can easily do this by right clicking on the Layer 1 directly. A menu will appear, showing the rename option. Simply change the name of the layer. For action completion, press enter on Windows and Return on Mac.
Step 3. Text Selection with Lasso Tool
Up next, we will use the Lasso Tool. You can select the Lasso Tool from the toolbar. Toolbar is located on the left side of your Photoshop screen. As you choose the Lasso Tool, the Lasso Tool icon will appear with a black cursor.

With the cursor, you need to click near the edge of your text. Now, with the tool, you need to outline the text by dragging it on the outline. Be mindful and leave a thin border around it. This will ultimately enable Photoshop to perform better blending the background, after the text removal.

Step 4. Remove the Text
After outlining the text with Lasso tool, now you can remove the text. For this, click on edit. Further, select fill from the drop down menu. On the other hand, you can just use the shortcut by pressing Shift + F5. The Fill panel will appear.

Now, choose the option "Content Aware Fill" from the drop down menu. Next, click on OK and it will remove the text later, leaving a blank space. Give some time to Photoshop; it will fill the space.
Step 5. Unselecting the Image
Lastly, you need to unselect the image. You can do this by pressing Ctrl + D. After that, save the image. Within a matter of seconds, Photoshop will remove the text.

Using the Content Aware Fill is highly recommended. Moreover, the Content Aware Fill comprises of various features that allow you to improve the quality of your work in Photoshop. It enables you to optimize your work by removing unnecessary objects ffrom your project. In this way, you end up with a more refined nature of work.
How to Delete Text in Photoshop using the Clone Stamp Option
Removing unnecessary objects from your Photoshop is always a great idea. By eliminating the unwanted elements from the project, you can enhance the outlook of your project. We have discussed two methods of removing text above. However, now we have a third one that allows you to do editing, in a more subtle manner. Moreover, the clone stamp option, you will not disrupt any pixels of the image.
Let us now learn how to use the Clone Stamp Option, to remove text in Photoshop.
Step 1. Head to Images in Photoshop
In your Photoshop Dashboard, open your images. Next, create a copy of a specific image. The aim of copying is to not make any change to the original image. By doing this, you can mitigate risk. For copying, you can do this by pressing Ctrl + J on Windows or Command + J on Mac.
Now, observe the layers panel. You will notice that you have two layers with that same image. However, the original image will be designated with the background layer. On the other hand, the copied image stays as Layer 1.
Step 2. Selecting the Layer
As mentioned earlier, the copied image stays as Layer 1. Now, you can rename that layer. Because, we have to be smart. Otherwise one can easily get mixed up between the two layers. For instance, you can rename the layer as "for text removal" or "with text removed".
You can easily do this by right clicking on the Layer 1 directly. A menu will appear, showing the rename option. Simply change the name of the layer. For action completion, press enter on Windows and Return on Mac.
Step 3. Object Selection with the Clone Stamp Tool
After you have renamed the layer, now it is time to select the particular area on image or text. For this, we will use the Clone Stamp Tool. You can easily get the Clone Stamp Tool from the tools pallet in the Photoshop. One can also get it through the shortcut. Just press Ctrl – S. Moreover, you can also get it by holding the rubber stamp icon. That will open a fly out menu from which you can choose the Clone Stamp Tool.
Now, you have to mindful about the use of brushes. For text removal, you have to choose a brush with a soft tip. In addition, the brush needs to have a flow rate between 10 and 30 percent. Next, adjust the opacity at 95%. However, you can also make adjustments accordingly.

Step 4. Selecting the Original Layer
Next, you have to opt for the original layer. Simply, select the original layer through the Layers Panel. Now, you need a new layer button. Just drag the original layer for a new layer button. You will find the option or the icon next to the Trashcan icon. On the other hand, you can also proceed with the shortcut Ctrl + J: this will create a new layer.

Step 5. Specify the Source trough Clone Stamp
Now, place your cursor on close spot to the text. By holding Alt, left click on the spot. It makes a selection and that spot is referred as a "Source". Next, select the paint and use it to cover the text.

You have to be extremely careful and precise in this step. In case of any imprecision, you will notice the distortion when you will paint the image.
Step 6. Align the Pixels
Through the options menu, choose Aligned. This will help you to sample the pixels continuously without the loss of the sample point. Make sure to reset this option after choose a new sampling point.

Step 7. Cloning the Text
Move the mouse over the text that you want to cover. In addition, paint on the source as well, by left clicking. The background image will light up. Remember that the spots that you are cloning are lit in the same direction, as of the image.

A good thing to do is to paint in small sections that are manageable. Making large strokes can disrupt. Moreover, it will give your work a more professional outlook. You can carry on the process until you get the finest quality.
Best Photoshop Alternative for Beginners to Get Rid of Watermark
Being a beginner in the field of editing? Nothing to stress about! We have an amazing alternative for you to use and get your editing done within minutes! Editing with not only in minutes but it will also be professional looking! iMyFone MarkGo is this amazing alternative to Photoshop to remove text from a photo. This is very easy software with some unique built-in features. Let's get to know how you can remove text within minutes with this exciting software in just a few steps:
iMyFone MarkGo
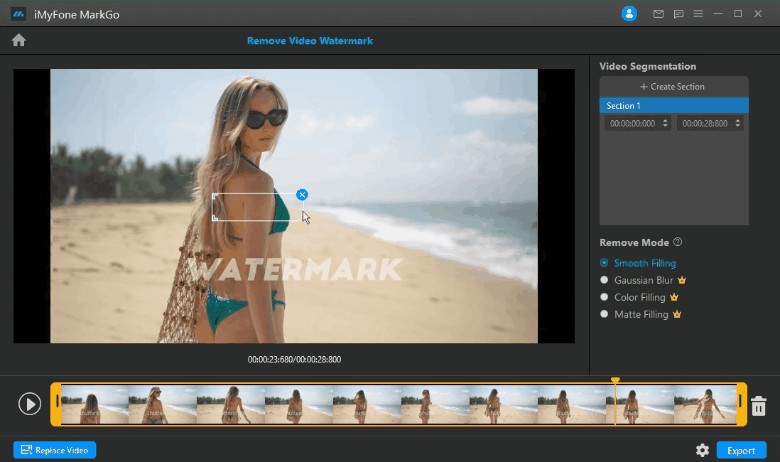
Step 1: Import File
Let's start with the basics! Open iMyFone MarkGo and import the image/photo that you want to remove text from.
Step 2: Select the Area
Once you have imported the file into the software, you can select the 'Selection tool' and select the area around the text.
Watch the video tutorial to learn more about MarkGo

Step 3: Drag the Selection Box
After you are done selecting the area with the 'Selection tool,' a Window box will open up, and you can drag it over the text.
Step 4: Remove Now
After that, click on the 'Remove Now' button that is present on the right side of the preview option. And now, press 'OK.' The unwanted text will be removed from the image.
Step 5: Save the Changes
Once you are satisfied with your results, you can save the changes by saving the file somewhere on your PC.

Why do we like it?
It is such amazing software with all the editing tools for not only an image but also for videos. You can use it for multiple tasks, and it is easy to use too! There are built-in templates, audios, filters, and effects that are just some clicks away! If you are looking for an alternate for Photoshop, then this is it for you!
People Who Liked this Content Also Liked
Best Watermark Remover Online for Photo / Video >>
Apowersoft Watermark Remover - Free Download and Detailed Guide in 2021 >>
FAQs about How to Let Text Vanish in Photoshop
Here we go with some of the frequently asked questions:
1. Does this work on faces?
Yes, Photoshop works on pictures, images, portraits, landscapes, etc. You can use the same methods from above to remove the text from faces, too, but you will have to see with of the methods suits you better so that the facial features are not distorted.
2. I have Adobe Photoshop 7.0. There's is not an option of "context-aware" in Fill. Could you please tell me where I can find that option?
This option was added in CS5 and the versions before, it does not have this option, but there is 'Content-Aware Scaling.' Other than that, you can still remove the text with the 'Patch tool.' It is not as good as the Content-Aware Fill, but it can still help a lot.
3. How do I get Adobe Photoshop for Mac?
You can simply go to the official website of Adobe and download Photoshop from there for Mac. Here is a link to help you direct to the official site of Adobe:
4. How do I remove text from an image without removing the background in Photoshop?
There are three different methods explained in detail above, and you can read them to know how to remove text from an image without removing the background in Photoshop.
5. How do I remove a watermark in Photoshop CC 2019?
There are a lot of tools and methods to use to remove watermark in Photoshop CC 2019. You can use the pen tool or quick selection tool, or stamp tool to remove the watermark.
6. How to remove transparent watermark Photoshop?
A transparent watermark is removed the same way as the above watermark is removed in Photoshop.


