Video rendering is when the computer program processes the information provided from a coded data source and collaborates it to build and display an image. Or we can say that it is the process of converting the source material, in this case, a video, into the final form.
Today we will learn how to implement Sony Vegas best render settings. You will find several versions of Sony Vegas operational out there, but the render settings are almost the same for all, depending on the existing video codec. Video rendering is a hardware-intensive process. It puts to test even the best of processors and systems, hence, you must follow the right process for how to render Sony Vegas.
Best Render Settings for Sony Vegas
Before moving to the best render settings for Sony Vegas, it's important to find out the difference between real-time and advanced rendering. The distinction between them is fairly simple.
Right now, you may be reading this article on a computer, which is rendering data in real time. In other words, whatever your computer is displaying on the screen is real-time rendering. The computer processors are computing and interpreting the coded data with a remarkable speed that you won't see any lag when it displays the images, content, etc.
In advanced Sony Vegas 11 best render settings or in any other version for that matter, the software will render a video in advance because real-time rendering is not possible. For instance, when you see an animated video by Pixar or Dreamworks, they are rendered in advance. This is because the video quality is too good to be rendered in real time. Hence, the editors render the video beforehand to ensure that it plays continuously.
For great results, you need to set Sony Vegas' best render settings before giving the command.
1. Video Render
To create a high-quality and lag-free video, set the video render settings to HD 1080-60i (1920x1080, 29.970 fps). This also means that the video will be produced in 1920x1080 resolution at 29.970 frames per second.
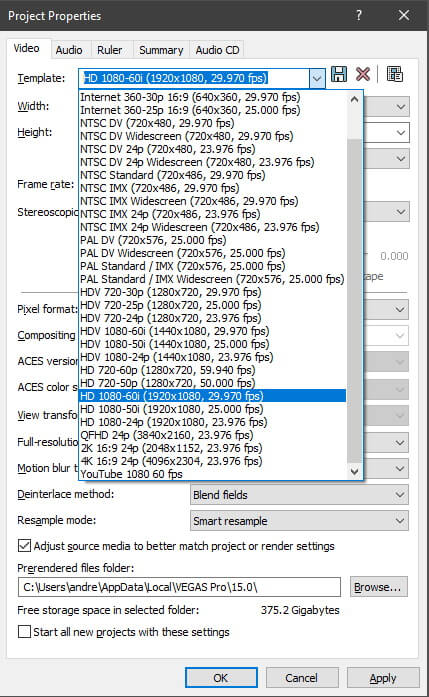
The frame rate must be set at 60 frames per second, which is not available on Sony Vegas under default options. The closest default option available is 59.940 fps, but you can set it to 60 fps manually.
In addition to these settings, choose the following;
Render Quality - Best
Motion Blur - Gaussian
The Deinterlace Method must be configured for Blend Fields.
For Resample Mode, set it to Disable Resample.
With these video settings set, you can expect a great video quality and outcome.
2. GIF Render
You can convert a video or a small length of a video into a GIF image with the Sony Vegas GIF render. The Sony Vegas best render settings for a GIF image are 240x80 with 256 colors set as the most suitable option for rendering.
Also Read:
Best Video Settings for Twitter >>
Add Text Over Video with Sony Vegas >>
How to Resize a Video in Sony Vegas >>
How to Render on Sony Vegas
Earlier, the Sony Vegas had the Mainconcept encoder, which is still available in some of the Sony Vegas versions. But the new versions of the software come with the new Magix AVC/ACC video codec.
This codec has default templates for video render depending on the video resolution. You will find different Sony Vegas best render settings for 4K, 1080p, and 720p resolution.
The new Magix AVC/ACC video codec replaces the older version and it has been optimized to work with graphic engines including the Intel Quick Sync Video and other NVidia or AMD Radeon graphics architecture.
This means that now you can render videos on Sony Vegas by only using the Graphics card instead of the earlier CPU-only infrastructure. Here's the process for best render settings for Sony Vegas 11 and up versions.
Turning on GPU Settings
Step 1:
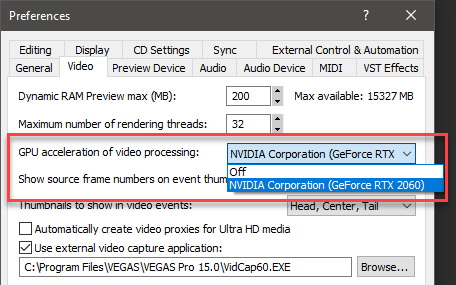
Before rendering videos on Sony Vegas, you need to ensure that the software has your preferred graphic settings enabled. To do this, go to Options in the main menu and navigate to Preferences, then moving to Video.
Step 2:
Under "GPU Acceleration of video processes," select your system's graphic card.
Rendering with Magix AVC/ACC settings
Step 1:
For rendering the video with these settings, open the settings menu on Sony Vegas software and select the output folder destination. This is the folder where the final video will be saved.
Step 2:
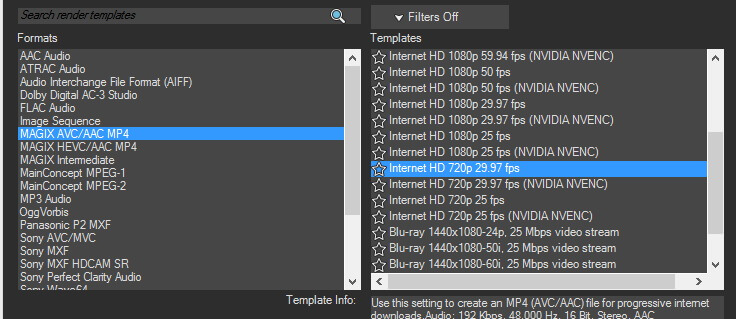
On the left side, you'll find the Format section. Click on it, and from the drop-down menu, select MAGIX AVC/AAC MP4.
Step 3:
On the left side, you'll find video output templates with pre-set video rendering settings. You can choose the preferable template. Rest assured that it can be customized according to specific requirements.
Customizing Sony Vegas Best Render Settings
Step 1:
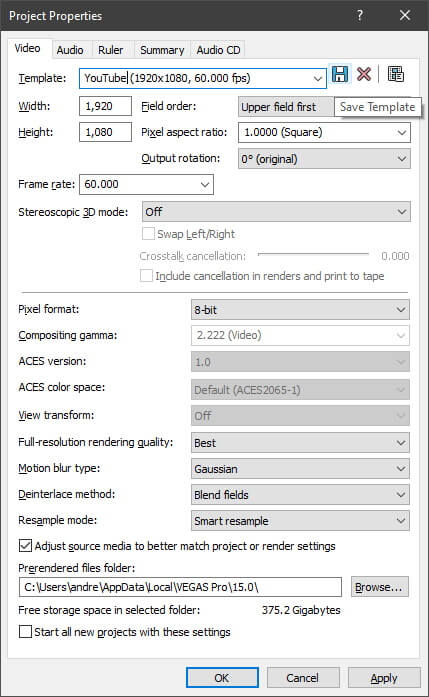
Click on the customize template while you are working on the video settings in the "Video" tab.
Step 2:
If required, start by renaming the template and click on the Save (Floppy Disk) icon next to the name bar.
Step 3:
Next, set the frame size and frame rate. For best render settings for Sony Vegas 17. From the options available under the drop-down menus of both the parameters, choose the highest value. For frame rates, you can also customize them to make the figure 60.000 fps.
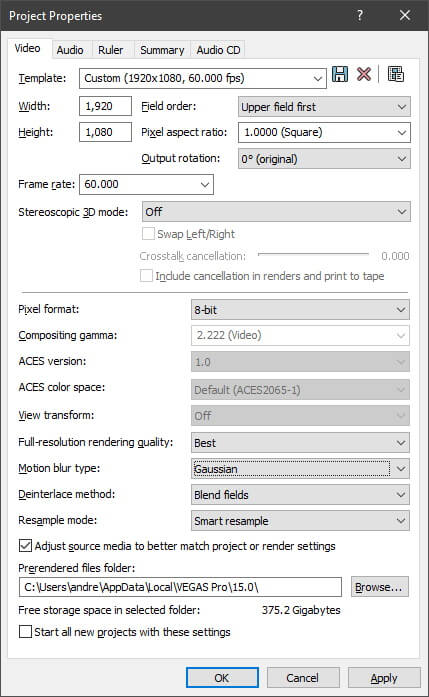
Step 4:
Move to the "Project" tab and set the "Video rendering quality" to Best.
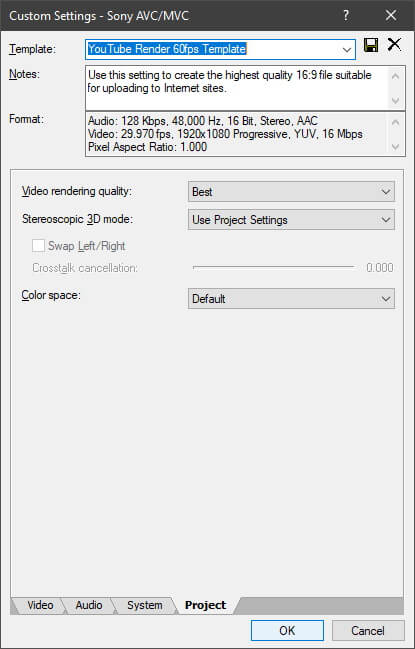
This completes the best render settings on Sony Vegas and all its versions. While there may be some differences in the interface of the Sony Vegas version you are employing, the settings and the parameters are the same.
So, make sure to understand this process and then navigate to the right options. While exporting the rendered videos to YouTube, you may see a dip in the quality. That is not an issue of the software, but YouTube minimizes the video size for storage and viewing purposes.
Best Way to Edit and Render Video-iMyFone Filme
iMyFone Filme presents another easy and simple way to create a highly quality video without depending on the Sony Vegas best render settings. On iMyFone Filme, you need to gain access to the video play settings and adjust the video resolution plus frame rate to customize its rendering properties.
Step 1:
Import the video you want to render on Filme and check its video quality.
Step 2:
To change the output when you export the video, click on the Gear icon above the timeline, and the Play Settings window will open.
Step 3:
Here you can change the video aspect ratio, Resolution, and Frame Rate.
Step 4:
For the highest video quality, set the aspect ratio according to your requirements and change the Resolution to 1920x1080. Set the frame rate to 60 fps. Click on OK.
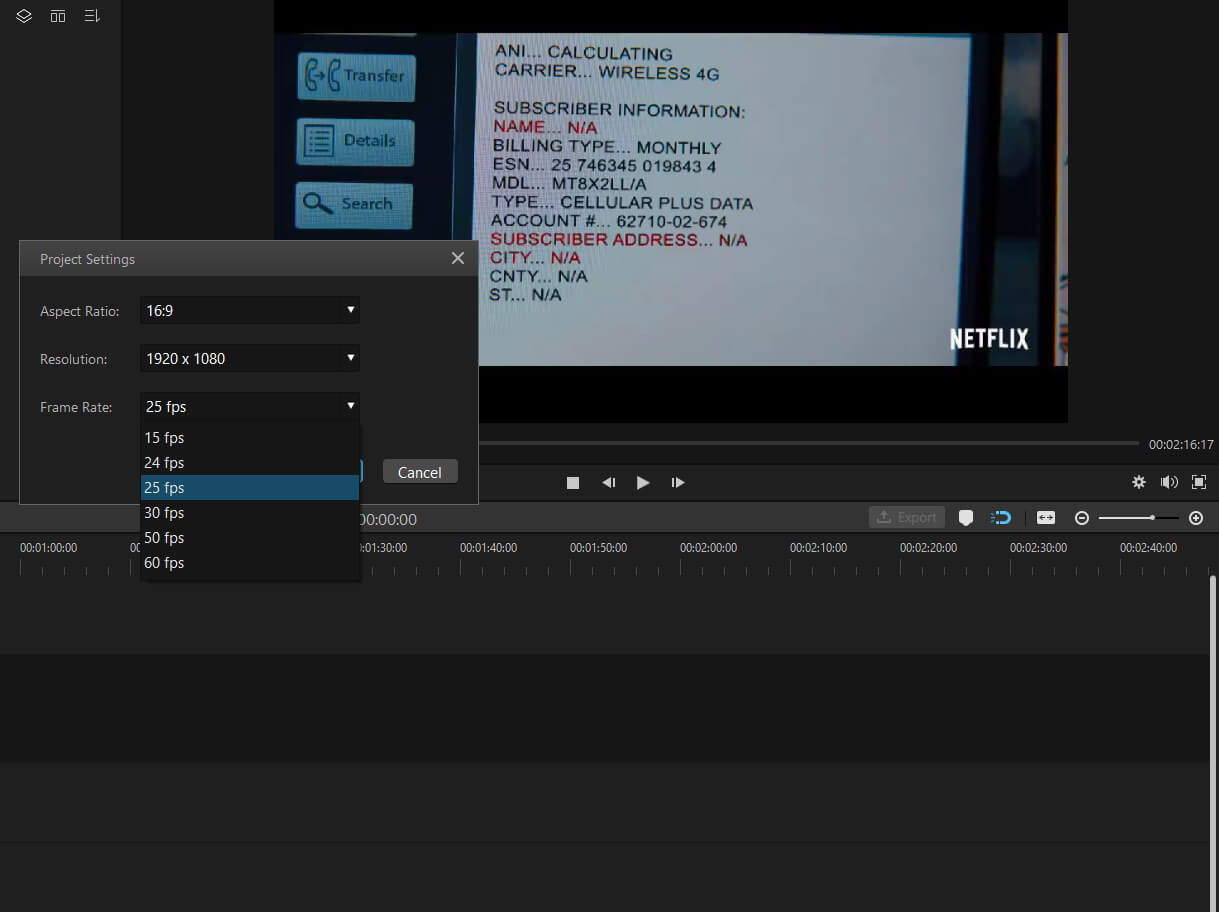
With iMyFone Filme, you can quickly change the video outcome by tweaking a few settings.
Editing Videos with iMyFone Filme
Besides letting you fine-tune the video quality, Filme also provides access to a ton of video editing features. While using Filme, you will find yourself surrounded by pro-quality editing tools that include cutting, trimming, adding graphics, voiceovers, etc.
Here's what you can do with Filme video editor;
From the Resources tab, you can add short videos depending on the occasion, like the one below, where we have added a short intro video.
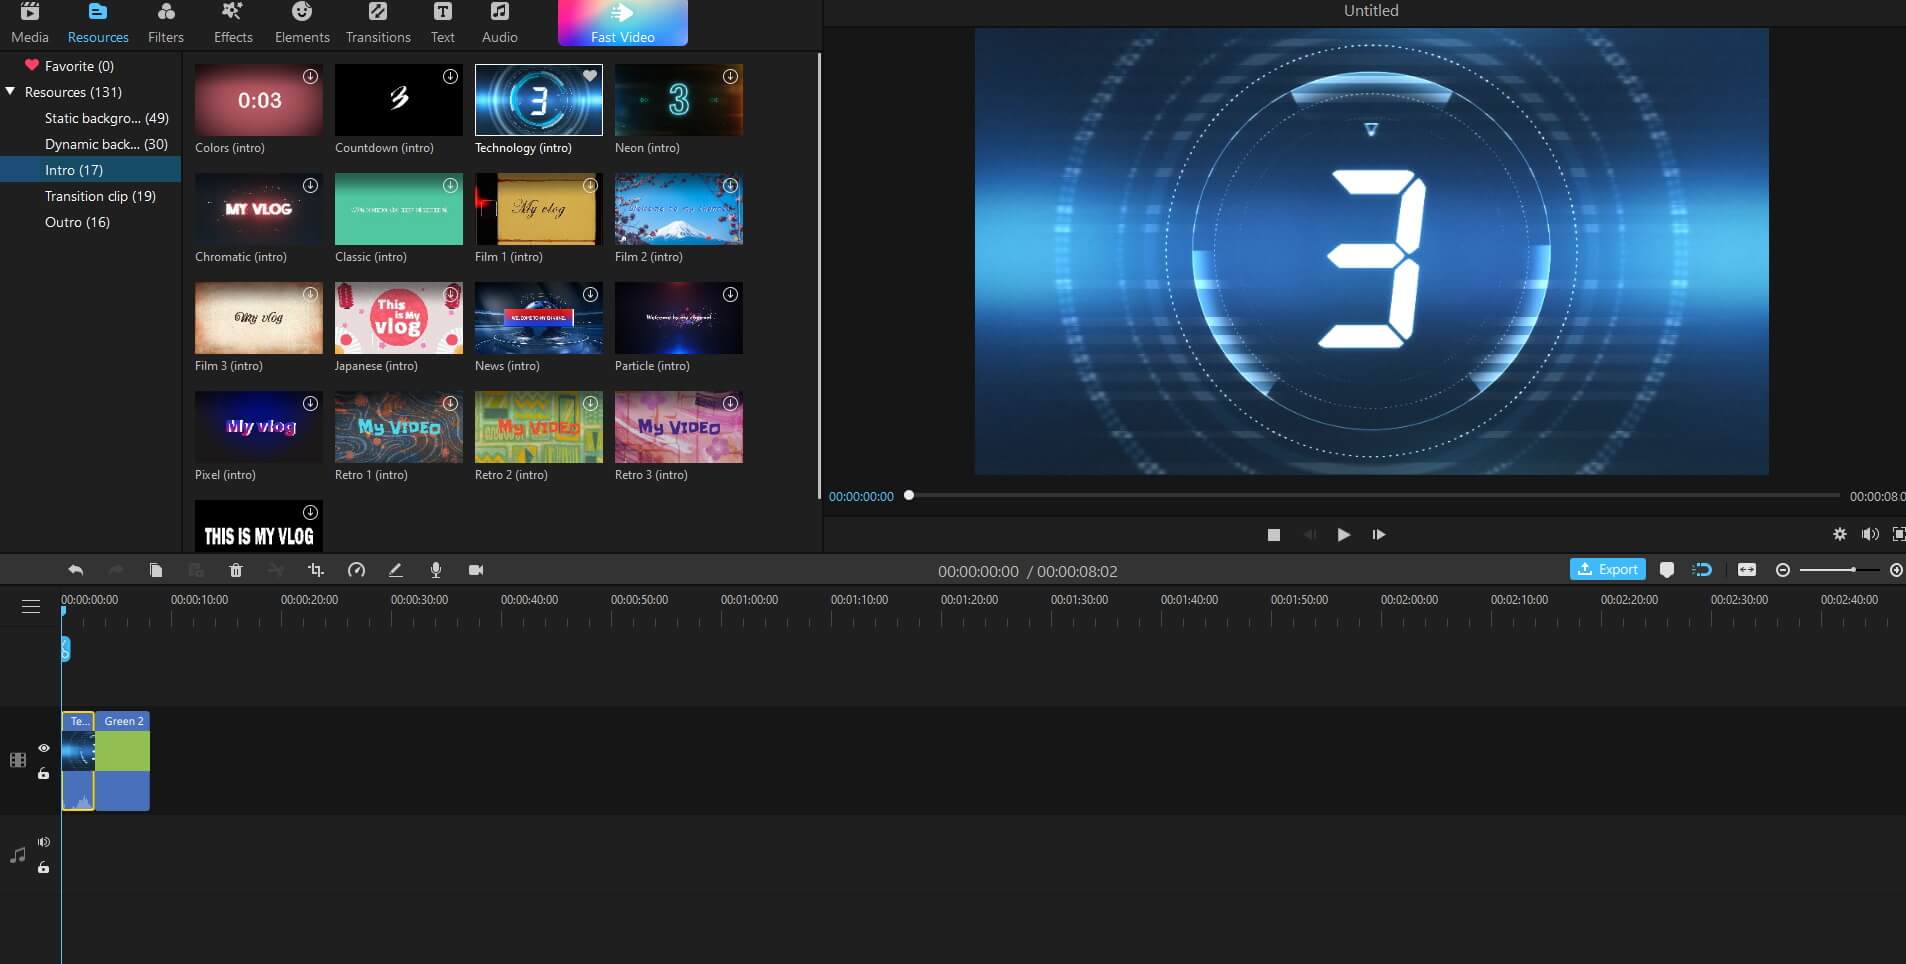
Next, you have a wide variety of filters to add onto the videos and make it look exactly as you want. Similarly, you can also add effects to the videos.
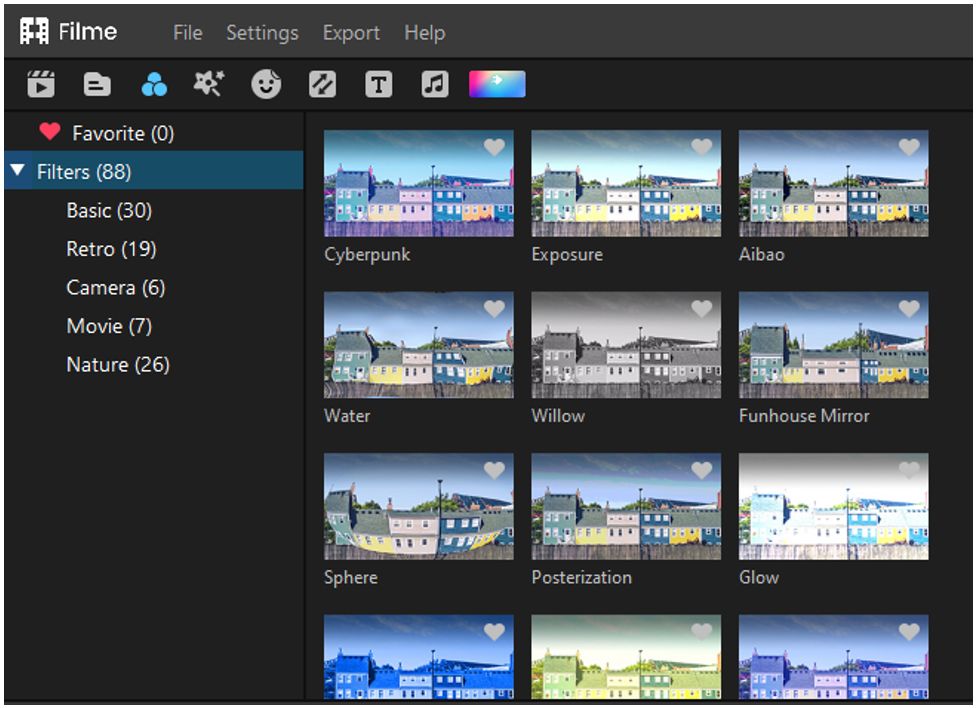
You are free to add additional elements and transitions to the media content according to the requirements.
While these are the basic functions, some pro-level features of Filme include self voice recording, screen recorder, changing voice, changing the video quality via rendering (explained above).
All of these and many more features make Filme one of the best choices for creating bespoke videos from an easy and intuitive interface.
FAQs
1. How much time does it take to render a video?
The ETA for rendering a video depends on the video length and quality. The longer length and higher quality will extend the rendering time and vice versa. Moreover, it can also depend on the encoder you are using. When it comes to Sony Vegas best render settings, the latest MAGIX AVC/AAC codec will take less time than its previous versions.
2. Is it possible to customize audio settings along with video?
Yes, similar to changing the video settings before rendering, you can access the audio settings from the "Audio" tab next to the "Video" tab in the dialog box. With audio, you can change the format by choosing the template and also choose sample rates plus bit rate according to requirements.
Final Words
The above guide explained the process for how to render on Sony Vegas, and the same process is applicable to all the versions of the software with some changes in the interface. The purpose of rendering a video is to ensure that it runs continuously when someone plays.
The Sony Vegas best render settings means setting the most effective video playback settings. Besides Sony Vegas, you can also use Filme to change the video playback settings, ensuring the same outcome with much less steps and work.
You will find the method to render a video with both the software. Make sure to understand the entire process before making a decision.


