You must have seen multiple videos in a single frame or a small size video at the corner of the other video. These are common nowadays, especially when it comes to video streaming, teaching, and tutorials. You can only achieve picture in picture effect or multiple videos in a frame by resizing and scaling the video. Resizing and scaling means changing the dimensions of the video as required.
Today, we will explore various software and tools that can help you resize and scale your videos. If you know the right tool, you will be able to resize your videos without any hassle. We will show you the step-by-step guide on how to resize video using different software programs. Let's start.
Part 1: Resize and Scale Video on Windows
01 iMyFone Filme
iMyFone Filme is a video editing software program for Windows. You can easily edit your videos like a professional. Even if you are a beginner, you can use it because it is simple and easy to use.
How to Resize and Scale Video Using Filme
Resizing and scale a video in Filme is quite easy. It requires only a few steps and a couple of minutes to resize and scale a video.
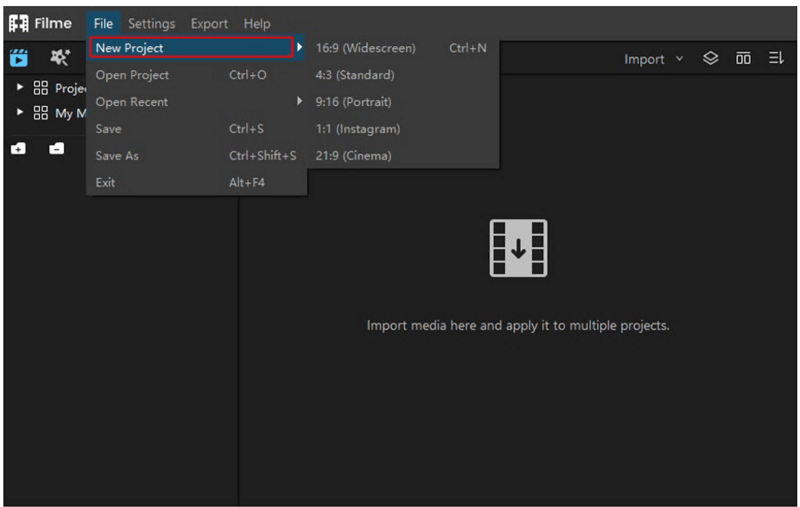
Step 1: Launch Filme on your computer. Go to the File menu, then New Project, and click on any of the aspect ratios you want.
Step 2: Now, you need to import the file. To import a video clip, go to the Import option. Click on Import Files. Browse the file and add it to the project. Once you add it to the project, you will see the video clip in My Media.
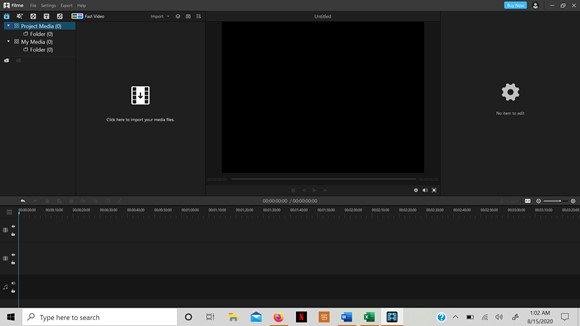
Step 3: Drag the video from My Media to the timeline. Double click on the video to see the editing options. You will see the editing options on the right side of the window.
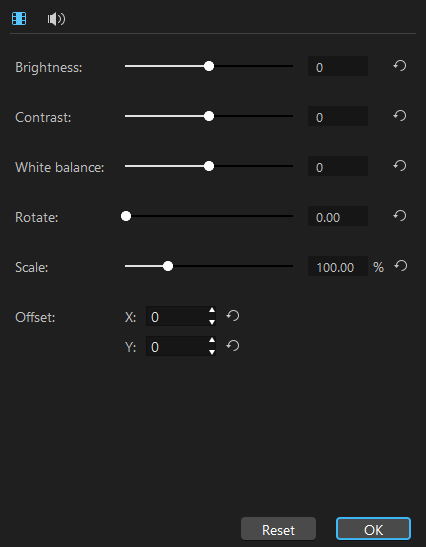
Step 4: For video scaling and resizing, you need to adjust the percentage of Scale. You can adjust it according to your requirement. The aspect ratio of the video will remain the same. If you want to make the video smaller, reduce the percentage to anything below 100%. You can also enter the desired percentage.
Step 4 (Alternate): Once you select the video from the timeline, you will notice the borders on the preview video. Drag the corners as much as you want to adjust the size of the video.
Step 5: After resizing, you need to position the video. Position it where you like it to be by dragging the video. You can also enter values in the X and Y coordinates of the Offset property.
Step 6: When you are done, go to the Export menu and click on Export Video. Enter the name, destination, and click on Export.
Watch this video to see how to use Filme to scale video:
02 Photoshop
Photoshop is a very powerful tool used for photo editing. It is one of the best photo editors that you can use to make professional images. Although it is a photo editor, you can do some basic video editing as well.
How to Resize Video in Photoshop
Before we see the steps, it is important to know that Photoshop considers the video layers similar to image layers. So, a video can be resized like an image.
Step 1: Launch Photoshop. Go to the File menu and click on New Project. Enter the name and set other settings (if needed). Click on OK.
Step 2: Go to the Layers menu, hover over to the Video Layers, and click on New Video Layer from File. Select the video you want to resize. Once you open the video, it is directly added to the timeline.
Step 3: The video layer in Photoshop is similar to an image layer. Select the layers and go to the Edit menu. Click on Free Transform. You can also use the shortcut Ctrl+T or Cmd+T.
Step 4: You will see a resizing box on the video. You can drag the corners of the video to resize it. It will disturb the aspect ratio of the video. If you want to keep the aspect ratio the same, press and hold shift and then drag the corners.
Step 5: Position the video wherever you want. Click on the video and drag it to the desired place.
Step 6: Go to the File menu, then Export, and click on Render Video. Enter the name and destination and select the format. Click on Render.
Also Read:
Make A Slideshow In Photoshop >>
Speed Up a Video in Photoshop >>
Part 2: Resize and Scale Video on Mac
03 OpenShot
OpenShot is a free video editor that can be used on macOS as well as Windows. The software is user-friendly, and it offers excellent editing features.
How to Resize Video Using OpenShot
Step 1: Open OpenShot. Go to the File menu and click on Import Files. You can also press Cmd+F to import the file. Open the video clip you want to resize.
Step 2: You will see the imported file in the Project files. Drag the video to Track 1 of the timeline.
Step 3: In the properties section, you will see Scale X and Scale Y. Scale X is used to resize the x-axis, and Scale Y is for resizing the y-axis. The value will be in 1.00 by default, which means the original size. You can reduce it to make the video shorter. Click on the number and hold it. Drag the mouse left or right to change the value. You can also enter the desired number in the field.

Step 4: Click the Red Dot in the toolbar. It is to render the video. Enter the name and folder path and click on Export Video.

04 QuickTime Player
QuickTime is a default video player for macOS. It is not a video editor, so you cannot use it to export the resized video. You can only change the aspect ratio while watching a video. The desired video size can be achieved without any hassle.
How to Resize and Scale in QuickTime Player
Step 1: Open QuickTime Player.
Step 2: Go to the View menu; you will see four options: Actual Size, Fit to Screen, Increase Size, and Decrease Size. These can be used to change the size of the screen while playing the video.
Step 3: Actual size will show you the video in its real size. Fit to screen adjusts the video dimensions to cover the full screen, and it might change the aspect ratio. Increase Size and Decrease Size are used to increase and decrease the size with a particular ratio. Select any of the appropriate ones.
Step 3 (Alternate): You can also use the following shortcuts.
Actual Size: Cmd+1
Fit to Screen: Cmd+3
Increase Size: Cmd+ '+'
Decrease Size: Cmd+ '-'
You can only change the size while playing the video. The file cannot be exported. Once you close the software window, every change is disregarded.
Part 3: Resize and Scale Video Online
05 ezgif.com
Ezgif Video Resizer is a free web-based tool to resize your videos. You only need to open the link, and you are ready to go. It is perfect for beginners and people who don't want to download any file.
How to Resize Video Using Ezgif Video Resizer
Step 1: Open the website.
Step 2: Choose the video file you want to resize and click on Upload.
Step 3: After uploading, you can set the Net Width and Net Height of the video. Enter the width and height. You can also enter the size in percentage if you don't want to specify the width and height.
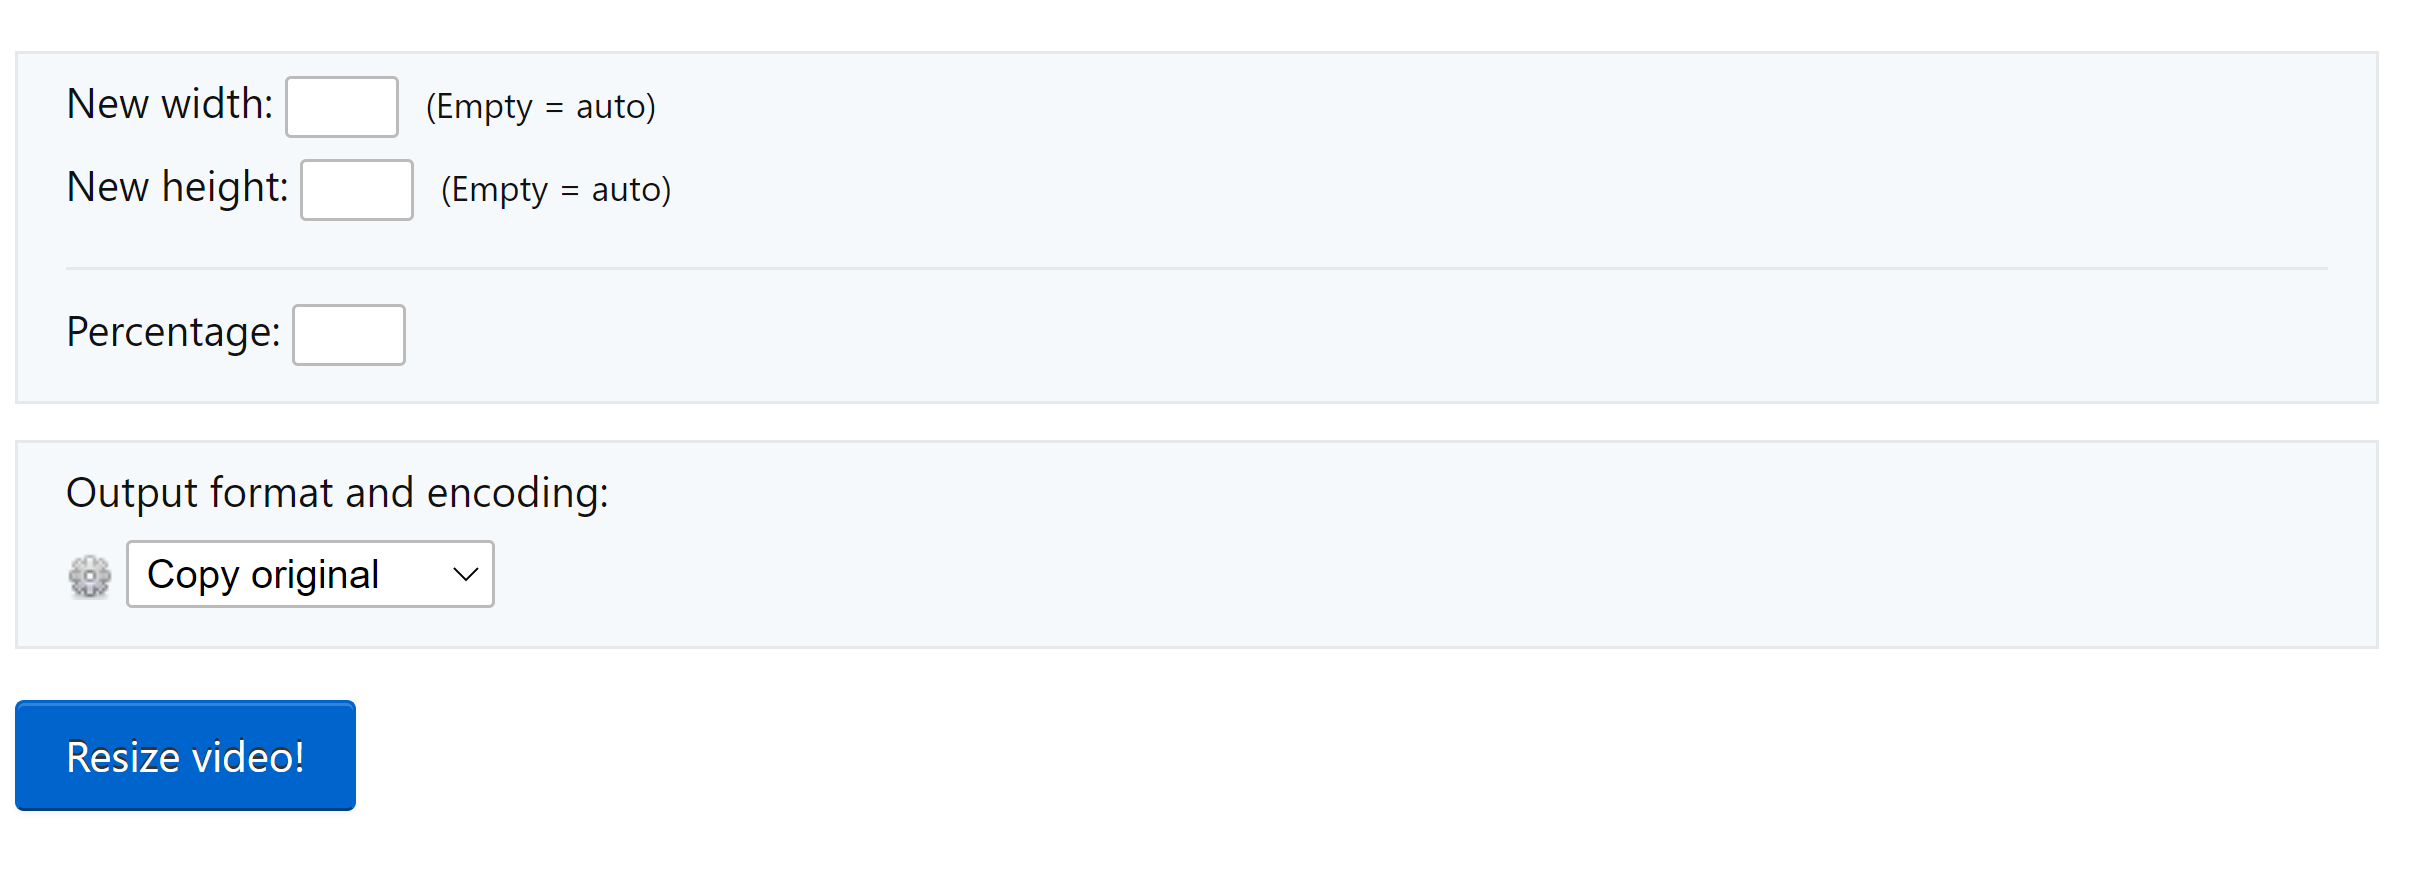
Step 4: After entering the size, click on Resize Video.
Step 5: See the preview; if you are satisfied, download the file. To download the file, click on the Save button.

Ezgif Video Resizer makes resizing easy and quick. You can do it on any device; you only need a web browser. The problem with this tool is the 100MB file limit. You cannot upload any file over 100MBs. Thus, it can be used to resize small videos. It is not suitable for professional editing.
06 Resize -Video
Resize Video is also an online tool for resizing videos. It is a good tool if you rarely need to resize a video. Social media users can easily resize the video according to the requirements.
How to Resize Video Using Resize Video
Step 1: Open the tool.
Step 2: Click on Browse and select the video you want to edit.
Step 3: There are three options for resizing a video. One keeps the aspect ratio the same, and you only need to provide the width. The second one is resizing the video by specifying the width and height; it changes the aspect ratio. The third one is similar to the second one, but it includes black borders in the video.
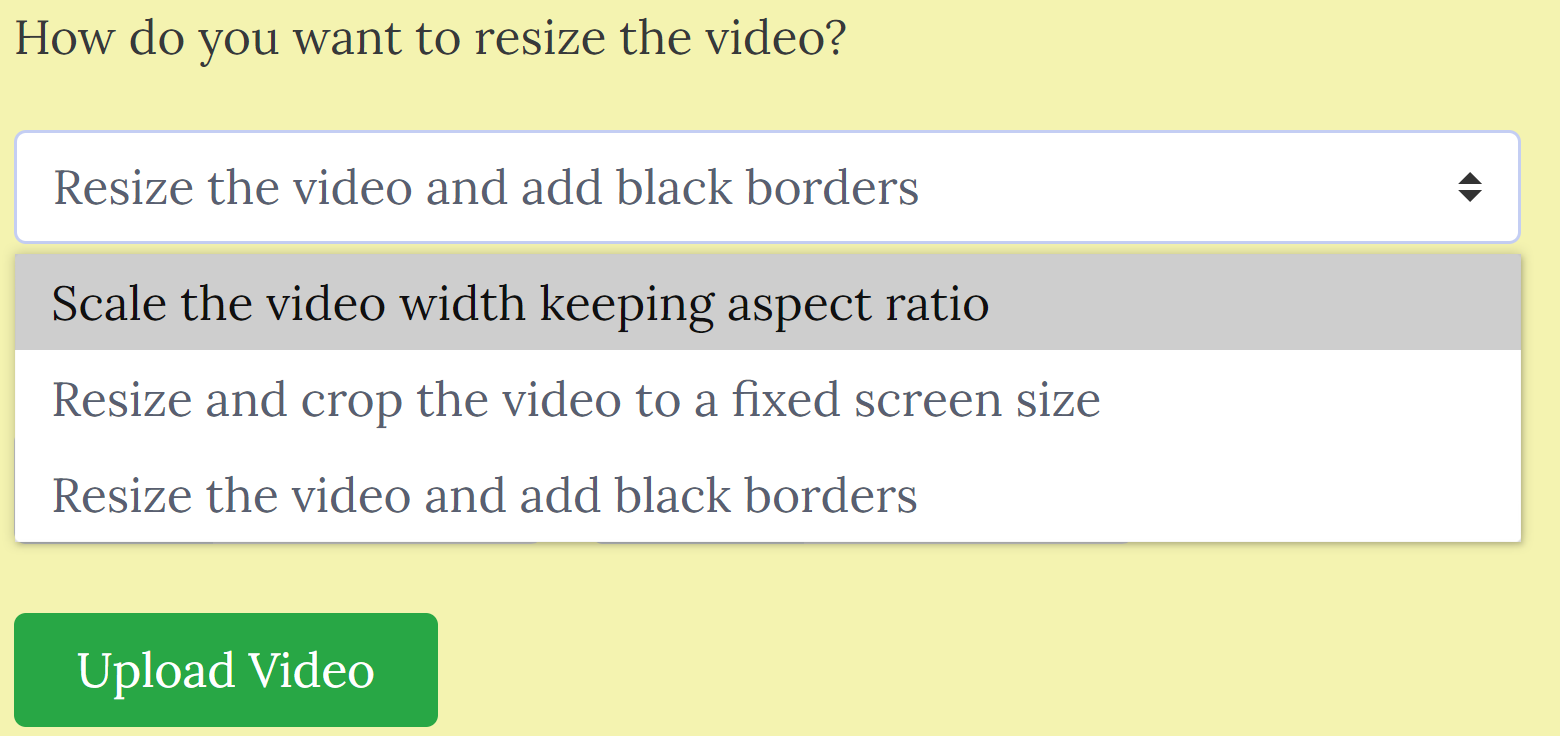
Step 4: Select any of the appropriate options and enter width, height, or both. Click on Upload Video.
Step 5: The tool will resize the video. You can download the final file or share it on social media.
Resize Video allows you to directly share the video clip on social media. Moreover, the maximum size of the file is 500MB, which is a lot more than other online tools. Therefore, it is a perfect application.
Part 4: FAQs about Resizing and Scaling Video>
1 Can I resize the video online without a watermark?
Yes, you can resize videos without watermark using online tools. But they have a limited file size. Most of them have a 100-200MB maximum file limit but Resize Video can resize video files up to 500MB, so we recommend this web-based tool.
2 How to resize by changing the width and height of the video in Premiere Pro?
For changing the width and height of the video, you need to select the video first. Go to Effect Controls; you will see the Scale option. Enter the percentage to resize the video.
3 What is the difference between resizing and compress?
Video compression refers to decreasing the file size. A video file takes more space in the RAW format because it has complete information. When compression is done, some of the frames are deleted without affecting the information in the video.
The file size becomes short in compression, but the video dimensions remain the same. In contrast, resizing is changing the dimensions of the video. When you change the dimensions, the file size is either increased or decreased, depending on the final size of the video.
Part 5: Tips for Resizing and Scaling Video
If you want to resize a video like a professional, you need to know a few tips. Let's see how you can make your video better.
-
Check the resolution and aspect ratio of the video. It will give you a better idea of how you need to resize.
-
When you resize a video, it is important to keep the aspect ratio the same as it was before. If you disturb the aspect ratio, the quality of the video will be compromised. If you keep the same aspect ratio, the width and height will change in the same ratio.
-
If you want to resize the video quickly, drag the corners of the video. Entering the values will take more time.
-
If the tool needs both height and width, make sure to enter according to the aspect ratio. For example, if the size is 3840 x 2160 and you are changing the width of the video to 1920, the height should also change in the same ratio, so the corresponding height will be 1080.
-
Use online tools if the video is small. For professional use and large videos, paid software like Filme is better.
Tips for better resizing and scaling videos:
Conclusion
Resizing is often needed, and you can do it on your own if you know the right tool and how to resize video. We have shared different tools for Windows, macOS, and online video resizing. All of them are suitable, but we recommend iMyFone Filme for Windows and OpenShot for Mac.
These are ideal for professional use and large videos. But if you rarely resize a video, you should try Resize Video; it has a good maximum file limit. We have explained the step-by-step process of resizing and scaling the video. Now, you can easily resize a video like a professional.


