A slideshow is a creative way of making a presentation interesting and understandable. Compared to photos, a slideshow video is more attractive.
Photoshop, a powerful editing software, is always a preferred choice for many users to create a video slideshow. The below guide is all about how to make a slideshow in Photoshop. However, if you don’t feel like using Photoshop, we have an even, much easier tool to help you create a stunning slideshow.
Part 1: How to Make A Slideshow in Photoshop?
To create a slideshow with Photoshop, make sure all your pictures are compiled in a single folder. This will save you the hassle of finding images while preparing the slideshow.
Photoshop Elements slideshow themes allow you to edit your images before you start organizing a slideshow.
After giving your images a retouch, go through the following procedure to prepare a slideshow.
Step 1: Load Images Into A Stack
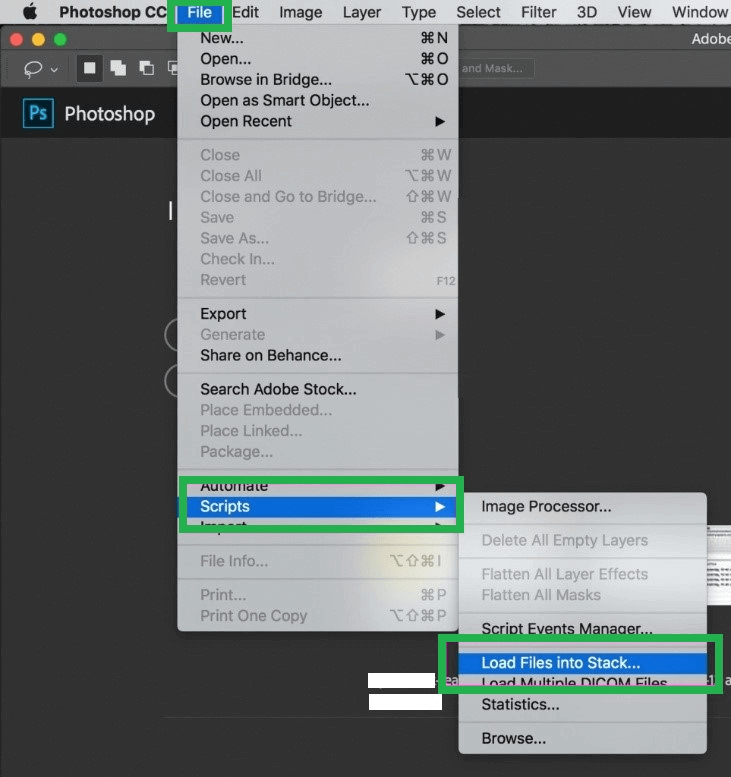
• Stack all your images into a layer by going to the File option
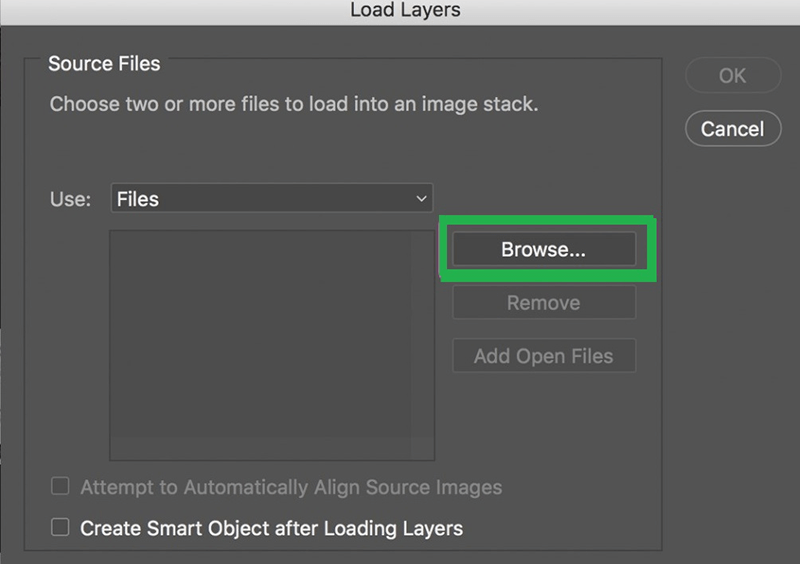
• Go to Scripts > Load Files Into Stack. “Load Layers” windows will pop up on your screen.
• Select Browse to find your images. Press Command to select all your images. Finally, press OK to exit the load layer window.
Step 2: Create a Video Timeline
• You must load the images into a new file as layers. To look at your layer panel, go to Windows > Layers.
• Now to create a timeline video, open the Timeline panel. Open Window > Timeline. You will see an option of "Create video timeline." Press the button to get started.

Step 3: Create A Video Group
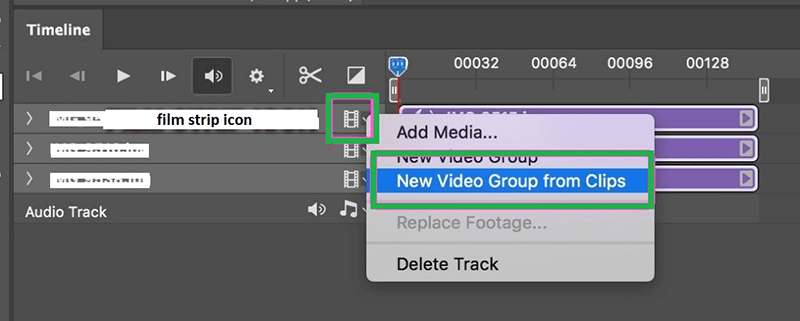
• Creating a video group will allow all your images to appear in a sequence. To do so, select all of the image layers in the timeline panel.
• You will see a Film Strip icon on the right side of the image. Then, go to New Video Groups from Clips.
Step 4: Add Music To Your Slideshow
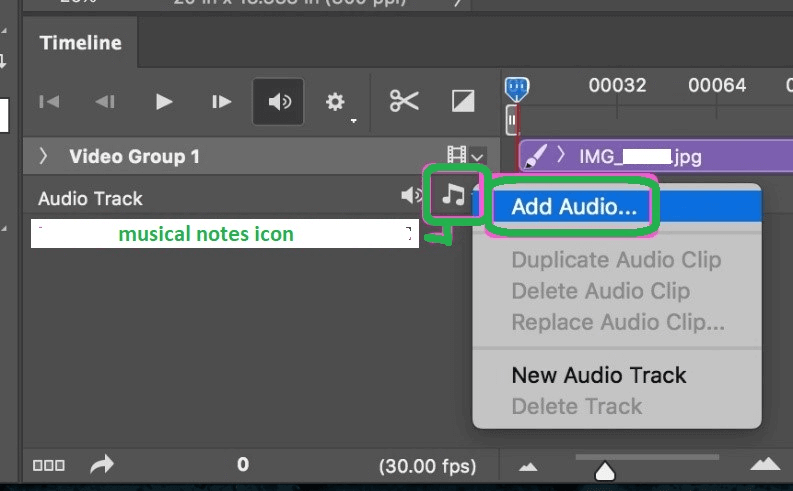
• A bit of music can make your slideshow eye-catching. So, how to add music to Photoshop slideshow ? It’s simple, go to the Musical Note icon to insert music in your presentation. Then, select Add Audio to browse through your music files.
• Selecting the New Audio Track option will allow you to add more than one audio track in the slideshow.
Step 5: Render Your Video
• Finally, when your slideshow is ready, you will need to export and render the video. Go to File > Export > Render.
• Rendering the video gives you the option to change the size and format of your slideshow video. The best format is H.264 and the best size to choose is HDTV 1080P.
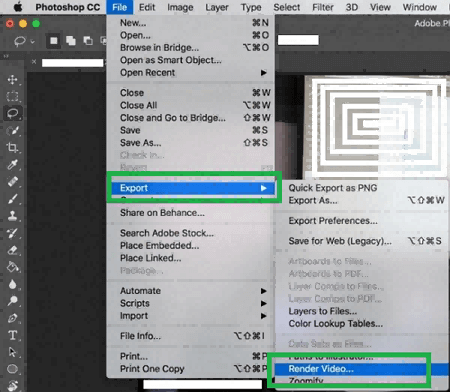
Step 6: Export The Video
• Now click on the “Render” option to start exporting your Adobe Photoshop slideshow with music and save it to be used later.

Pros And Cons Of Using Photoshop
Although Photoshop is a professional software, it does have its positive and negative sides.
Pros:


Cons:


Part 2: A Much Easier Way to Make A Slideshow- iMyFone Filme
Is the Adobe Photoshop Elements slideshow tutorial confusing for you? Well, we have a much easier tool for you that can make your slideshow preparation a breeze.
You can experience faster slideshow preparation with iMyFone Filme with advanced, high-tech features, allowing you to create a slideshow with few simple clicks. Along with being a powerful video editing tool, it will enable you to create a slideshow without any hassle. It is particularly famous for the One-Click Magnificent slideshow with music.
Main Features of Filme
-
Filme fast video mode is an incredible tool that lets you create a slideshow video with just one click.
-
It has multiple templates that can be used while creating a slideshow video.
-
You can merge videos, photos, and music to enhance the quality of your slideshow.
-
It allows you to add text, includes dynamic effects, filters, and transitions to make your video even more interesting.
Guide To Creating A Slideshow Using iMyFone Filme
To start your video-creating process with iMyFone Filme, use the following two methods.
Method 1: Use Fast Video Mode?
Use the fast video mode in Filme to produce a slideshow that looks professional in every way. Go through the following steps to create a video.
Step 1. Go to the “Fast Video” option that will open the Fast Video Mode. Select the template of your choice.
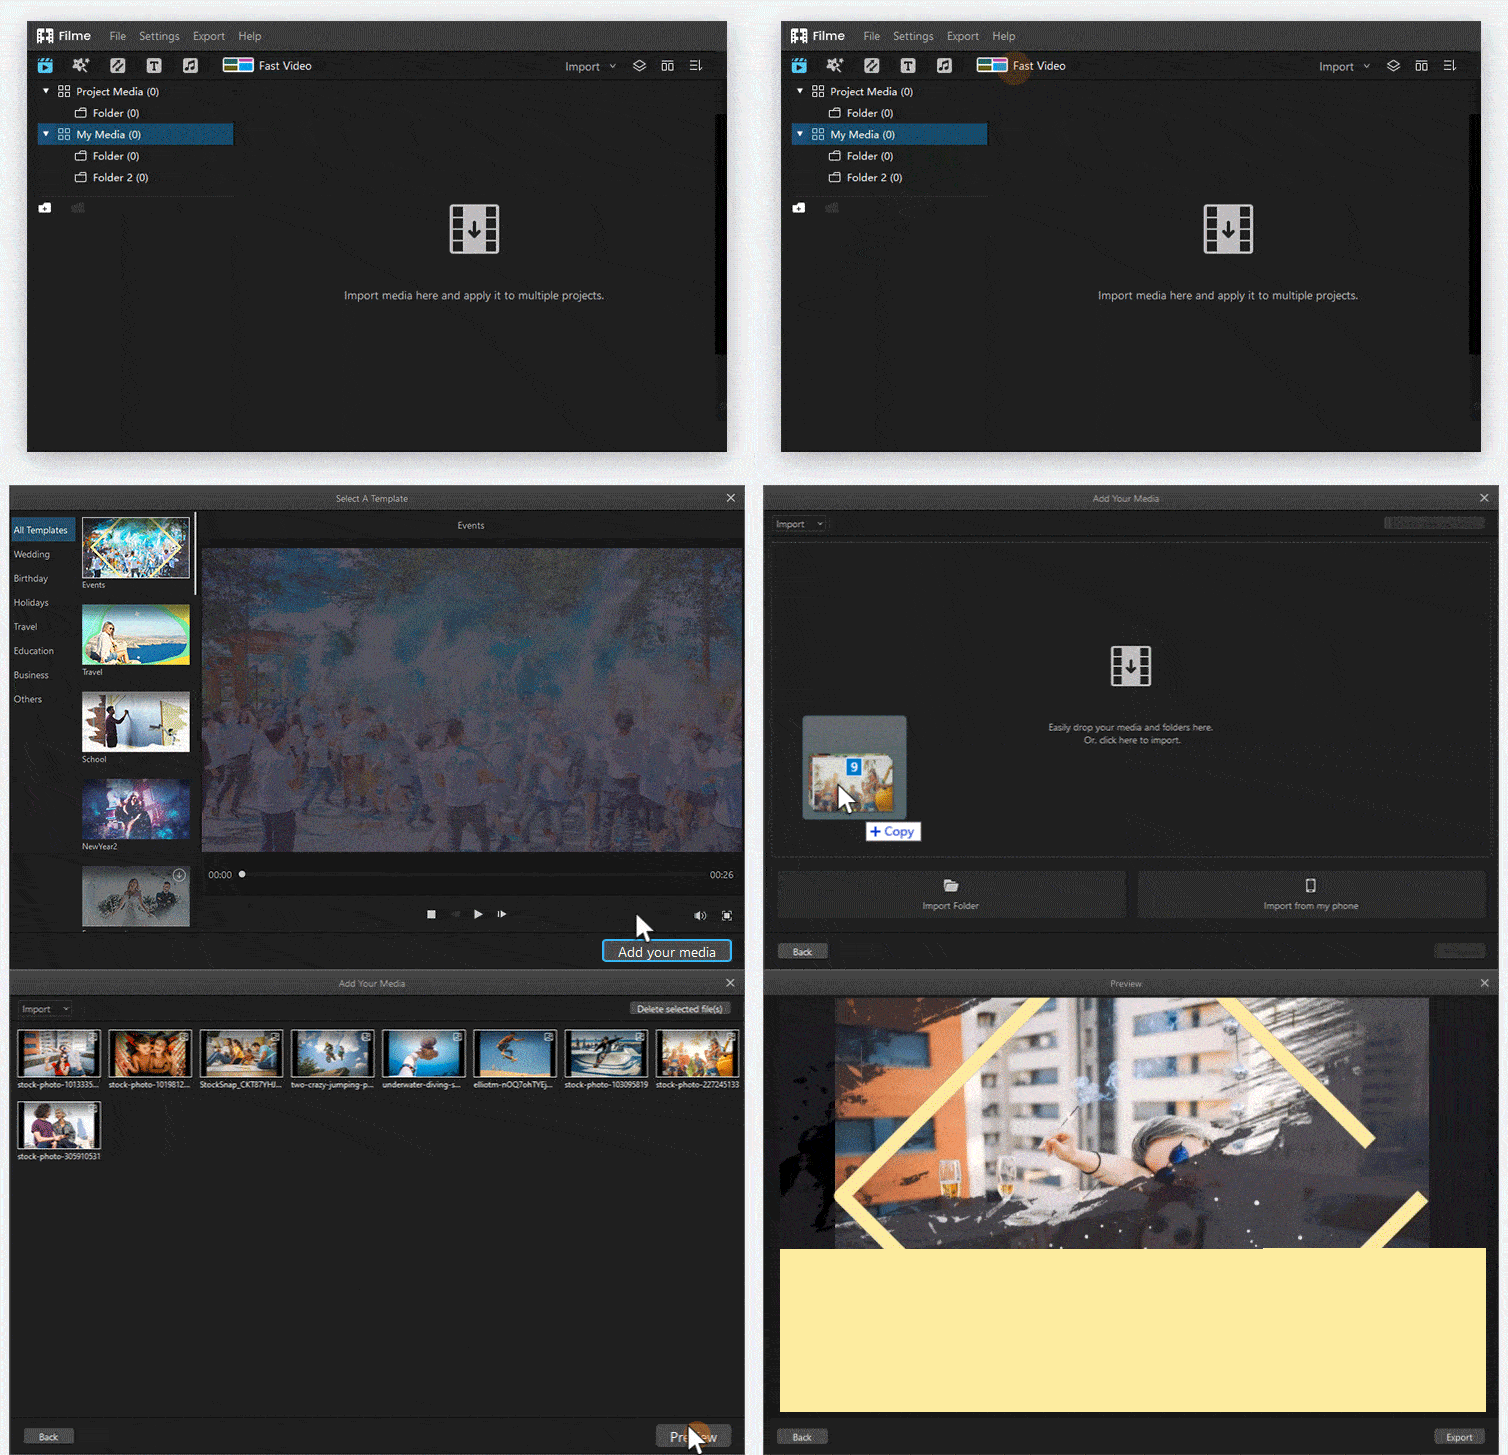
Step 2. Now, the following box will appear on the screen. Select the “Add your media” option.
Step 3. Now press the option “Click Here to Import your media files” to start importing media files from your system.
Step 4. Once your files are loaded to the software, select “Preview” and have a look at your slideshow. Finally, press “Export” to save your slideshow video on your PC or laptop.
Method 2: Make A Slideshow With Your Own Music
If you need a slideshow video with custom music, iMyFone Filme can help you out. The simple process for creating a slideshow having your favorite music is as follow:
Step 1. Select all the images and videos you need for your slideshow and press “Open” to load them in the software.
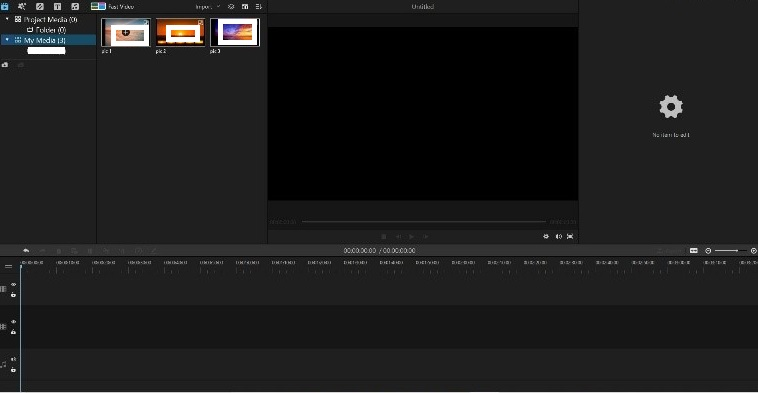
Step 2. The files will be uploaded into the library. Using the "+" sign, arrange the order of your images.
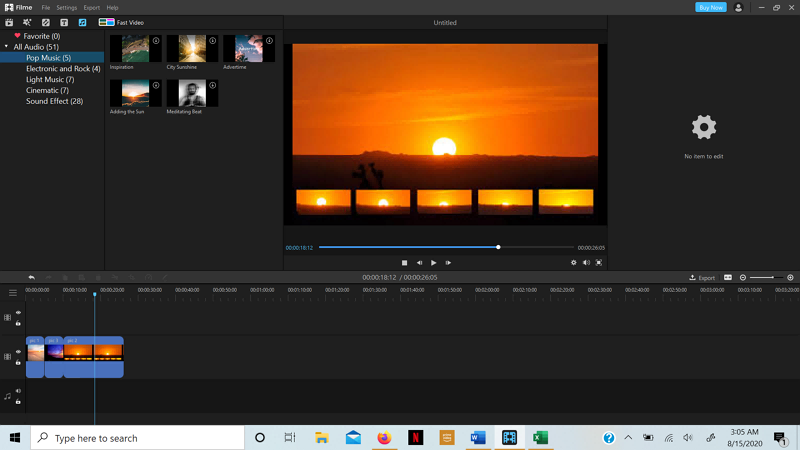
Step 3. All the images will appear on the grid, and you can also set the duration of the images in the slideshow by simply dragging and dropping.
Step 4. Now, to add music, go to the music sign in the toolbar above. Add music just like you added the pictures. Your music slideshow is ready.
Pros:


Cons:

Part 3: Hot FAQs About Making A Slideshow
Q1: How many seconds should each picture be in a slideshow?
To allow the viewers to grasp the content of your images giving each picture a 3-4 second duration is more than enough, which means you can have 8 minutes to deliver your slideshow presentation.
Q2: What should be in a Slideshow?
To make your slideshow excellent, use valuable information and include charts, graphs, use bullet points for quick reading, add text and try to incorporate short videos to make it appealing.
Q3: Does Windows 10 have a slideshow maker?
Yes, Windows 10 have a slideshow maker as a built-in feature. The app is simple and easy to use. By simply dragging and dropping the images and video, you can create a compelling slideshow.
Final Words
Making a stunning slideshow is something every user demands. If you want to create quick and effective slideshows, you can opt for Adobe Photoshop or a much simpler software iMyFone Filme. Using iMyFone Filme software lends you all the tools and basic and advanced editing features, making it easily manageable for you to create a slideshow video without difficulty.


