Meta: This article is a comprehensive guide for how to use Kinemaster for iPhone and KineMaster for Android on your smartphones and tablets. Detailed steps with screenshots included.
Many Android and iOS users often wonder how to use KineMaster to maximum effect on their premium devices. While KineMaster is a well-known app on the Apple App Store and Google Play Store, the official website has very little information on how to use KineMaster on iPhone or Android devices. That's why we wrote this article!
Part 1. How to Use Kinemaster on iPhone/Android
The first step is understanding the interface of KineMaster. Fortunately, the app is very similar on both platforms so the steps are almost identical but for a few very minor differences. Let's look at the basic layout and how to do various operations such as trim, split, add text, crop video, add audio, add effects/filters, and other basic tasks.
The welcome page is very much like a social media video platform such as TikTok. You'll see a big circular button in the middle to fetch media files from your device and create a new project. On the left is a TikTok share button and on the right is a video player button. Below that, you'll see various icons for settings, effects, notifications, FAQs, and so on. Now that the home page layout is clear, let's move on to doing specific actions.
Also Read: Use KineMaster on iPhone and Android Devices
How to Use KineMaster Step by Step
Preparing a Video for Editing in KineMaster
The initial step for editing a video is very simple, as shown below:
Step 1: Click the + symbol on the welcome page to start a new project.
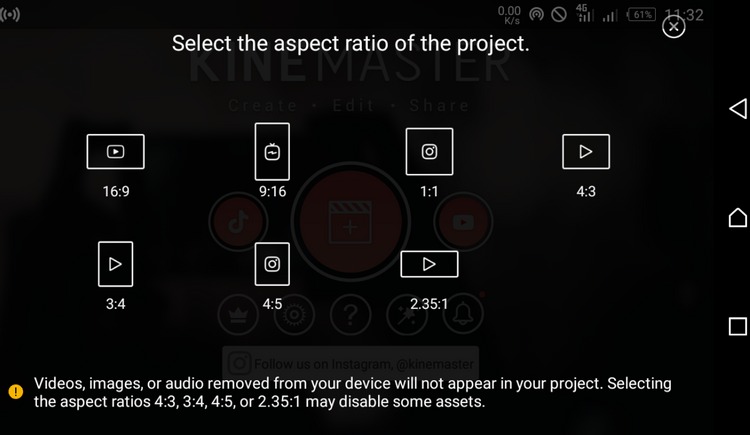
Step 2: Choose an aspect ratio for your video; however, note that selecting non-standard ratios such as 4:5, 3:4, etc. may remove some filters and effects by default. A better option would be the standard vertical (9:16), horizontal (16:9), or square (1:1), all of which are widely supported on most video platforms.
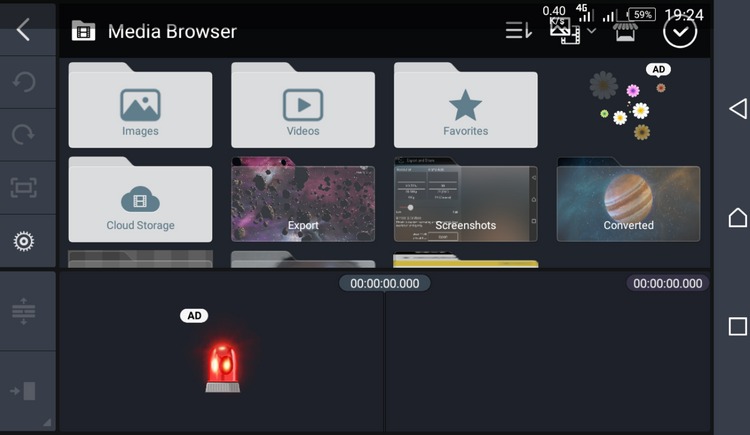
Step 3: Tap the Media option to import your media files. Since KineMaster doesn't have a dedicated Media Library, it simply links to your local device memory and connected cloud storage services. Choose the appropriate location and tap on the video file to import it.
Your video is now ready for editing.
How to Trim or Split a Video in KineMaster
Step 1: Tap on the timeline to select the primary track, which is your video track. You will see a yellow border appear around it.
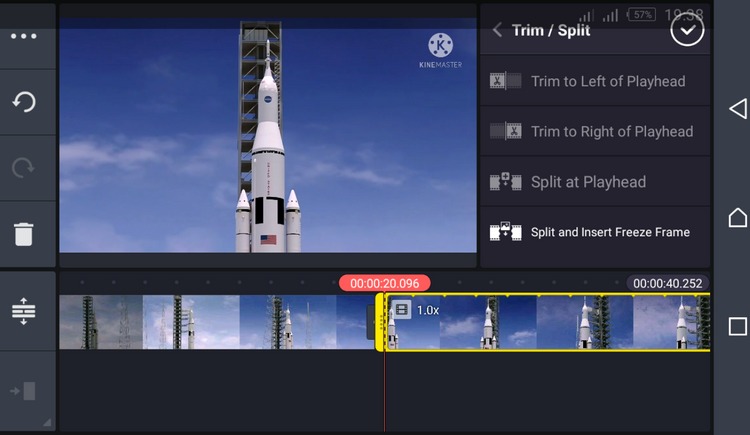
Step 2: Above the timeline, to the right of the preview area, you'll see various options such as Trim to Right or Trim to Left of Playhead, Split at Playhead, and Split and Insert Freeze Frame. Choose the option you want.
Step 3: Once you tap an option, you'll see the Media Panel in place of the trim options. Here, you can hit Play to preview the edit you just made. You can also undo it using the left circular arrow on the left sidebar panel.
How to Add a Transition in KineMaster
Assuming you have multiple (or at least two) clips in your video timeline, here's how to add a transition.
Step 1: Look for the + symbol in the intersection of two clips and tap that. You will now see the available transitions on the top right.
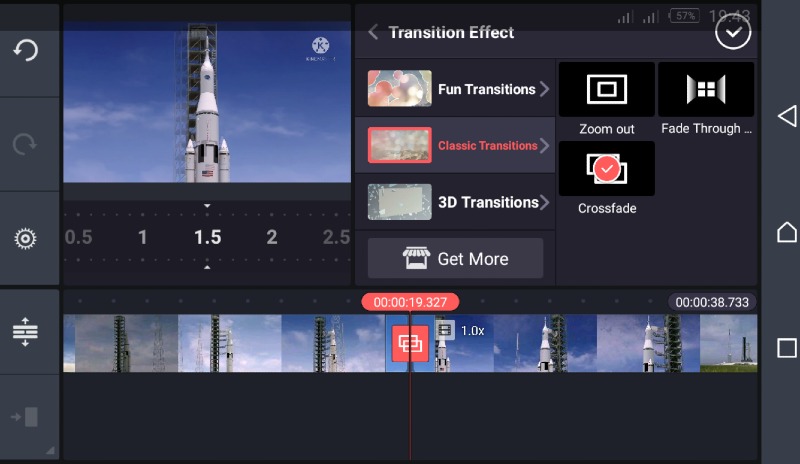
Step 2: Scroll to the transition you want and tap it. You will see another panel appear with more granular settings pertaining to that particular transition option you selected.
Step 3: If you need to preview the transition, move the playhead to just before it and hit the Play button.
Similarly, you can add different transitions to different clip intersections.
How to Add Text to Video in KineMaster
To add text, effects, audio, etc., you'll need to move the playhead to the spot where you want to insert the element in question.
Step 1: In the Media Panel, tap on the Layer segment on the left.
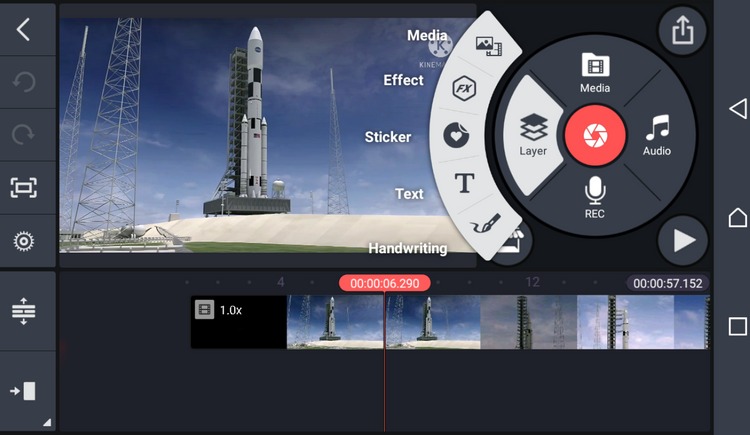
Step 2: Select the T icon, which represents Text.
Step 3: Type out your text in the space provided and tap OK when you're done.
Step 4: You can now reposition or resize the text by long-pressing and moving it or dragging the corner handles.
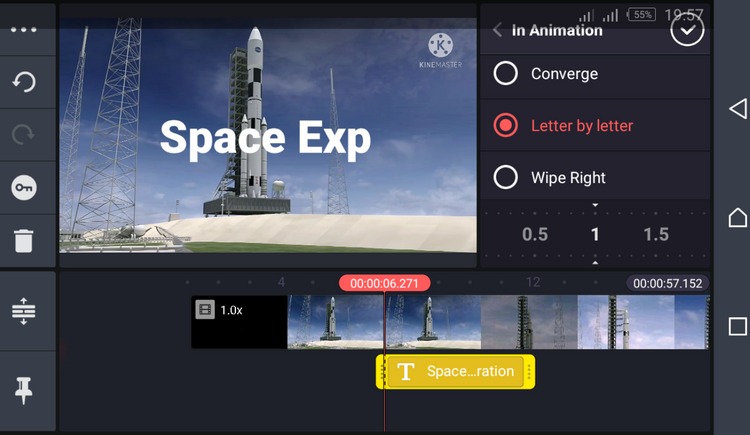
Step 5: When the text is selected, you'll see options such as fonts, animations, etc. This is where you can choose a font you like and animate the text. Tap the white-circle tick mark on the top right when you're done.
How to Add Background Music in KineMaster
After bringing the playhead into position, tap the Audio option in the Media Panel and proceed with the steps below:
Step 1: Choose the type of audio you want to use: Music, SFX, Recorded, or Songs.
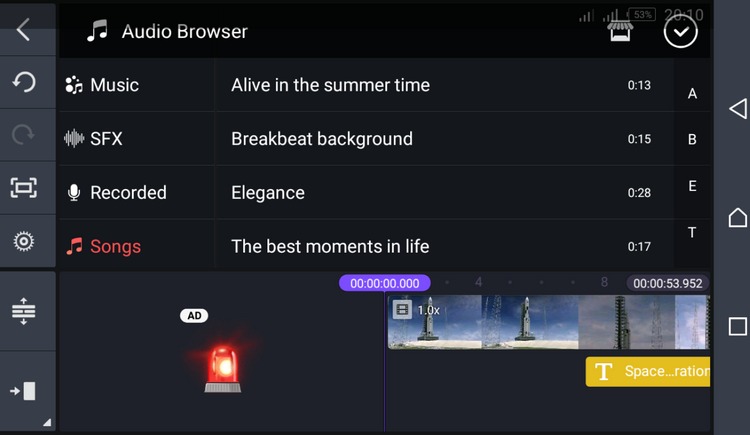
Step 2: Select an available option or record your own voice, then tap the red + symbol to add it to a secondary audio track.
Step 3: Tap this track to see various editing options such as trimming the duration of the audio. You can use this to sync the audio to the video. Tap the white tickmark to finish the edit.
After editing, you can export the video by tapping the Export icon on the top right. In the Export and Share window, choose the resolution, frame rate, and bitrate. As you make changes to these parameters, you'll see the output file size change accordingly. Tap Export and then tap Share if you want to upload it to YouTube or share it via other means.
Part 2. Useful Tips for Editing Video using KineMaster
As you can see, editing a video is fairly simple in KineMaster. But how do you find or create the right audio to go with it? You need something that's impactful and complements the video in a strong way. Let's look at some tips and ideas for this.
For videos that already have dialogs, it's better to use instrumental music in the background. You can find this in the Music section of the Audio tool. Also, remember that you'll need to choose a track that doesn't drown out the speaker.
For videos without any text or voice, try recording a voiceover and syncing it to the visuals. This will truly make your videos unique because viewers love narrations even if the visuals are self-explanatory.
If you're uploading it to YouTube, make sure you don't add any audio that could violate someone's copyright. Even if it's only in the background, your video may be reported and potentially taken down.
Part 3. A Better Way to Edit Video on Desktop - iMyFone Filme
Although editing videos on a mobile device is convenient (since the video was probably shot on or shared to your device directly), a desktop video editor gives you more options and greater flexibility. Besides, not everyone is comfortable using their fingers to manipulate the available tools, so a desktop video editor like iMyFone Filme makes sense from that perspective as well.
iMyFone Filme
Release Your Creativity with Best Video Editor iMyFone Filme!
Download NowKey Features of iMyFone Filme
-
All the editing tools you need to enhance the look of your video - crop, trim, split, change speed, pan/zoom, rotate, offset, adjust contrast/brightness/color, etc.
-
Dozens of filters, effects, text options, transitions, and animations to improve the visual appeal of your videos.
-
Fast Video mode to instantly create a video slideshow from existing media using one of several ready-to-use templates. Includes an audio track that you can change or edit.
-
Slick and intuitive interface that's simple to use and easy to navigate through various features.
-
Import media directly from your smartphone with a cable or wirelessly.
-
Export in a range of formats with advanced settings to control aspect ratio, bitrate, frame rate, resolution, etc.
Pros:
Easy to use
Fast file processing
Lots of effects and transition options
Convenient timeline editing
Easy import and export of media files
Part 4. KineMaster FAQs
Can I use KineMaster on PC?
Although KineMaster is primarily intended for mobile platforms, there is a Chrome extension available in the Chrome Web Store that you can add and enable to edit videos on PC or Mac with KineMaster. It's not as intuitive as the mobile app but, in a pinch, it will allow you to perform basic editing tasks. In addition, you can also use the Android app on Chromebook devices that support Play Store integration.
How can I use KineMaster without getting the watermark?
The KineMaster watermark is applied to all exported videos in the free version. If you want to get rid of it, you will need to upgrade to the KineMaster Pro subscription plan, which is available on a monthly or annual basis ranging from $3.49 to $27.99 on iOS; the pricing on Android goes from $4.99 to $39.99 for the subscription plans.
Final Thoughts
Although KineMaster is a great mobile video editor, it's always better to use a desktop video editor like iMyFone Filme. The main reason is that you get all the features of a desktop editor but not the complexity of a high-end professional platform. In fact, this is one of the unique selling propositions of iMyFone Filme - the simplicity that it brings to a complex process like video editing.


