There are many times when we watch a video on Facebook and think, “Hey, that’s a nice soundtrack” but we don’t know how to get it or even what to do. You don’t need complex methods because it’s quite simple, as long as you have the right tools or methods. That’s what we’re going to show you - three ways to convert a Facebook video into MP3 audio so you can use it for other purposes. If you want to convert Facebook video to MP3 online, you can also try the online converter. It's more convenient.
Method 1: Using an Online Facebook Video Downloader with an Audio Only Option
There are tons of sites that can download Facebook videos for you, and one such reliable site is GetFVid, which allows you to either download the video in HD or SD or rip the audio file and download that alone. It’s very simple to use and it won’t take you more than a couple of minutes. There are several other options to choose from, but we found this one to show the best results in terms of audio quality. Here’s the process you’ll need to follow:
1. First, get the URL of the Facebook video you want to download the audio for. You can do this by opening the video and copying the URL. Don’t copy the Facebook feed URL because that’s not the direct link to the video itself. The correct URL should look something like this:
2. After copying the URL, go to the GetFVid website, enter the URL in the box, and hit Download. Wait for the video’s details to be uploaded to the site and prepared for download.
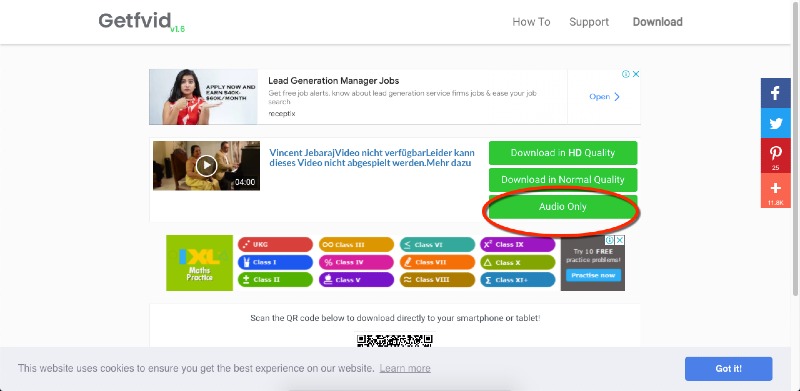
3. When you see the options for downloading, click the ‘Audio Only’ button. This will open the browser’s default media player (Chrome) in a new tab, where you can click the extended menu (three vertical dots) and click Download to save the file to your local desktop.
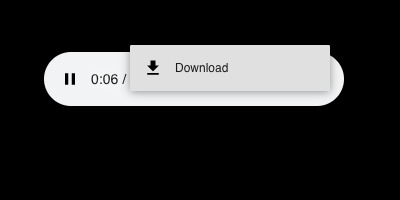
The audio file will play automatically, so you can check it before downloading the file. You will need to change the name because the default is a long alphanumeric string. The advantage of downloading audio from a Facebook video online is that there’s nothing to install. However, some users are not comfortable using online tools due to privacy, security, and other reasons. If that’s the case with you, don’t worry. The next two methods listed here will show you two free tools you can use to download audio from Facebook videos right on your desktop, whether it’s Windows or Mac.
Method 2: Use Audacity to Rip Audio from a Facebook Video
This method is over eight years old but it still works beautifully. For those who are not familiar with Audacity, it is a free, open-source audio recording and editing tool that’s been available for the past two decades! It is available for both Windows and Mac computers as well as Linux distros. The latest version of Audacity is 3.0.2, which was released in April 2021. The steps below show you how to record the audio track from a Facebook video quickly and easily.
1. First, keep the Facebook video open in a browser tab but don’t play it.
2. Next, install Audacity on your PC, Mac, or Linux computer.
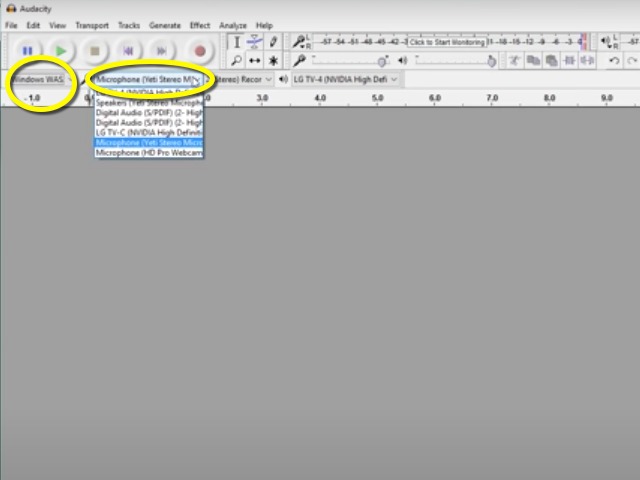
3. Launch Audacity, after which you need to make a couple of small settings changes. First, change the default Audio Type from MME to Windows WASAPI. Then, change the source audio device to your computer’s output, which should be the speakers, not headphones or other external audio hardware.
4. The internal recording mechanism is now set up so you can start the recording on Audacity.
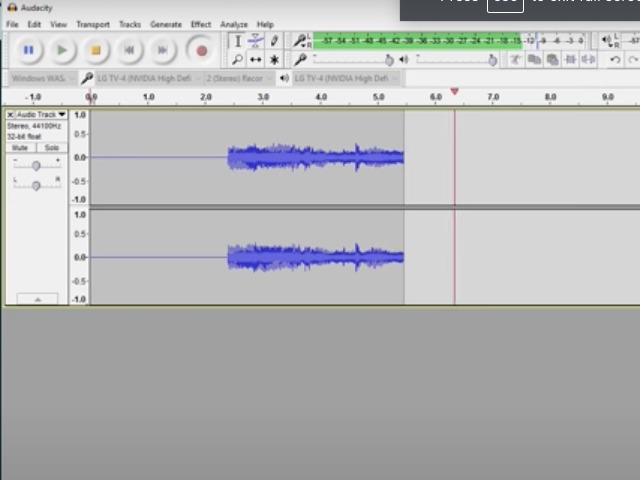
5. Immediately go back to the browser and start playing it. Allow it to play completely until the end. Once it stops, go to Audacity and stop the recording.
6. You can clip out the extra bits of blank audio at the beginning and end of the track by selecting the empty portions of the track and using the Cut tool or scissors icon. Save the recording with the default audio parameters as an MP3 file.
Open-source tools are great because most of them are free. However, some uses may be concerned about the stability of the latest version or the fact that if something goes wrong, there’s no formal tech support. That’s a legitimate concern, and if you’re worried about that, maybe you should try the safest and easiest method of all, which we’ve described in the next section. Moreover, if there are any issues with your device speakers, the captured audio quality won’t be up to scratch. That’s a problem if you’re going to be using it in another video or cleaning it up as an audio file. That’s another reason to go with this next method.
Method 3: Get Audio from Facebook Video on Desktop - iMyFone Filme
iMyFone Filme is a great video editor for beginners and professionals alike. The advantage of using it is that it gives you a lot of flexibility to import files of different types and from different sources. Even if you have a downloaded Facebook video on your phone, you can easily import it (wired or wireless) into the Filme media library for the purpose of ripping the audio track. It offers a ton of features:
- Full editing suite for video and audio files
- New audio detaching feature in the latest version
- Support for a wide range of video and audio file formats (input and output)
- Granular controls for changing audio parameters and settings
- Add effects like fade-out/fade-in to your audio track, increase volume, etc.
- Set the audio to any other video using Filme’s editing tools
- Control other aspects such as audio duration, etc.
- Add visual effects, transitions, text effects, etc.
- Zero learning curve for new users
- Tons of free audio tracks to mix and match with your FB video’s audio track
- Voiceover recording and screen recording to make tutorials and other videos
- Extensive editing tools to get your audio or video file exactly the way you want it - trim, split, speed control, etc.
- Audio detaching feature for exporting audio from a FB video file or any video format
Why Use Filme?
How to Use Filme to Extract Audio from a Facebook Video
1. Install and launch the latest version of Filme on your desktop.
2. To import the downloaded FB video, click the + button in the Media Library and choose the file from Explorer.
3. Bring the video into the timeline by clicking the + symbol in the middle of the thumbnail image.
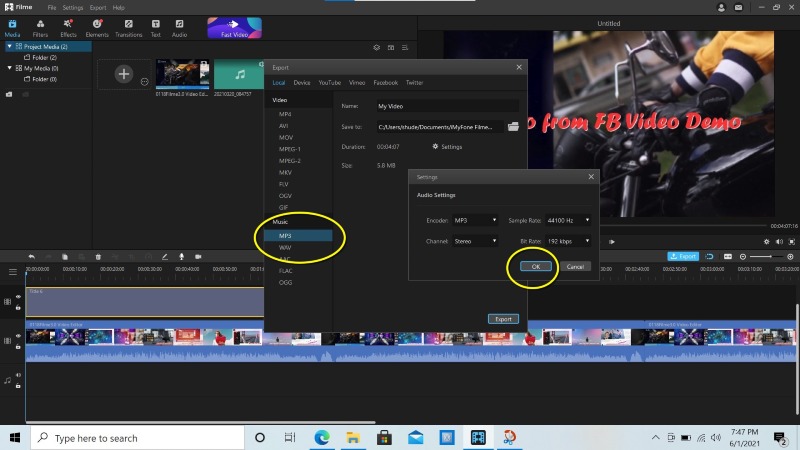
4. You can now export just the audio part of the file using the Export function, which has an audio detaching capability. To do this, choose MP3 from the Export options rather than MP4. This will extract the audio from the file and save it to your desktop.
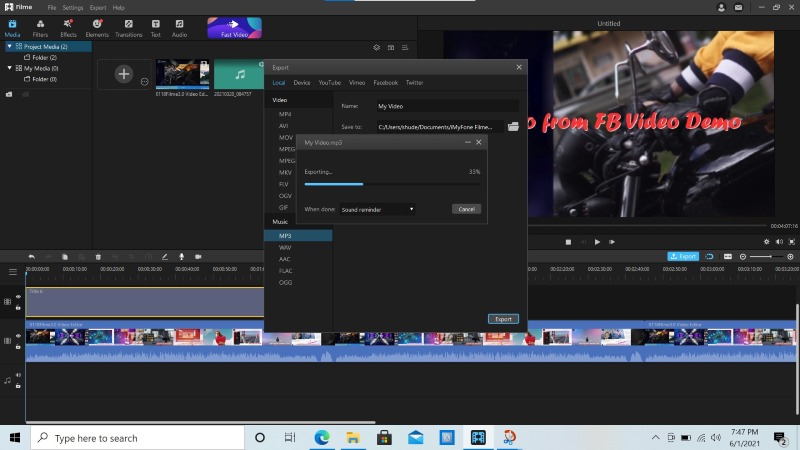
Once the file is exported, you can re-upload it to Filme in case you need to trim it or apply any of the edits we mentioned above. Filme is not only easy to use but extremely versatile, allowing you to execute myriad operations on video and audio files to enhance them and make them look and sound more professional.
Also Read:
Adding Music to Facebook Video | Your Life Made Easier
How to Save a Video from Facebook to Your iPhone
How Do I Save Videos from Facebook to my Android Phone
Parting Thoughts
Although the quality of the audio you extract from any Facebook video will be quite good, it’s always a good idea to increase the sample rate depending on where you will be using it. In reality, although you can go up to 96 kHz, which is typically used for audio in DVDs and other high-definition formats, 44.1 kHz is actually good enough for most media. Anything higher will be for professional use by audio or sound engineers only and is not of any practical value.
Another consideration is to create clips from the audio. Filme allows you to split audio tracks into as many parts as you want. That means you can use it for shorter video clips on Instagram, TikTok, and other short-form video sharing platforms. Adding fade-out/fade-in effects is another great idea, which you can also do in Filme.
Finally, make sure that the audio quality of the original FB video is good. No matter what kind of audio ‘clean-up’ you try, a poor audio source will always lead to sub-optimal results.


