If you want to know how you can remove objects from images, you are in the right place. In this article, we are going to show you the easiest methods to get rid of undesired objects in images. Just follow the simple steps and make your image according to your wish.
3 Best Object Removing Methods
| Photoshop | Photoshop Elements | iMyFone MarkGo | |
|---|---|---|---|
| Results | It provides the best results because it offers advanced tools and functions. | It gives satisfactory results without consuming more time. | It blends the removed parts exactly with a suitable background and makes the image clear and natural. |
| Process | There are many compulsory steps for removing objects. | It has 3 to 4 steps similar for removing objects from images completely. | You can remove objects quickly with just 1 click. |
| Revisions | It demands precision and accuracy with revisions. | It sometimes requires the process to be revised to obtain optimal quality. | No need to repeat the process after removing objects. |
| Interface | Itt has a little bit of a tricky interface. | The interface is easy to understand and utilize as compared to Photoshop. | It has a very intuitive and clear interface. Even a beginner know how to use. |
| Ease | Photoshop offers a lengthy process. | It offers an easy and understandable process. | It offers the easiest and quick method of removing objects and watermarks. |
Part 1. Delete Object from Photo with Photoshop
Photoshop is one of the most famous professional software that people use to edit images. Besides many mind-blowing features, it also helps to get rid of unwanted objects or things from images.
Step-by-step Guide:
Step 1: Open Photoshop. Click on Create New to create a new project. Select the desired settings and click on Create.
Step 2: Go to File > Open. Select the image from which you want to remove an object.
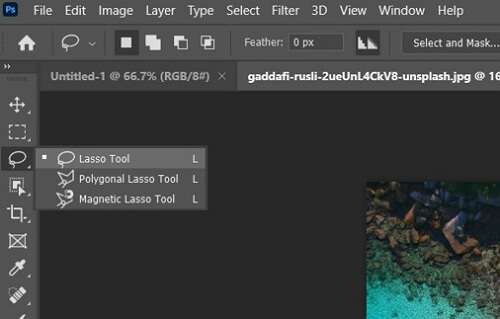
Step 3: On the left side of the screen, click on the third tool and select Lasso Tool to select the area which you want to remove from images.

Step 4: After selecting the tool, go to the image and create a loose selection around the object which you want to be removed.

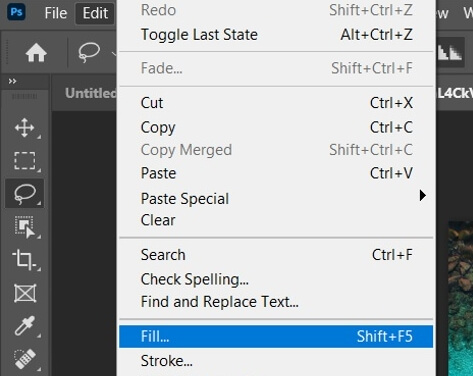
After creating a loop around the object, click on Edit > Fill. A small dialog box will appear on the screen.

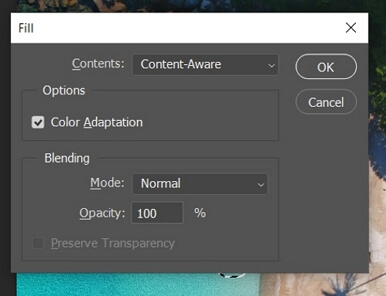
Step 5: In the dialog box, the first option will be Contents. Click on the small arrow in front of this option and then select Content-Aware. The next option will be Color Adaptations. Do not forget to keep it checked. Color Adaptations will automatically fill the selected area with matching surroundings to make it natural and real.
Step 6: Find the blending mode and blending opacity. Make the adjustments according to your image, and then click on OK.
Step 7: Within a blink of an eye, the object will be removed. Save the file.

Part 2. 1 Click to Remove Object from Photo Using MarkGo
iMyFone MarkGo is a simple and useful software for removing and adding objects to videos and images. It has a simple and easy procedure to accomplish tasks. Even if you are not familiar with it, you can easily add or remove things from images or videos due to the straightforward interface.

MarkGo Step-by-step Guide:
Step 1: Enter "Remove Image Watermark" feature
First of all, Download iMyFone MarkGo and install. Then open it. click on the second option, Remove Image Watermark, and a new window will appear.

Step 2: Add Image
To import images, you will see an option Add Image. You can also use the Drag and Drop method.
Step 3: Select Object to Remove
After opening the image, click on the option Selection Tool on the right side of the window. A selection box will appear in the photo. Now just select the area which you want to remove.

Step 4: Remove the Object
After selecting the area of removal, click on the Remove Now option on the right side of the window. iMyFone MarkGo will automatically remove the object.

Step 5: Save and Export
Now click on the Export button on the bottom right of the screen and save your edited image.
Also Read:
Remove Watermark from Camtasia Video >>
Remove Any Object from Photo with GIMP >>
Part 3. Use Photoshop Elements to Erase Object from Photo
Photoshop Elements is a lighter version of Photoshop. It has similar functions, but it is user-friendly. It offers fewer functions and tools as compared to Photoshop. Moreover, it does not require any learning because of its simple and well-managed user interface.
The method is quite similar to the method we have already discussed in part 1 of this article. Photoshop Elements also has the same Content-Aware Tool to fill the removed part of the image with a suitable matching background.
Steps on How to Remove Objects Using Photoshop:
Step 1: Open Photoshop Elements. Click on Photo Editor.
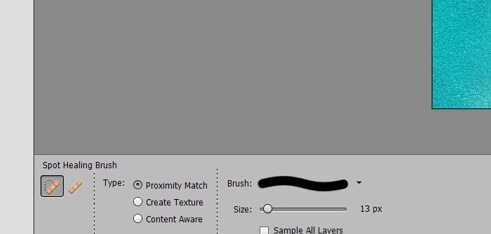
Step 2: Go to File and click on Open. Select the image and open it. From the tools, select the Spot Healing Brush.

Step 3: After selecting this tool, your mouse cursor will start acting like a brush. At the bottom of the screen, checkmark to the third option with the name Content-Aware. Adjust the size of the brush according to the object.

Step 4: You need to move the pointer over the object while pressing the left mouse button. The first time you will select the object, some of its pixels will be replaced with the background.

You need to do it several times until the complete object is replaced.

Step 5: After removing objects, you can save your edited image and enjoy the image in the way you exactly want.
Final Words
You do not need to go and capture any image again just because of an unwanted object. There are several methods through which you can easily make your photos according to your wish and remove objects from them in just a few seconds. We have shared the methods and tools for object removal, but we recommend iMyFone MarkGo. You can install it and add or remove objects without any hassle. It is the simplest yet most effective tool on the market. You can also use it to remove Kinemaster watermark easily.


