Often video content creators need to add text in their videos. It makes the video easier to understand and more attractive. Text in videos is used for adding captions, descriptions, names, titles, translations, and many other things.
You must have seen text in videos, and you might have wondered how it could be done. Today, we are going to discuss how to add text to a video with Final Cut Pro X. We will guide you through different ways of adding simple and animated text in the video. After reading this article, you will be able to add text in your videos like a professional.
4 Ways Add Text to Video with Final Cut Pro
Final Cut Pro X is an outstanding video editing software for professional use. It has every feature, from basic editing to advanced editing. You can add different styles of text in the video without any hassle. Let’s see how to add text to video in Final Cut Pro using different methods.
Method 1: Common Steps to Follow in All Methods
Step 1: Open Final Cut Pro X.
Step 2: If there are any libraries open, it is better to close them. Click on the library on the left side of the window. Go to the File menu and click on Close Library “Name of the Library”.
Step 3: Go to the File menu, hover over New, and click on Library. Enter the name of the library and click on Save.
Step 4: Go to the File menu, hover over New, and click on Project. Enter the name of the project and click on OK.
Step 5: Go to the File menu and click on Import Media. Select the video in which you want to add Text.
Step 6: The video will be in the library. Drag it to the timeline.
Step 7: Follow Method 1, Method 2, or Method 3.
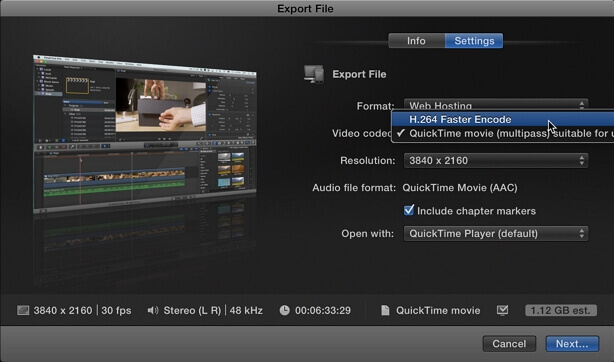
Step 8: Click on the Export button at the top right corner of the window. Click on Master File. Select the desired settings and export the video.
Method 2: Using Edit Menu
This is the easiest way of inserting basic text in the video.
Step 7: Go to the Edit menu. Hover over Connect Title and click on Basic Title. This will add a title to the timeline. Click on the title in the timeline and click on the Text Inspector in the Inspector Panel. You will see editing options on the right-hand side. Edit the text, color, or whatever you want.

Method 3: Using Title Menu
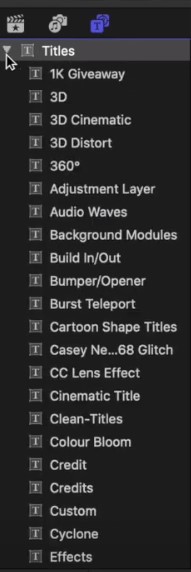
Step 7: Go to the Title menu in the top left corner of the window. You will see Titles and Generators. Open the drop-down list of titles. You can select any of them. For now, look for Basic Title. You can search it in the search bar. Drag the title to the timeline. Click on the title in the timeline and open Text Inspector for editing the text.
Method 4: Using Captions
Step 7: Move the Playhead where you want to add the captions. Go to the Edit menu, hover over to the Captions and click on Add Captions. The caption will be in the timeline. You will see a text editor under it. You can enter the text you want. Move the ends of the title in the timeline to adjust the duration.
Also Read: How to Add Sound Effect to Video with Final Cut Pro >>
How to Add Animated Text in Final Cut Pro
Animated videos are catchier. It is better to use animated text to make the video more engaging. You can easily add animated Text in Final Cut Pro in a few steps.
Step 1: Open Final Cut Pro. Select the library if there is any and go to the File menu and close the library.
Step 2: Go to the File>New>Library. Name the library and click on Save. Go to the File>New>Project. Enter the name and click on OK.
Step 3: Go to File>Import Media and select the video you want to edit. Drag the video to the timeline.
Step 4: Click on the Title menu at the top left corner of the window. Search for the Custom and drag it to the timeline.

Step 5: Go to the Text Inspector and edit the text. You can change color, font, size, and many other things.
Step 6: Go to the Published Parameters. The “T” icon on the left of the Text Inspector. You will see a list of different In/Out animation settings. For instance, set the opacity to 0%. Play the video, you will see there won’t be any text at the start, but the text will start to appear. For changing the position of the text in the video, open the In Position Settings. You can set X, Y, and Z parameters to move your text during the video. Similarly, you can change speed, blur, scale, rotation, duration, or many other parameters.
Step 6: (Alternate)You can also add some effects instead. Go to the Effects tab on the right-side toolbar over the timeline. Select any of the effects you like and drag it on your text in the timeline.

Effects also have a setting. You can set the size, speed, opacity, position, and many other things.
See the preview of the text after adding the effect.
Step 7: If you want to adjust the duration of the text, move the ends of the title in the timeline.
Step 8: Once you are done, click the Export button on the top right corner and export the file.
Also Read: How to Add Video Transitions in Final Cut Pro >>
How to Move and Adjust Text in Final Cut Pro
Adjusting and moving text in Final Cut Pro X is quite easy. You only need to follow a few steps.
Step 1: Click on the text in the timeline.
Step 2: Go to the Text Inspector for adjustments. The Text Inspector contains all the adjustment options you need. Enter the text you want. You can choose the color, alignment, font, opacity, blur, scale, line spacing, or anything you want. You only need to select the desired value. The Inspector also has options for creating a shadow and changing the outline of the text.
Step 3: For text adjustments, see the Position in the Inspector. You can enter the X, Y, and Z coordinates to move the text wherever you want. The easiest way of moving the text is by dragging it. In the canvas, click on the text, hold it, and move wherever you want. If you want precise movement while dragging the text, go to the View menu and click on Show Title/Action Safe Zone. This will show boundaries, so you can easily move the text with ease.
Step 4: When you are done, check the preview. You are also ready to export the file.
Best Final Cut Pro Alternative to Add Text to Video - iMyFone Filme
Final Cut Pro has many text features, but it is not user-friendly enough for beginners. You need time to learn and explore things. In contrast, iMyFone Filme is quite easy. You can add text to the videos without any hassle.
Features:
Filme is a very user-friendly tool. It is perfect for beginners.
There are various text styles that you can use for title, subtitle, and captions.
You can easily adjust the text and move it wherever you want on the canvas. It saves you time.
Filme offers all types of basic editing, including cropping, speed, adjustment, and rotation. You can also use it for advanced editings, such as effects, transitions, animations, and multi-layering.
How to Add Text Using Filme
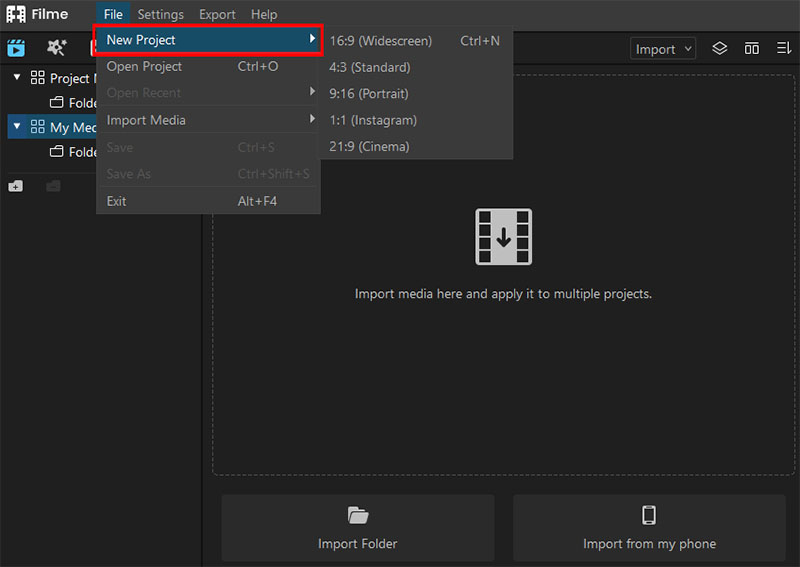
Step 1: Open Filme. Go to the File>New Project and click on the screen size.
Step 2: Go to Import>Import Files. Select the video in which you want to add text.
Step 3: The video will appear in My Media. Drag it to the timeline.
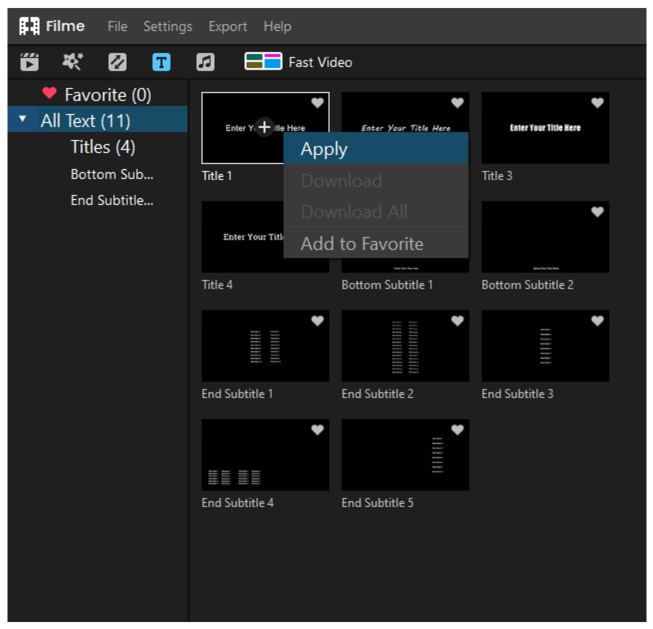
Step 4: Go to the Text at the top left corner. You will see different styles of text. Move the Playhead where you want to add the text. Right-click on any of them and click on apply. You can also click on the ‘+’ button to add the text to the timeline.
Step 5: Double click on the title in the timeline. You will see editing options on the right side of the window. You can edit text and do all kinds of adjustments, including alignment, position, opacity, font, color, and size.
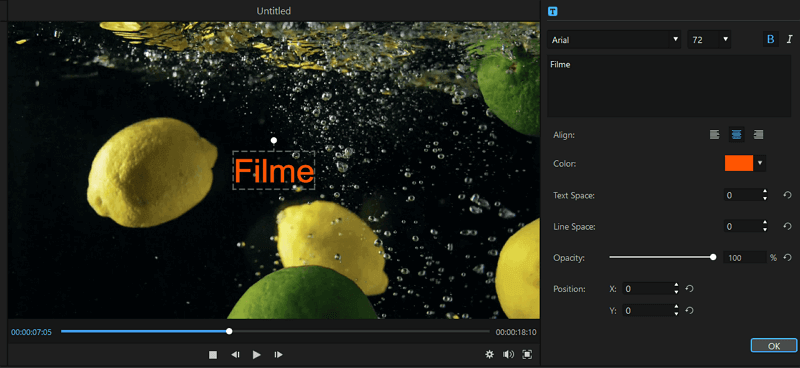
Step 6: You can set the duration of the text in the timeline. Drag it corners to adjust the duration. You can also drag the text in the canvas to position it wherever you want.
Step 7: When you are ready, go to the export menu and click on Export Video.
Or you can watch this video tutorial to learn about how to add text to video using Filme.
Final Words
You must add text in your videos to make them more appealing and self-explanatory. There are many ways and tools to add text in videos, but we have discussed Final Cut Pro X in detail. The step-by-step method is explained for your ease. Final Cut Pro X is a bit difficult to work with. If you are looking for its alternative to add text, then Filme is the best option. You can easily add text to your video using Filme. You will be able to create a stunning video in no time.


