Picture this, you are trying to do all the edits you could think of on your video – you know, the audio crisp and the titles look great, and it cuts perfectly together. However, when it comes to color grading and effects, then you start experiencing some problems, as you don't know what you are going to do. Here is the thing though, with the Adobe premiere pro, adding effects to your video has been made easy, especially adjustment layers, which allows you to add effects, such as color and tonal adjustment, on your video or image without changing the pixel values permanently. You definitely want to add these layers into your workflow if you haven't done so already. In this article, we will tell you more about the add/make adjustment layers in premiere pro, especially how to add them to your video/images.
Part 1. How to Add/Make Adjustment Layer in Premiere Pro
Premiere Pro is an excellent video editor, but i would recommend iMyFone Filme, Filme is more cheaper than Premiere Pro. Filme is a much more comprehensive video editing tool. you can upload edited video to facebook,vimeo,youtube with single click. Filme has the best 4k HD support. Download iMyFone Filme below.
As we've mentioned above, adjustment layers allow you to make a tonal or color adjustment to your images or video, without changing their pixel values, making them quite special to video editors. You see, instead of having their own content, the layers simply adjust the information on the layers that are below them. For instance, let's say that you want to increase the contrast or brightness of an image, without altering the original photo, well, using an adjustment layer will help you achieve exactly that. Other than that, they help you keep your work even more organized, and will certainly make your work easier as a video editor. So, how can you add adjustment layers in premiere pro?
Steps to Add Adjustment Layers in Adobe Premiere Pro
Step one – the very first thing will be to download and install premiere pro into your device – that's if you don't have it already.
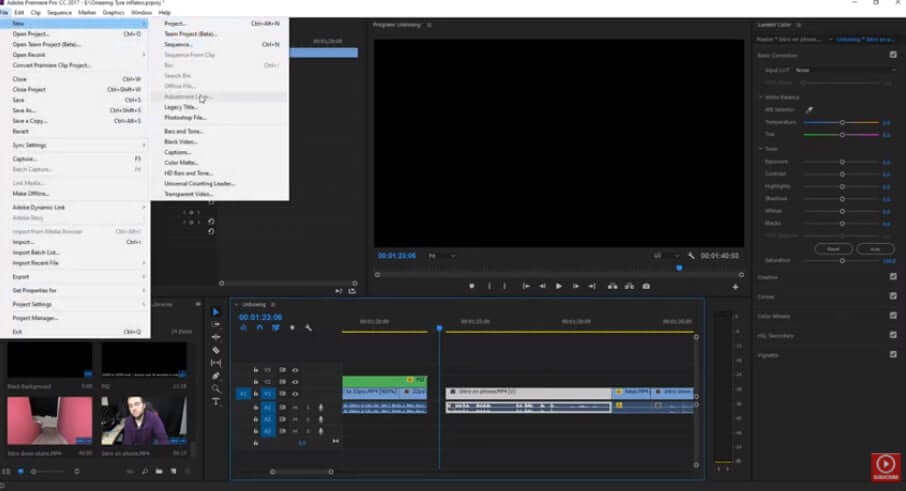
Step two – open the software, and then go to File, then New, and then Adjustment Layer, which when you click, will open the adjustment layer panel.
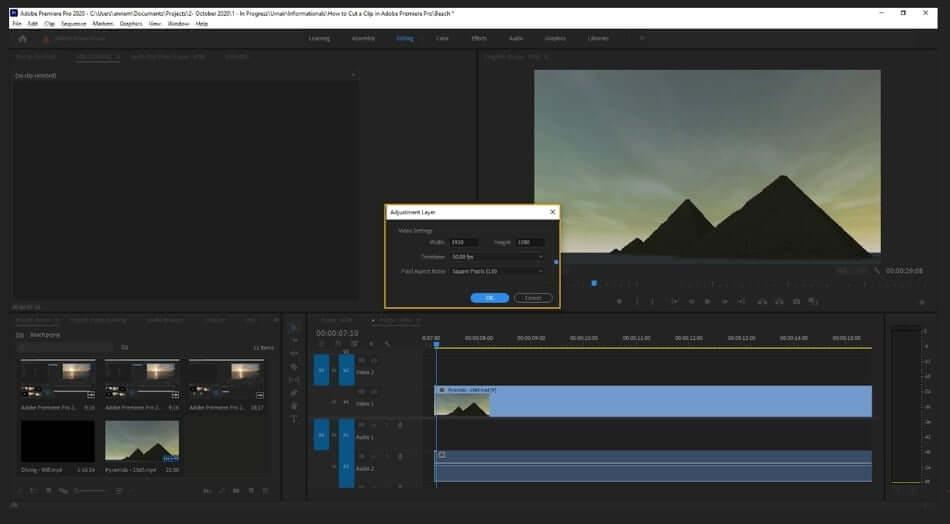
Step three – in the panel, you can adjust the width, height, Pixel Aspect Ratio, and timebase of the layer. Once everything is set to your liking, just click OK.
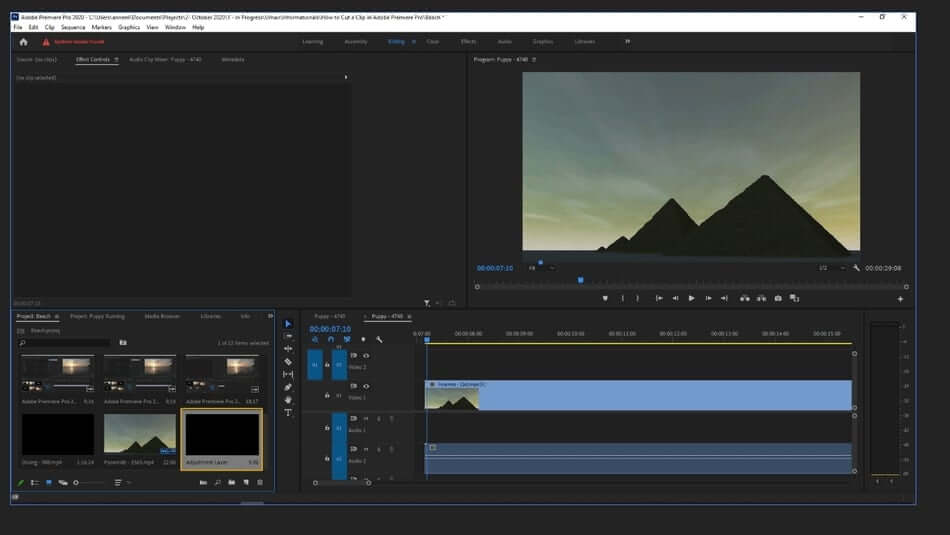
Step four – drag the adjustment layer into the timeline, where your project is. After that, with the layer selected, you can then go to the Effects panel, and select the effect that you wish to add. Double click on it, to add, and to remove it, you just need to select the effect and hit Remove.
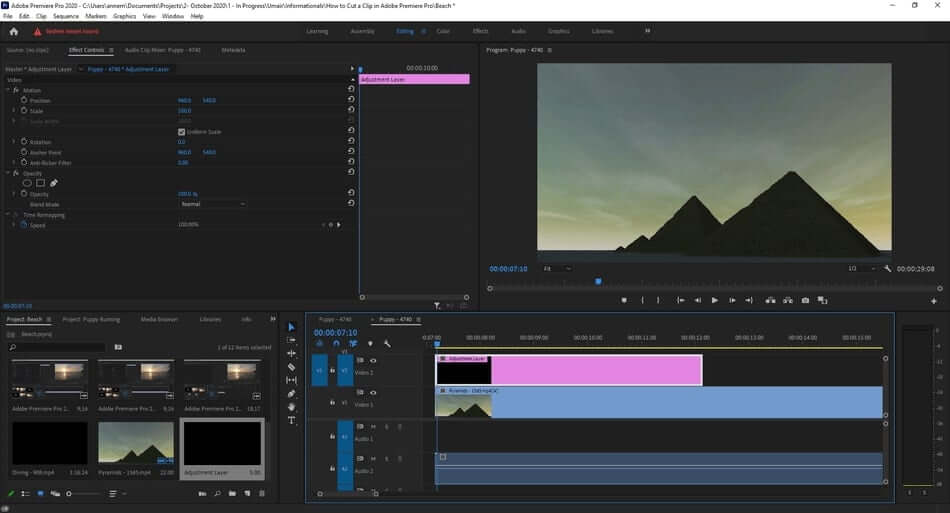
Step five – with that, you will have added an effect to your image without necessarily tampering with the original photo. So, hit Save, to save the changes.
Part 2. Best Alternative Video Editor - iMyFone Filme
Even though Premiere Pro may be one of the best video editors, especially when it comes to adding the adjustment layer, which then allows you to add effects onto it, but we have to tell you of another video editing tool that could be even better. iMyFone Filme is considered by many video editors to be the best, thanks to its super easy interface plus hundreds of effects that are all tailored to make your videos appealing and enjoyable to watch. Now, when you want to add effects on your video or image, but don't want to tamper with the original image, Filme allows you to do exactly that. You see, it offers you a simple interface that even beginners will get an easy time navigating, and that means, even finding the effects to add to an image or a video, you are able to easily do it. For instance, let's say you want to add text on your video or any other effect on your video, here is how you can go about it:
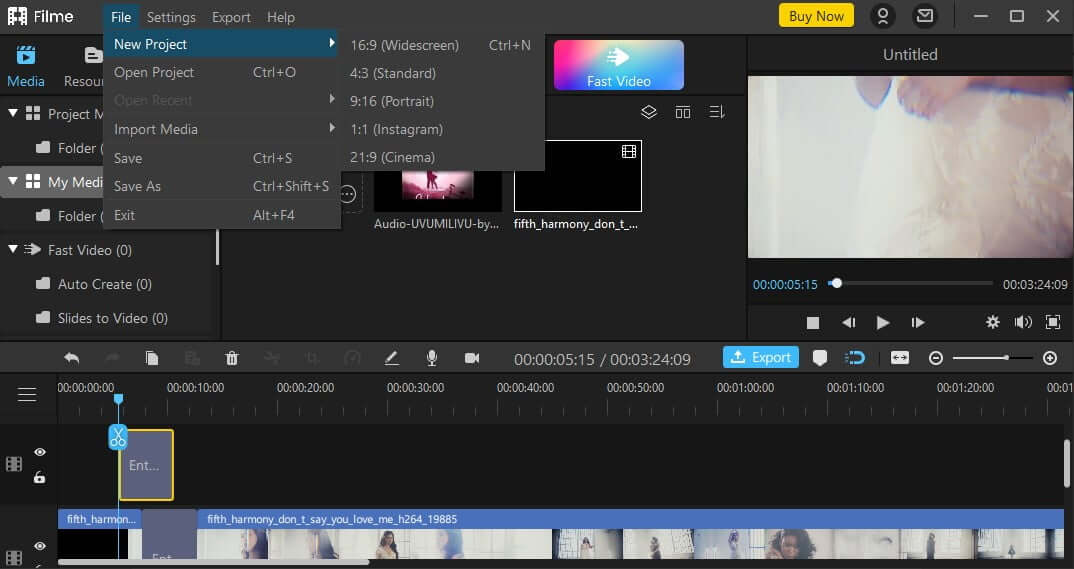
Step one – first and foremost, download and install Filme on your device. Then open the tool and go to the File menu, then New Project. Select your preferred ratio.
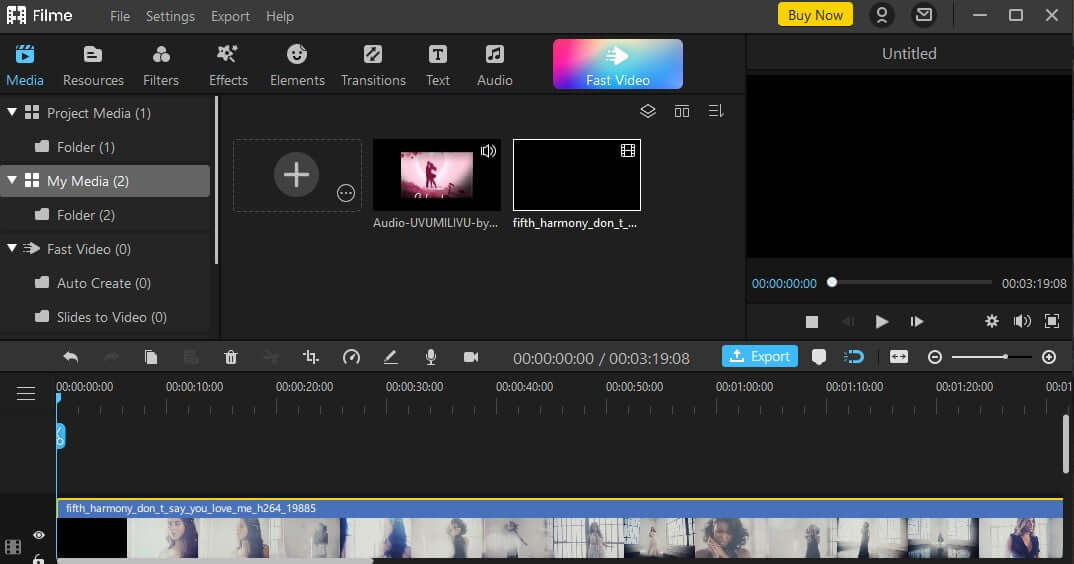
Step two – after that, import the file that you seek to edit by clicking Import File. Once the file is on the interface, add the file to the timeline, which is where all the editing will take place.
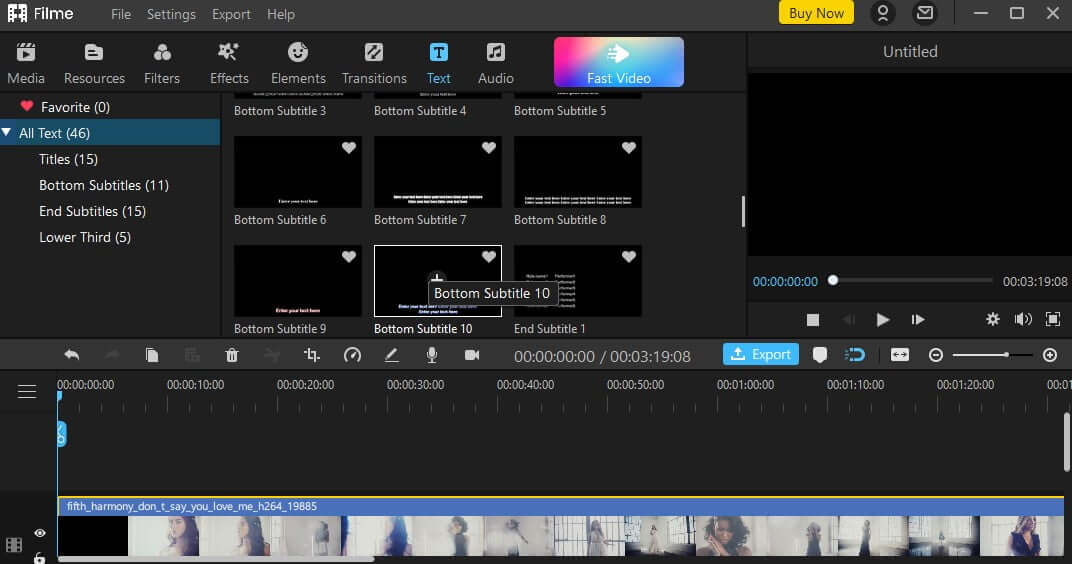
Step three – on the toolbar, which is at the top of your screen, go to the Text option, which when you open, you will see several effects, including titles, subtitles, or any other effect that you want. Just move the Playhead to the point where you want to add the text. Right-click on the style and then click on Apply.
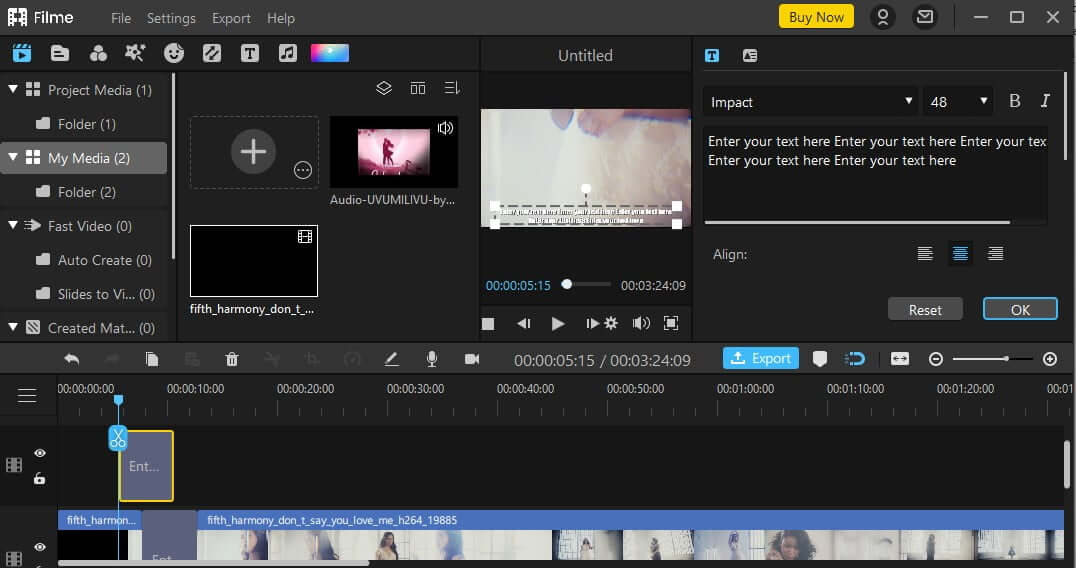
Step four – after that, just double-click on the title, and a window will pop-up with several editing options, where you are able to change the color, alignment, size, position, opacity, and anything else you would like to change. After doing all the adjustments, just click OK.
Step five – by doing that, you will be good to go. Just click Export Video to save it on your device.
Part 3. Why the Adjustment Layer Grayed Out in Premiere Pro?
Normally, when you open the Premiere Pro tool, you will find that if your try to click on the Adjustment Layer option, which is under the File option then New, it has been grayed out, and that you can't click on it. Now, the reason why it has been grayed out is because you haven't selected the file to which you want to add the adjustment layer to. This is an easy fix though.
You see, all you need to do is to go to the project panel where you will select New Item, which is at the very bottom of your screen. When you click on it, you will see several options come up, among them is Adjustment Layer, which you can click on, and an adjustment window will pop up and you will click OK. After, that you can carry on with your editing as planned.
Part 4. Tips Using the Adjustment Layer
When using the adjustment layers on premiere pro, occasionally things can go wrong. And you absolutely don't need that. That's why we recommended the following tips so as to ensure that you keep your adjustment layers organized and trouble-free. They are as follows:
First: Ensure that you name your layers at all times – you see, by naming your adjustment layers, it will not only save your time, but it will also make your editing more efficient, which pretty much should be the goal of every video editor out there.
Secondly: Make color corrections before you color grade – this is a requirement for anyone planning to color grade on your adjustment layer. See, normally, your layer will affect pretty much everything on your sequence, which means that your grade might look different from clip to clip. So, make sure that you correct the clips first before adding your color grade.
Thirdly: Utilize keyframes creatively – given that the properties on the adjustment layer as well as on the clip are similar, you are able to keyframe even those effects that you would have never keyframed. There are a number of really cool effects that you can be able to create with your keyframed adjustment layers, which includes:
-
Using the Gaussian Blur effect over the sequence, and then keyframe the Blur Amount settings, which really comes in handy when you need to add titles to your videos.
-
It is possible to use the lumetri color saturation function to come up with a Wizard of Oz kind of color.
-
You can also use the Leave Color function so as to fade your sequence to white and black, thereby leaving only one color in the sequence. This comes in handy when working on music videos and event promos, especially ones with different and brighter colors.
Fourthly: Consider saving your work as a preset, which means that given all the effort you did put in creating your fantastic effect, how about you, you might want to do it again in the future. And instead of doing it all over again, you will just need to find the one you already did, and then apply it to your project. Premiere Pro does allow you to do this, and once you save it, it appears on your Effect panel.
Final word
We have to admit that adjustments are pretty fun to work with as they enable you to experiment with your amazing visual effects skills in a user-friendly kind of way and ensure that the end result is one you will be proud of. If you've just started using premiere pro, it is our hope that this guide will help you. We will also recommend iMyFone Filme as a tool to add effects to your videos or images. As we already mentioned earlier, it is one of the most reliable video editing tools in the market right now, all thanks to its amazing effects plus an easy-to-use interface.


