Do you have just the perfect footage on a GoPro and want to know how to download GoPro videos to Mac? Worry not as this article will cover the most efficient ways to transfer files from a GoPro camera to a Mac computer.
Additionally, we will also discuss how to edit GoPro videos on Mac in an intuitive way. Read on and find out.
Ways to Download GoPro Videos to Mac
The first thing you do after capturing your adventures and memories on GoPro is to get them off the camera and upload on your Mac. Luckily, there're a plethora of ways to download GoPro videos to Mac
Let's dive in.
1. Via SD or Memory Card
Using an SD card is the quickest method to transfer GoPro videos to a Mac. You need to buy a micro SD card reader, if you don't have one already.
Text Guide
Here's how to transfer GoPro videos to Mac via SD card.
Step 1
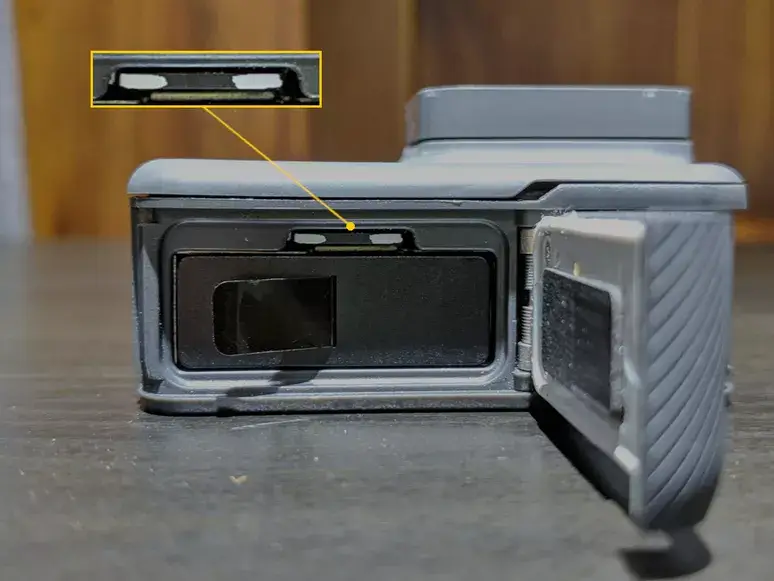
Remove the SD card from your GoPro and insert it into the card reader.
Step 2
Now, connect the card reader to your Mac and launch Finder
Step 3
Click on your "Memory Card" name shown in the left tab.
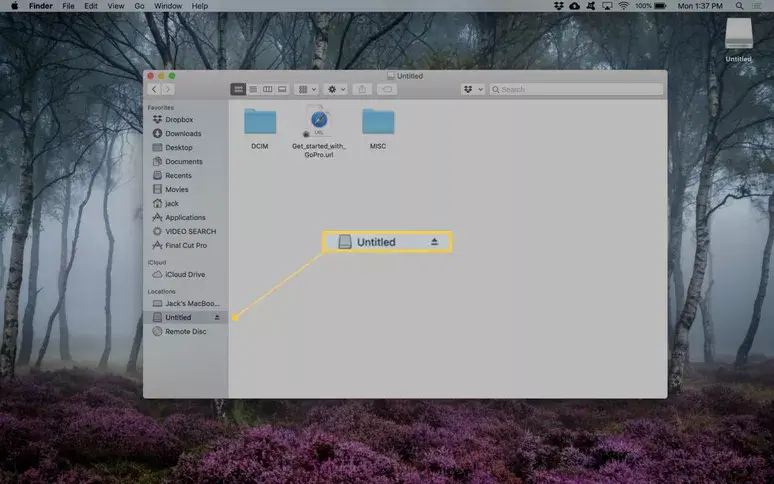
It will show two folders. Double click the folder named, "DCIM" and then, "101GOPRO."
Step 4
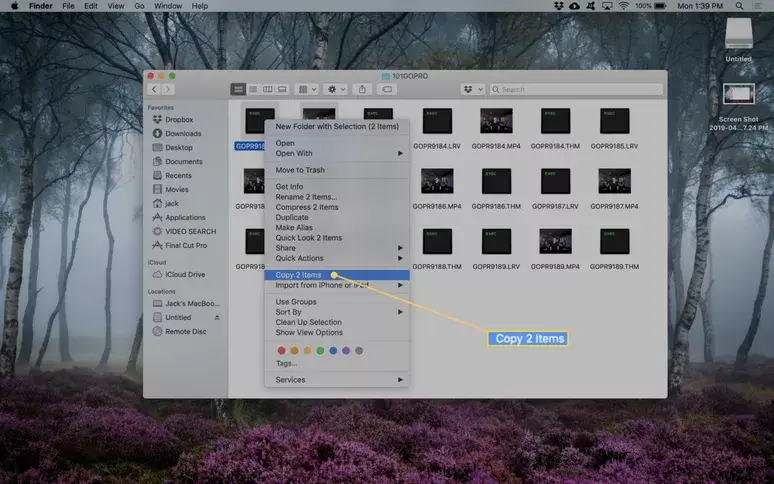
You'll see all the videos (and photos) on the GoPro. Select the videos you want to download, and copy and paste them on your Mac.
Step 5
Eject the SD card safely when you're done.
2. Via Image Capture
Image Capture is an official Apple program that enables users to directly transfer videos from a GoPro camera to a Mac. All you need is a USB-C cable to connect the two devices.
Here's how to import GoPro videos to Mac using Image Capture.
Step 1
Use an original USB-C cable to connect GoPro and Mac. Turn on the Go Pro.
Step 2
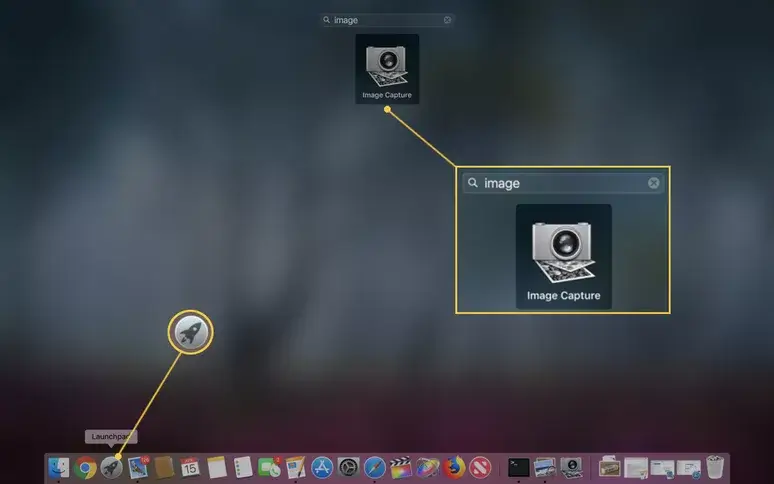
Now, launch Image Capture from the Application folder. Or search "image" in the Launchpad app and hit Image Capture.
Step 3
After that, hit the name of your GoPro camera on the left tab. Then, use the drop-down menu of 'Import To" and select a folder to download the videos. Click on Import All.
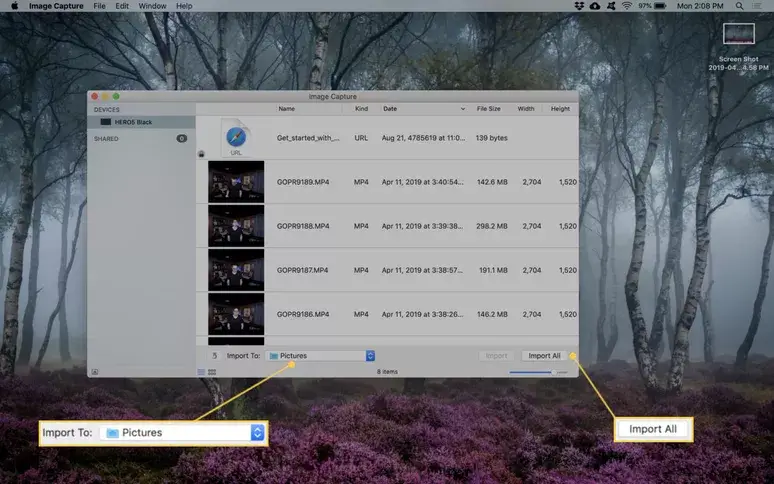
Step 4
Hardly a few minutes later, the app will transfer all the videos to your Mac. Close Image Capture and Unplug the GoPro.
Now, you can enjoy the captured footage on a big screen.
How to Edit GoPro Videos on Mac with iMovie
Now that you have downloaded the GoPro footage on your Mac, it's time to further spice it up using iMovie. This free editor for Mac offers tons of features for basic-grade editing.
iMovie's strength lies in its simple and intuitive interface, making it a preferable choice for even non-technical users. Apple has long taken pride on the efficiency of iMovie and upgrades it regularly to meet the expectations of users.
Even if you're using it for the first time, it won't take long to get used to its interface and edit GoPro videos on Mac. Here are the highlighted features of iMovie:
Crop, trim, and rotate video clip
Adjust speed
Green-screen controls
A huge library of built-in video transitions and filters
Video stabilization
Color adjustment
Real-time titling
Audio editing
Exports in HD and 4k
Text Guide
Check out yourself how to use iMovie:
Step 1
Launch iMovie on your Mac and hit on Create New > Movie to enter the workplace.
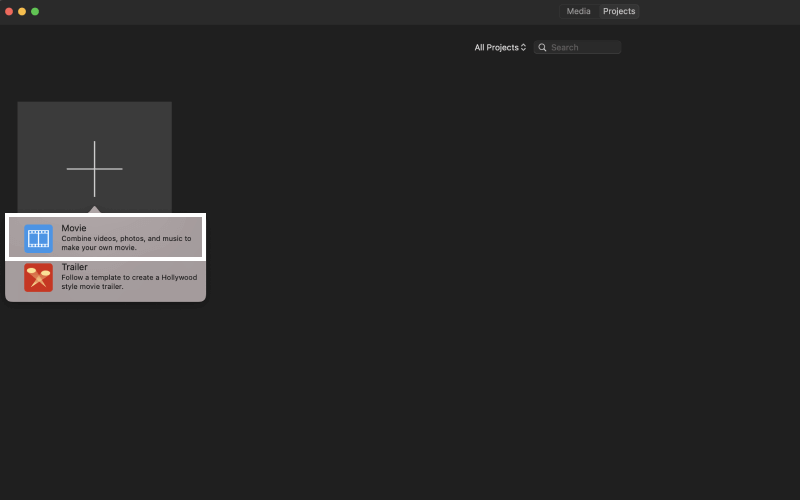
Step 2
Now, import the GoPro videos you want to edit and drop and drag them to the timeline.
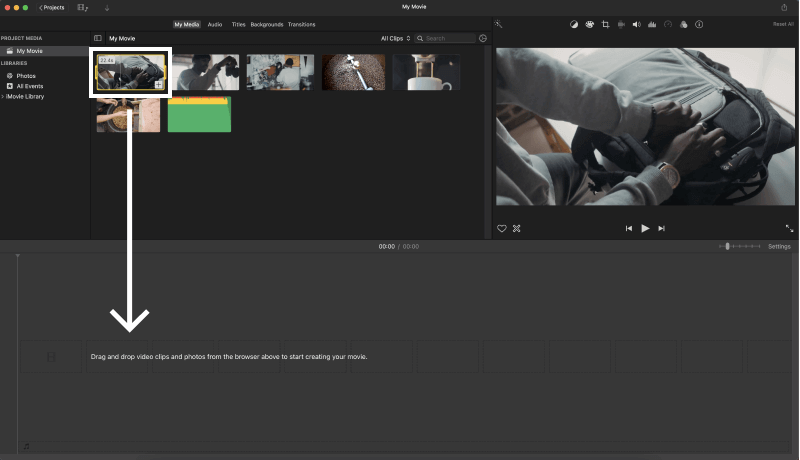
Step 3
Once the video is in timeline, click on the 'Crop" icon.

Also Read:
Resize and Scale Video on iMovie >>
Extract Audio from Video Using iMovie >>
Hit on 'Crop to Fill" and adjust the rectangular box to crop your video as needed. Hit Apply to save changes.
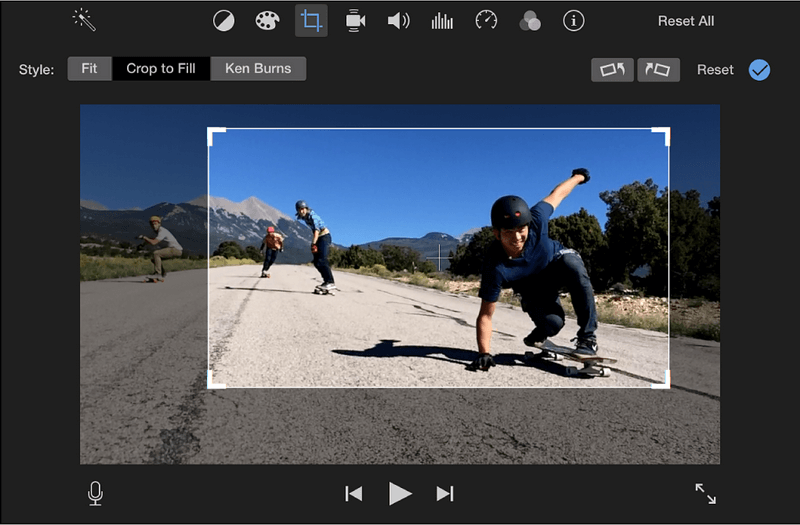
Step 4
Click on "Text" on the top tab and drag and drop any text style you want.
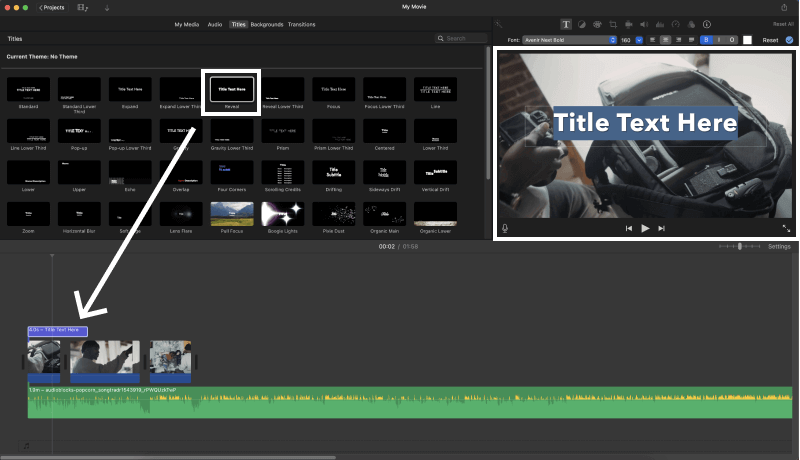
Step 5
When you're done editing, hit Export on the top-right corner to save the output clip.
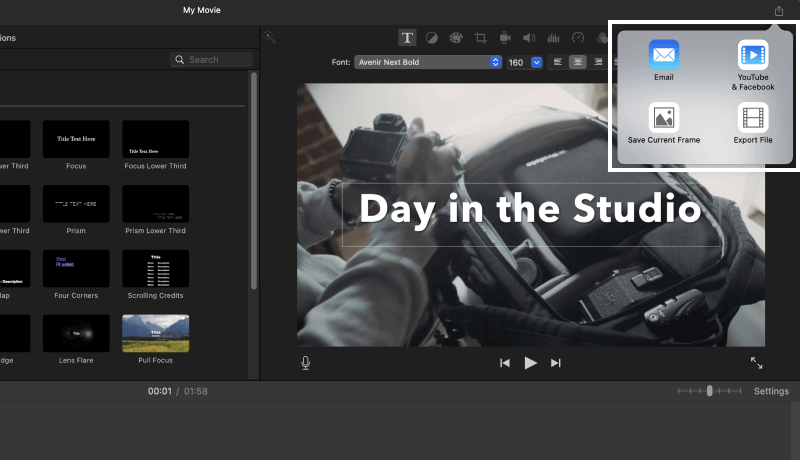
And just like that, you can use other features of iMovie to enhance your GoPro videos and captivate the audience.
Best Program to Edit GoPro Videos on Mac - iMyFone Filme (Mac)
With a streamlined design and innovative interface equipped with intuitive editing tools, iMyFone Filme is the best software for editing GoPro videos on Mac. It lets users edit and create professional-looking HD videos with just a few clicks.
Over the last few years, Filme has established itself as the market standard for editing GoPro videos on both Mac and Windows. It comes preloaded with a myriad of basic and advanced editing tools that along with its user-friendly interface allow even non-tech savvy users to handle editing tasks easily.
On top of that, Filme offers free trial to all its users to assess its efficiency, compatibility, and ease of use while editing GoPro videos.
Features of Filme
-
A huge library of stunning transitions, filter, and effects
-
Tons of overlays, resources, and templates
-
All basic editing features like crop, cut, trim, split, change speed, and so on.
-
Adjust color grading with high precision
-
Multi-layer video and audio editing
-
Make picture in picture effects
-
Zoom in/out timeline
-
Audio and video Screen recorder
-
Slideshow maker
-
Add and refine music
-
Audio editing
-
Voiceovers
-
Add text and cinematic titles to videos
Pros:
 Easy to install and use
 Offers free trial period
 Professional technical support
 Supports all audio and video output formats
 Customizable export settings
Text Guide
Using Filme to import and edit GoPro videos is a walk in the park. Here's how to do it:
Step 1
Install and launch iMyFone Filme on your computer. Hit on "Editing Mode" to get started.
Step 2
Import the GoPro video you want to edit and drop and drag it to the timeline
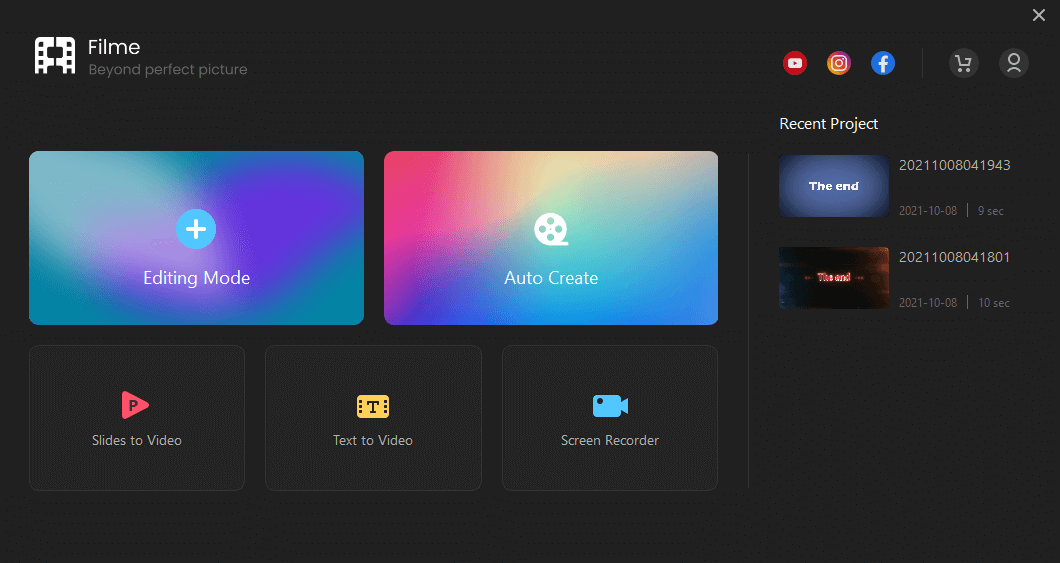
Step 3
Now, you can perform any type of editing you want from adding filters and transitions to adjusting its size.
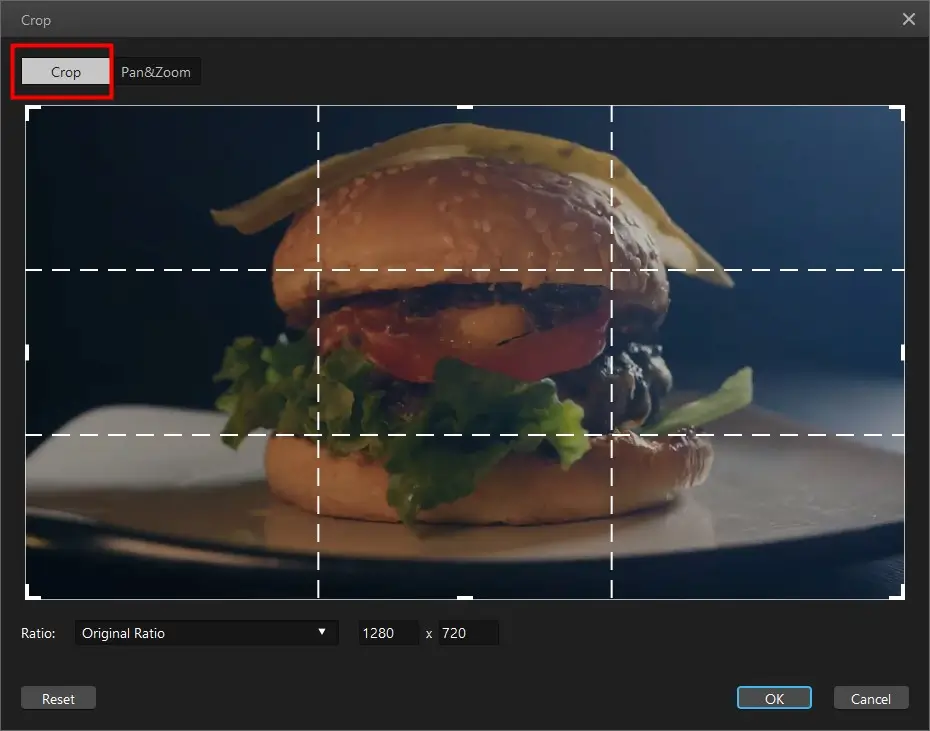
To crop a video, hit on the "Crop" icon on the quick tab after clicking on the video in the timeline.
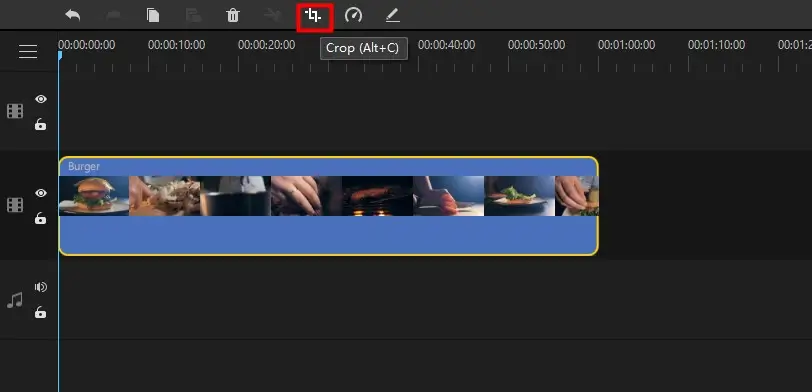
Step 4
Adjust the corners of the rectangular box to fit the size of your video. Else, select the aspect ration options. Hit Ok to apply the changes.
Double click the video in timeline to further edit it as needed.

Step 5
Once you're done editing, hit on Export to download the output video.

FAQs
We have answered the common queries of users pertaining to how to get GoPro videos on Mac.
1. How to fix GoPro videos not showing up on Mac?
GoPro cameras offer the best way to capture your precious moments and save them on your Mac. If somehow GoPro videos are not showing up on Mac, here's how to view GoPro videos on Mac:
a. Don't rename the folders on the GoPro SD card and ensure all the folders have original names as shown in the figure.

b. Reset the USB port to check the compatibility of GoPro camera with your Mac. To do that:
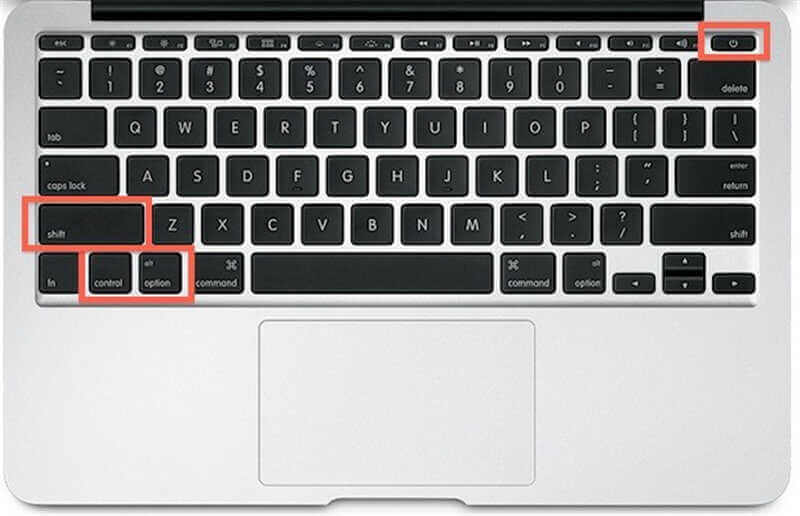
Hit the Apple icon > Shut Down. Then press Shift + Control + Option + Power keys for simultaneously for 5 seconds.
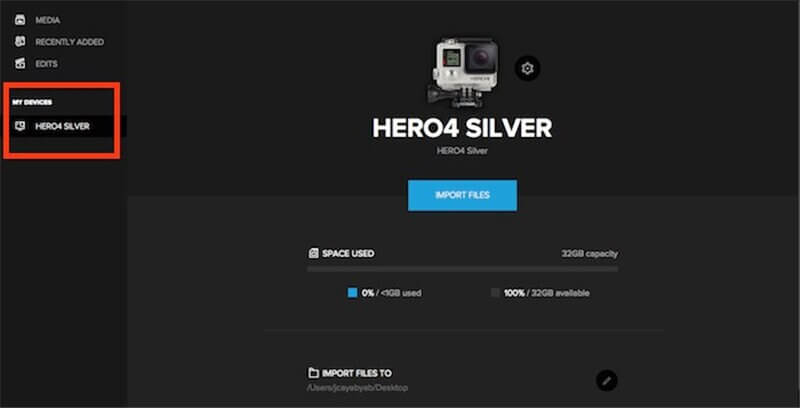
Now, connect Mac and GoPro with a USB cable and confirm if GoPro is recognized under My Devices.
2. How to fix GoPro videos lagging on Mac?
Implement the below fixes to troubleshoot the GoPro videos lagging issue:
Copy all GoPro videos on your Mac instead of playing them in the DCIM folder.
Use the latest version of a competent video player like VLC.
Make sure your Mac meets the minimum system requirements for playing GoPro videos. Else, try to capture the footage in lower resolution on your GoPro.
Use another Mac or upgrade your computer.
Final Remarks
To wrap up, this article has provided a step-by-step guide om how to upload GoPro videos to Mac quickly and safely. You can rely on any of the aforementioned way to get the job done. Choose the one that suits your requirements and preferences.
After offloading media from a GoPro to a Mac, use iMyFone Filme to edit and enhance the videos and entertain your viewers. With the impeccable editing tools it offers, Filme is your best bet to get a professional editing software at a user-friendly price.


