Final cut Pro not only has the zooming options but also has plenty of tools for an editor that you can use to cut your clips together. If you want to add movement to a shot or crop something from the clip you can easily do so. For this purpose you must have basic knowledge on how to zoom in on Final Cut Pro.
If you are highly interested to know how to do that and enjoy zooming in video using Final Cut Pro, this article will turn out to be a very helpful guide for you.
Way#1: Zoom in A Clip-on Final Cut Pro Using Ken Burns Effect
If you want to add motion to images of footage we recommend you to use Final Cut Pro X. it has everything you need for zooming in a clip using Ken burns effect.
Step 1: Adding the Ken Burns Effect
As we are going to study how to zoom in on a clip-on Final Cut Pro using the Ken Burns effect, we should understand the concept of the Ken Burns effect first which is the simplest way to add motion to your video shots or clips.
For the addition of Ken Burns' effect, you have to choose the clip in the timeline first.
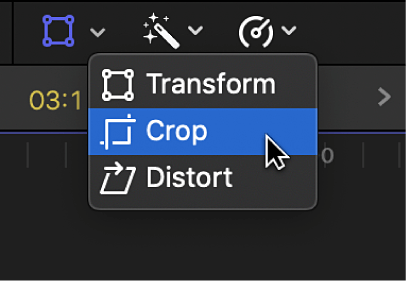
Now you will see the option of a transform icon in the dropdown menu at the bottom of the screen. Select the Crop button from the menu.
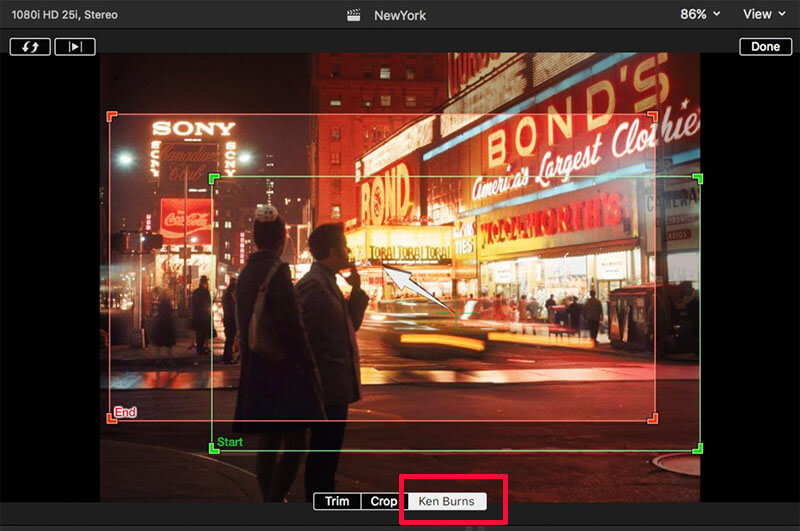
in the viewer you will see written Ken burns, click on it.
Step 2: Effect Customisation
As we have already activated the Ken Burns effect, we will tell you how you can customize the motion. For this purpose, we have to learn how to control scale and position.
Proceed with the points given below to learn how to customize the effects.
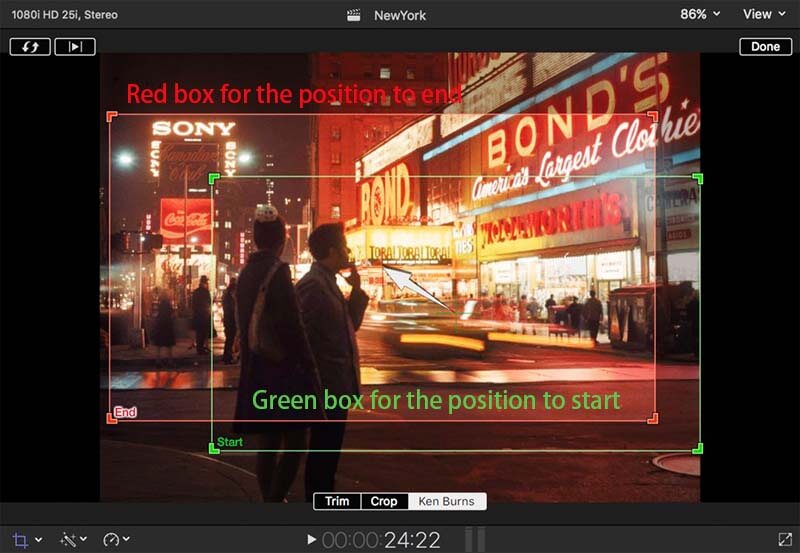
Go to the viewer where you will see the green box. You can adjust the size and position of the video by grabbing the green box and bringing it to the point where you want to start the animation. And the movement of the red box determines the position of the end of the animation.
Now look at the top left corner of the screen and click on the Preview button. The preview option gives you an idea about the view of the video till the current editing. you can proceed with this option after applying every effect and then checking how it looks in the final form.
If you have proceeded with a particular effect and are happy with that after reviewing it you have to hit Done and it will be applied.
However, if you are not satisfied with the particular animation, you can simply apply another effect and change the animation.
Other Editing Tips About Final Cut Pro: How to Rotate Video in Final Cut Pro >>
Way#2: Zoom in A Clip-on Final Cut Pro Using Keyframes
If you want to quickly move the clips of images and add the movement effect, we recommend you to proceed with the Transform Effect which allows you the quick addition and editing of the zoom in a clip.
In Final Cut Pro you can also see the zoom effect but the fact is the Transform effect is a quicker option that does not limit your control and allow you to quickly add movement to video clips. If you want to use transform options, you need to add keyframes to your clips for enhancing scaling and movement.
Step 1: Adding Scale Keyframes
When you add keyframes to the transform tools you can make a lot of changes in the video including changing its scale, position, and rotation.
So if you want to get full control over II the whole movement of the video including how it moves, when it moves, and where it moves, you should proceed with keyframe scaling. Let's have a look at the main points on how you can do this.
First of all, decide where you want to start the animation and move the play head to that point. Now select the clip and bring it to the timeline.
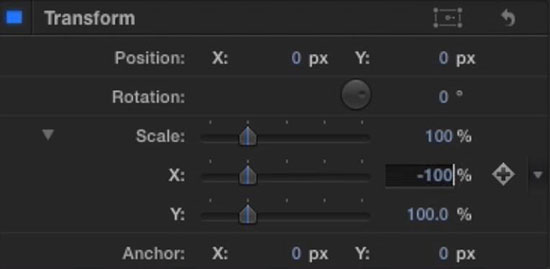
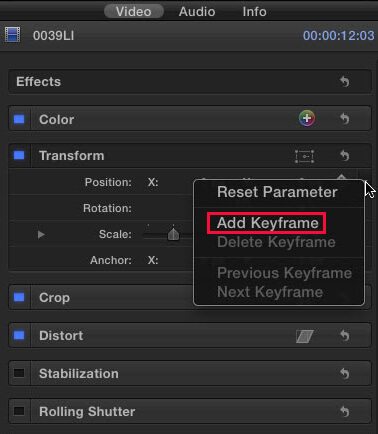
After bringing the clip to the timeline, you will see the Effects control option. Here you will find the Scale And Position settings by clicking on the transform menu.
Now see next to the Scale and Position settings where the Keyframe icon is present that will help you in setting the size and position of your clip.
In the next step, you have to move the playhead and bring it to the point where you want to end the animation. After that, you can create a second keyframe and make image adjustments accordingly.
Step 2: Learning to Adjust your Keyframes
After the addition of keyframes now you can see how to move the clips. However, the keyframes will not be immediately visible to you. Some people may want to add the keyframes at this stage if you want to do so you will have to open the video animation again.
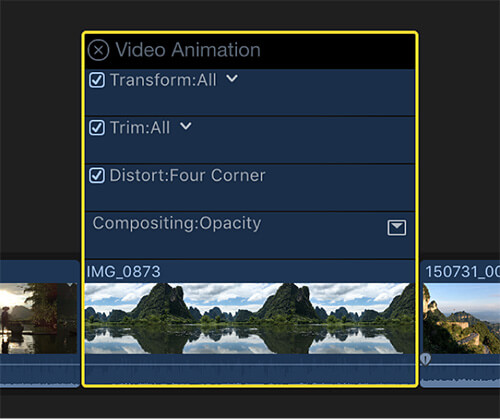
Go to the timeline and right-click on the video clip that you want to move and select the Show Video Animation option. After doing this, the keyframes will become visible.
If you want to see the particular keyframes, you will have to click on the dropdown option next to Transform All, then select scale and position to see only particular keyframes.
Dragging the keyframes along the clip will result in shortening or increasing the size of the animation. It is particularly helpful when you need to compare scale keyframes with position keyframes.
Other Editing Tips About Final Cut Pro: How to Speed up Video in Final Cut Pro >>
A Much Easier Way to Zoom in A Video Clip - iMyFone Filme
The zoom-in feature of the iMyFone Filme is very helpful and you can use it to target the particular object that you want to zoom. Moreover, it can also help you to zoom in on YouTube, Snapchat, or any other video.
Steps to Zoom in A Video Using Filme
Step 1:
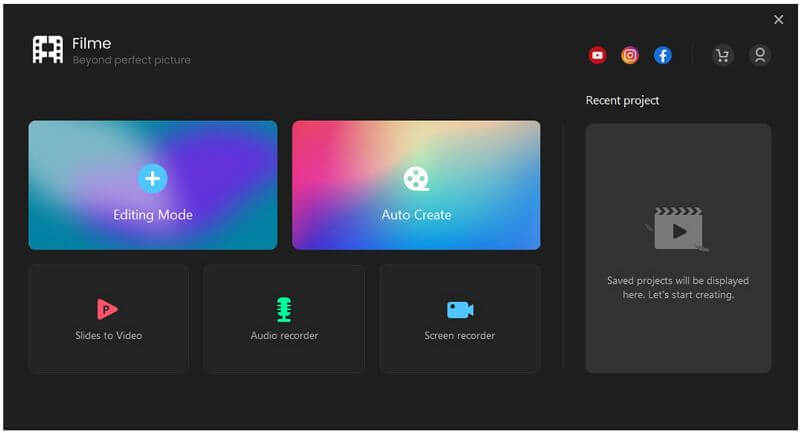
First of all, download and install Filme on your computer and click on "Editing Mode" to edit your video.
Step 2:
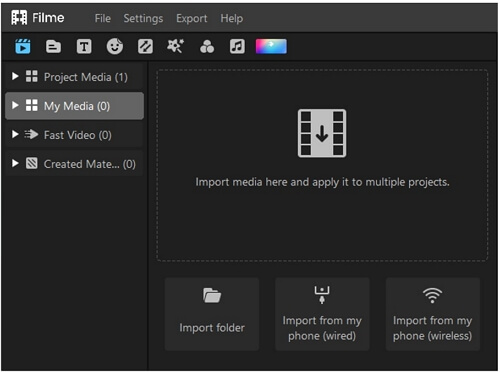
In this step, you will see the option to import the video to use the zoom-in feature of Filme. For this purpose, you will have to go to the media menu and select the video from the computer that you want to zoom. Here it is worth mentioning that if the video is not on your computer, then you can import the video from your mobile, you can use a USB or QR code.
Step 3:
Well, now you have imported the video, it is time to drag the to the timeline for detailed editing.
Step 4:
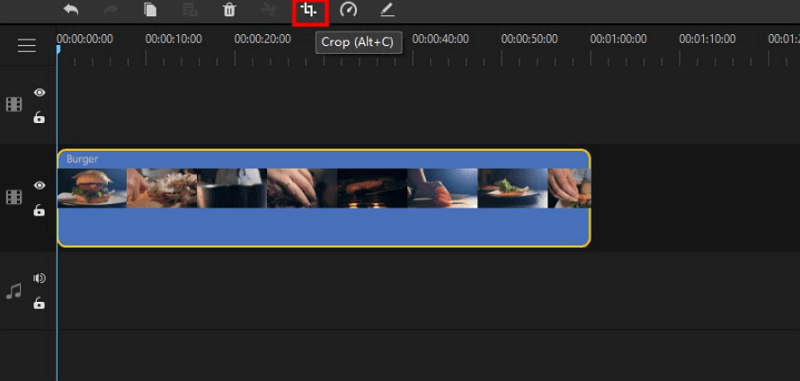
Now the video is in your timeline, select the video and look for the toolbar which is present above the timeline. Here you will see the Crop option. Then click on it.
Step 5:
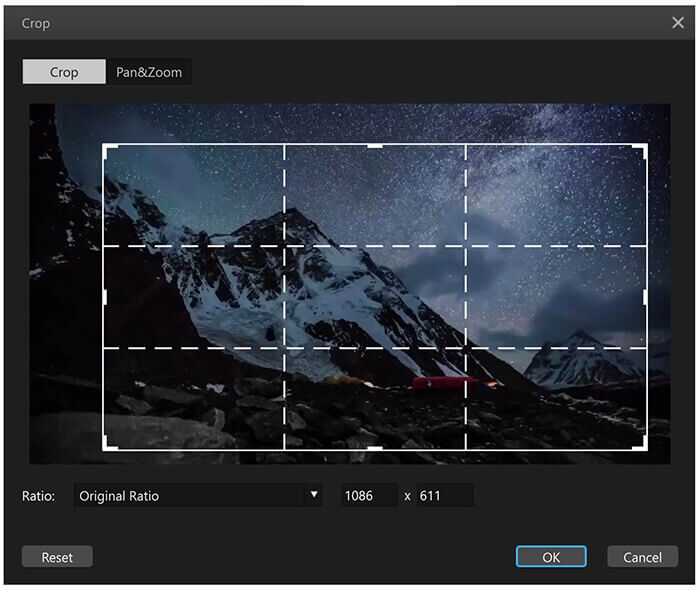
As you can also preview the video after applying the zooming effects. If you are not satisfied with that, you can always adjust the zoom effect. Remember that Filme is a unique software that allows you to zoom in up to 400%. Here you can also make the scale adjustments according to your preferences.
Step 6:
After you are satisfied with everything, export the video.
Other Video Editing Features Of Filme
As we know that Filme is an All-in-One basic video editing tool that has all the features like cropping, splitting, trimming, scaling, voice recording, color control as well as speed adjustment of the video or audio.
Allows you to add a variety of cool effects, filters, and transitions that make your videos more attractive and useful for the viewers.
By adding captions, text, subtitles, and text styles you can enjoy a variety of Editing options.
Thousands of templates are available that you can use for various video editing purposes. Moreover, it allows you to create awesome slideshows with Fast Mode.
This tool also has voice changer options that you can use to change the voice of different audios for your voice that you can record through a microphone.
This tool is super friendly for beginners. So whether you are an expert or a newbie, this tool is equally helpful for you.
FAQs about Zooming In and Out Videos
1. What is the difference between zooming in and cropping?
The main purpose of zooming is to retain more information in the image. However, cropping simply means zooming a particular portion of the video or photo by deleting unwanted parts or blurring them. So we can say that in zooming you do not delete the other pixels of the photo, just maximize the size of a particular portion of the photo or video.
2. How do I zoom in on a video in Windows 10?
If you want to zoom in on a video in Windows 10, you simply need to click on the "Zoom in" option from the "View" menu. Doing this will allow you to see all the minor details of the video.
3. How do I zoom in on a video online?
There are various free videos zooming platforms available online that you can use to zoom in or out your videos easily. Some of the most prominent and famous video editors that are used for zooming in on a video online include Flexclip, Video Studio Pro, Movavi, or Pixico. By uploading your video on any of these given platforms, you can choose any moment or shot for cropping and zooming.
Conclusion
Final Cut Pro x allows zooming in and cropping the video and has all the advanced features that you can expect. But it is not the only two out there in the market or on the internet. Various other tools are also available that you can access for free and enjoy detailed video editing options from trimming, cropping, zooming to adding filters and speed customization. Remember that this article is written with very extensive research on the best tool for zooming-in video and we recommend imyfone Filme because it allows you to access all the advanced and premium features entirely for free.


