Many times, we want to share our creation with the world, but face certain limitations due to the difference in format. Turning a presentation into MP4 format, enables others to view it using different apps like VLC and Windows Media Player. You can also upload it on social media platforms like YouTube. So, the question is, how to create a video in PowerPoint? Here is a step by step guide for you!
Part 1. How to Create a Video in PowerPoint
The question is, how to create a video in PowerPoint? We'll introduce how, but first let's understand how PowerPoint works.
1 Microsoft PowerPoint
We all have used PowerPoint at some point in our lives - for school or work-related presentations. It is a program by Microsoft, that can be used to combine text, graphics and multimedia content, to create detailed and captivating presentations. It enables you to include an illustrative backdrop for the content of your presentation, and even add animations to make the presentation more interesting and fuller of expression.
When you convert a presentation into a video, all the animations and effects are automatically saved just as you applied them. The only difference is that you don't have to click for the slides to change. However, you can set the timings for each slide, and it will play like a video according to the duration you have set for each slide.
2 How to Create a Video in PowerPoint?
The following steps will guide you on how to create a video using PowerPoint.
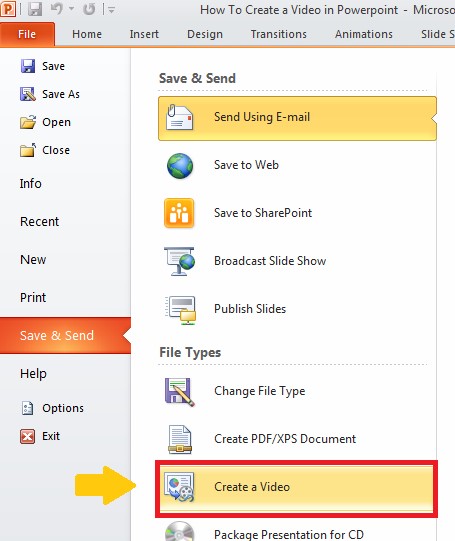
Step 1: Make a presentation on PowerPoint and save it in ".pptx" format. Then, click on "File", then "Save and Send" and finally select the "Create a Video" option.
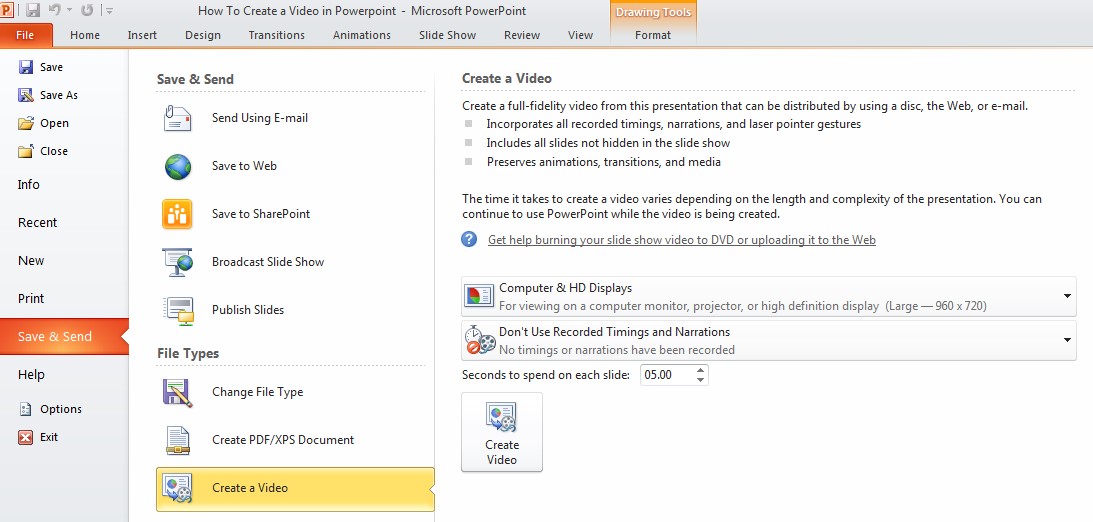
Step 2: When you click on "Create a Video", a menu will open up on the right. It will give you an option to select the quality and resolution of the video, according to the device on which you want to display it.
Step 3:
Once you've selected the quality and resolution, you can move to the other settings for narration and timings.
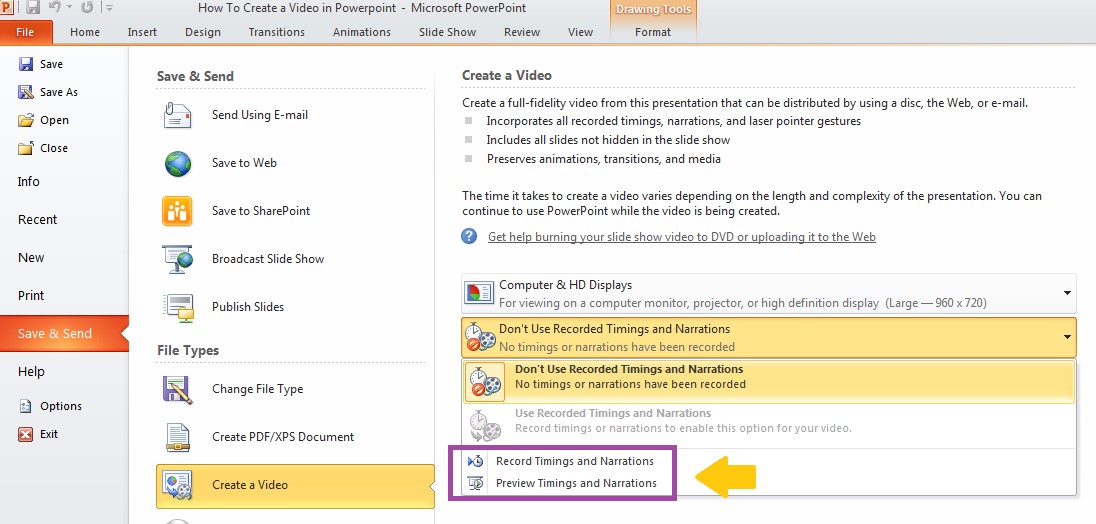
It will give you two setting options according to your presentation:
-
Don't Use Recorded Timings and Narrations. (When there is no timing or narration)
-
Use Recorded Timings and Narrations. (For default settings)
Below these settings, you will find the options of:
-
Record Timings and Narrations - By clicking on this option, you can set the timings and narrations of each slide.
-
Preview Timings and Narrations - This option shows you a preview of your presentation, according to your settings.
Step 4:
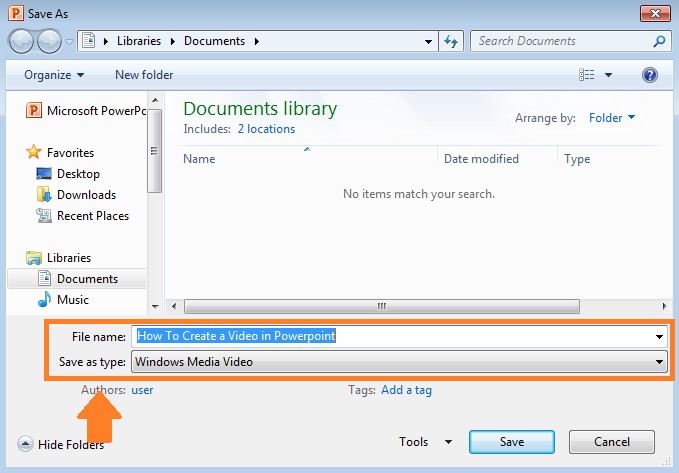
Once you have selected the desired settings, click on "Create Video". A "File name" box will appear. Here you can select the folder where you want to save the file. Don't forget to save the video as MPEG-4 Video or Windows Media Video.
Part 2. Frequently Asked Questions (FAQs)
Q1 What Kind of Video Quality Can I Opt for?
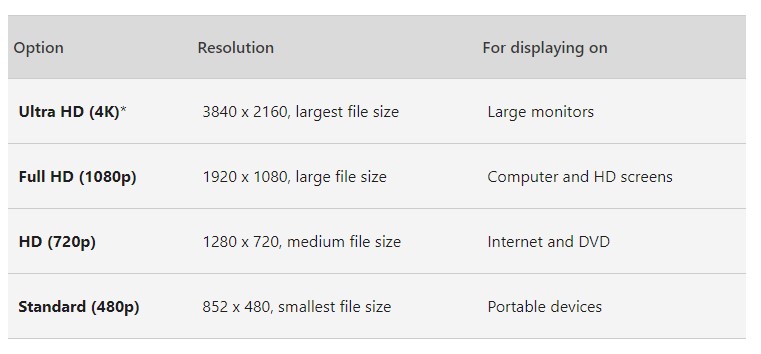
The video quality is related to the resolution of the finished video. This means that a high video quality results in a large-sized video. You can opt for the video quality, based on your displaying device. The following chart might help you out:
Q2 What Parts Won't Be Included in the Video?
When you convert your presentation into a video, some parts won't be included. This includes:
-
Media added in a previous version of PowerPoint. The media will play in the presentation, but won't be included in the converted video.
-
Quick time media
-
Macros
-
OLE/ActiveX controls
Q3 What Can I Do with My Video after Creating It?
Once you have successfully created your video in PowerPoint, it's time to share it with others. There are 3 ways to share your video:
-
Send it via email.
-
Save it to a file share location.
-
Save to the Microsoft video-sharing site by selecting File > Export > Publish to Microsoft Stream.

Part 3. Best Alternative Video Maker of PowerPoint
1 iMyFone Filme
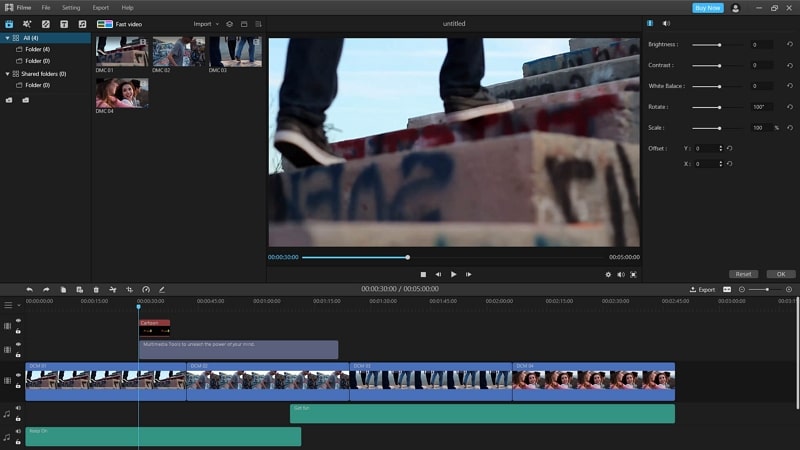
Although PowerPoint is the go-to program for anyone who wants to make a presentation, other software work just as well, like iMyFone Filme. It is a video editor made especially for people who don't want to get into the complexity of technical stuff for editing videos and creating stunning slideshows. It helps you create your video presentations creatively, so that they seem interesting to the audience.
2 How to Create a Video with Fast Video Mode in iMyFone Filme?
With just a single click, you can create an amazing video presentation in iMyFone Filme. The Fast Video Mode enables you to use the built-in, refined templates to create an astounding video or slideshow. You can also add music to make it exciting and watch-worthy.
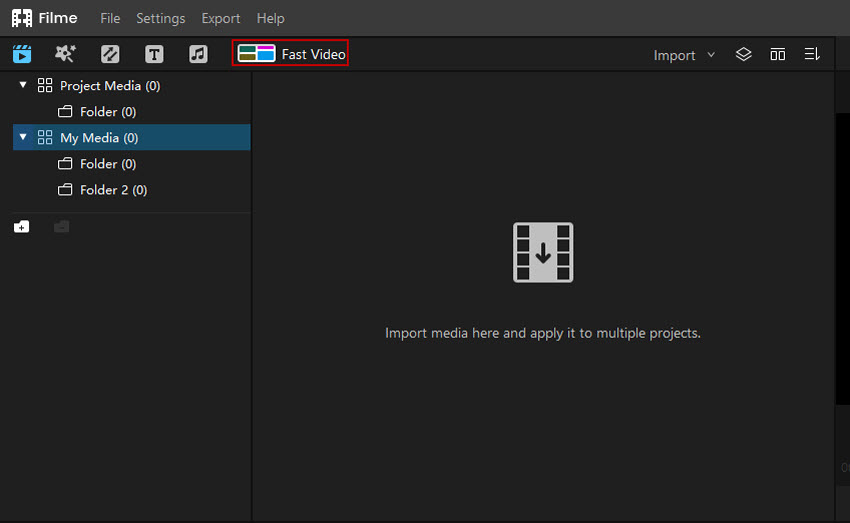
Step 1: Go to the media library and click on Fast Video. This will open the fast video mode.
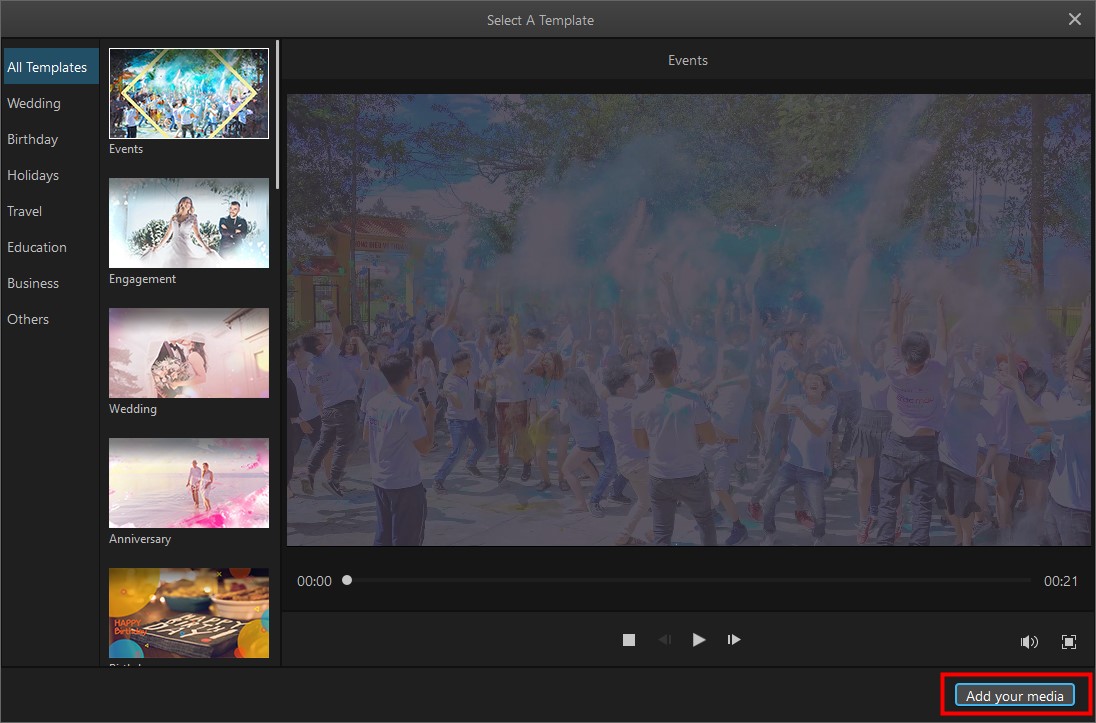
Step 2: Here you will find numerous built-in templates. Click on a template to preview it. When you have selected the desired template, click on "Add media".
Step 3: Click on "Import" to add individual or multiple files from your computer.
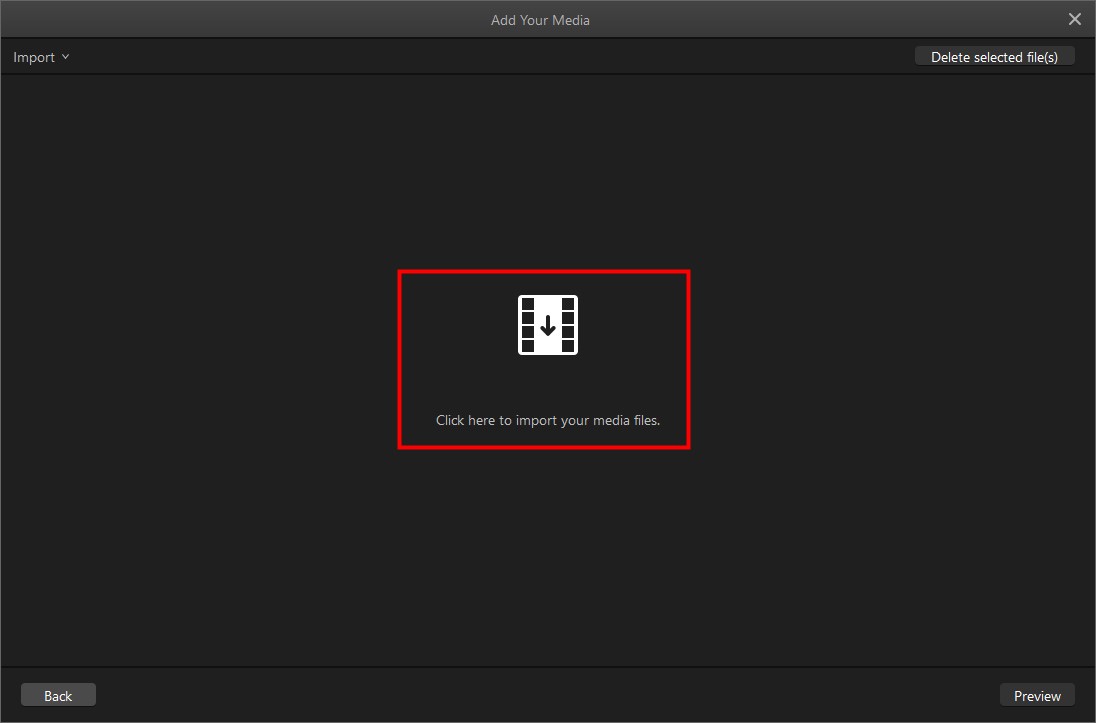
Step 4: Once all the files have been imported, you will see them on the interface. You can drag them around to rearrange the order.
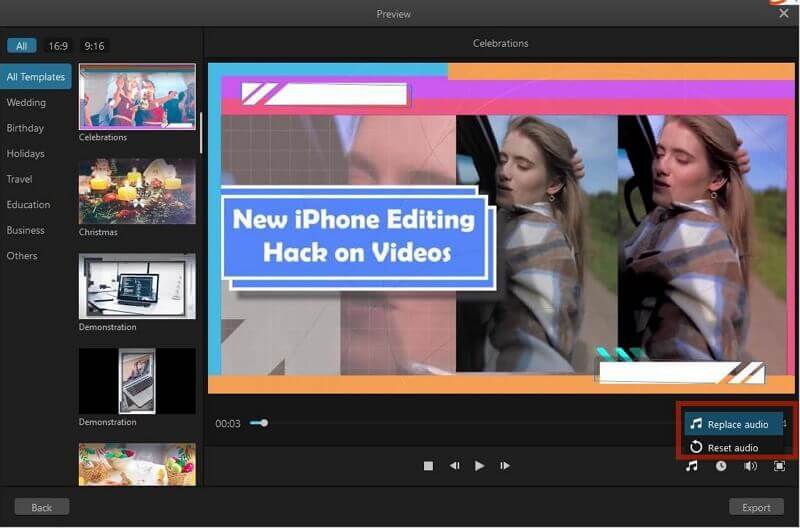
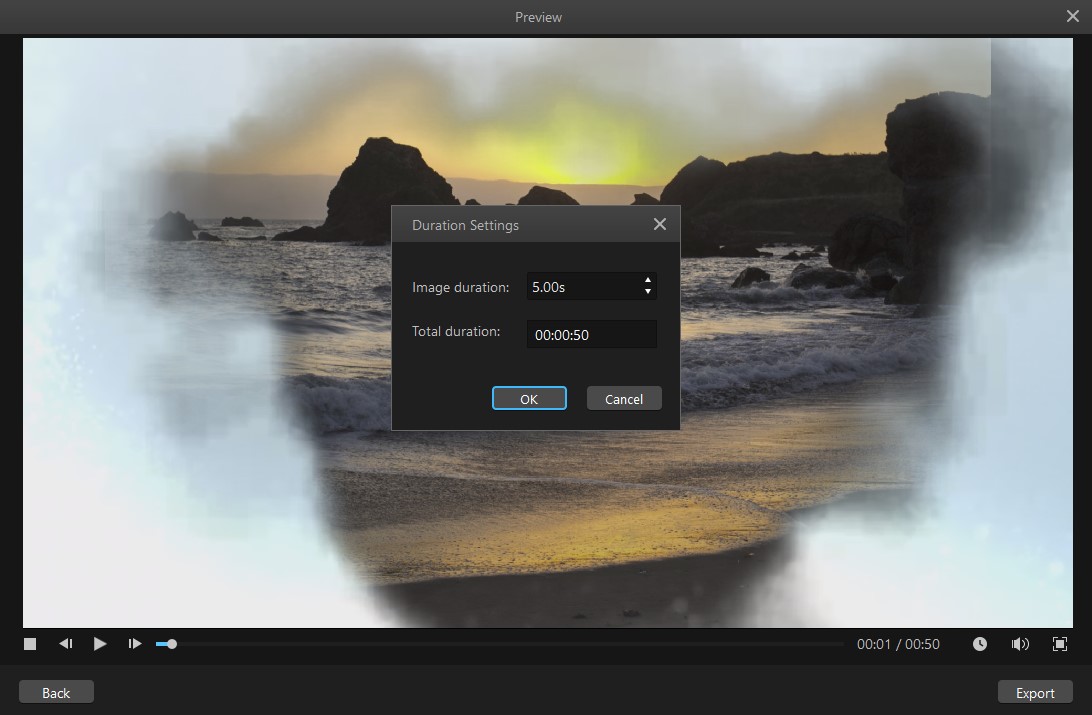
Step 5: Once everything is in place, you can preview the video, change the duration and adjust the volume. For the best results, it is recommended to go with the default duration. Finally, click on "Export" to finish editing.
Watch this video to see how to use Filme to create slideshows:
Final Thoughts
Microsoft PowerPoint is a universally accepted program used for creating presentations. It is easy to use and understand. But it's time you moved on to something with a variety of options and better features - iMyFone Filme. With this software, you are guaranteed to create magnificent slideshows, with unique templates that can add a wow factor to your video presentations.
So, get a free license for iMyFone Filme by sharing it with others, and enjoy the many exclusive features it has to offer.


