MP3 and MP4 are two different kinds of file formats that are used in iTunes. MP3 corresponds to an audio file, while MP4 corresponds to a video and audio file. MP4 file format is used to store while MP3 is used to store audio. You can play MP3 in the background on your iOS device while browsing through all other applications, but the same cannot be done for the MP4 file format. Converting MP4 to MP3 is useful in such instances. Let’s see how you can do that in a matter of minutes.
How to Convert MP4 to MP3 in iTunes
For many iOS users finding an application on the App store is sometimes difficult. Many applications available on the iOS platform used to convert MP4 to MP3 are paid, so even if you want to use it a single time, you will have to pay for a complete subscription. On the other hand, a few people know about this; iTunes can changes the format of your song or video from MP4 to MP3 in no time. All it takes are a few simple steps and a few minutes of your time. You won’t need any other application for this task ever again. Follow the simple steps mentioned below and learn how to do it.
Step 1. If you are using a Mac, go to the Apple Music App and look for its menu bar.
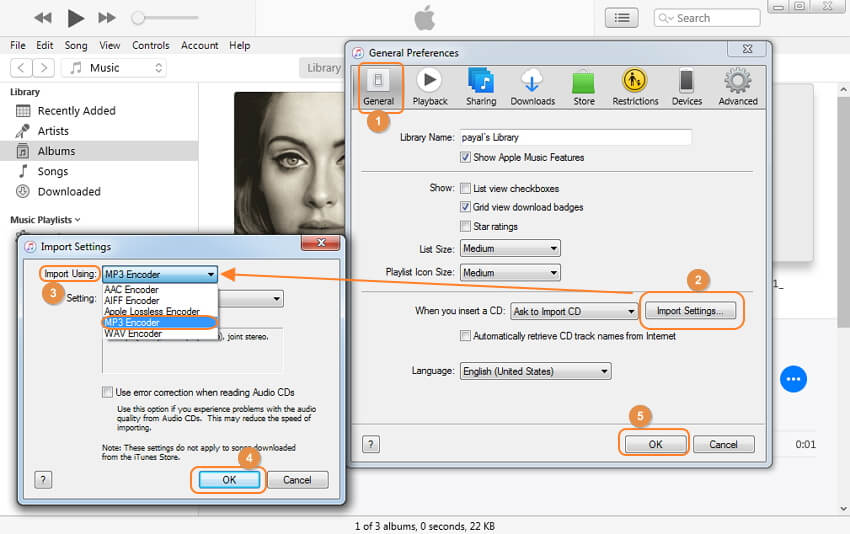
Step 2. After locating the menu bar, look for Music. Click on the Music option and then click on preferences.
Step 3. In the next step, click the files tab and then look for the option of Import Settings.
Step 4. In the next step, you need to choose the option Import Using. Once you select this format in the next step, you will need to select the format that you want to use for the conversion of your song.
Step 5. After choosing the file format for conversion, click OK to save these settings.
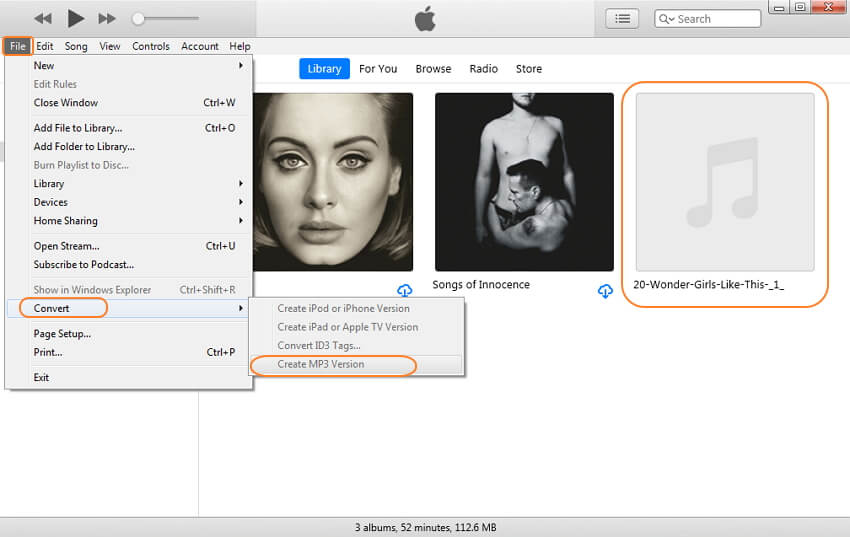
Step 6. 6. In the final step, go to the option Files and then select the option convert. For the last task, click on Create Version option, and you will see that the song with a new format shows up in your Apple Music App.
By following the above simple steps, you can change the format of your files anytime easily, but if you’re using a PC instead of a Mac, there is a slight change in the process. Let me show you the steps that you can use to convert the MP4 files on your PC to MP3 files.
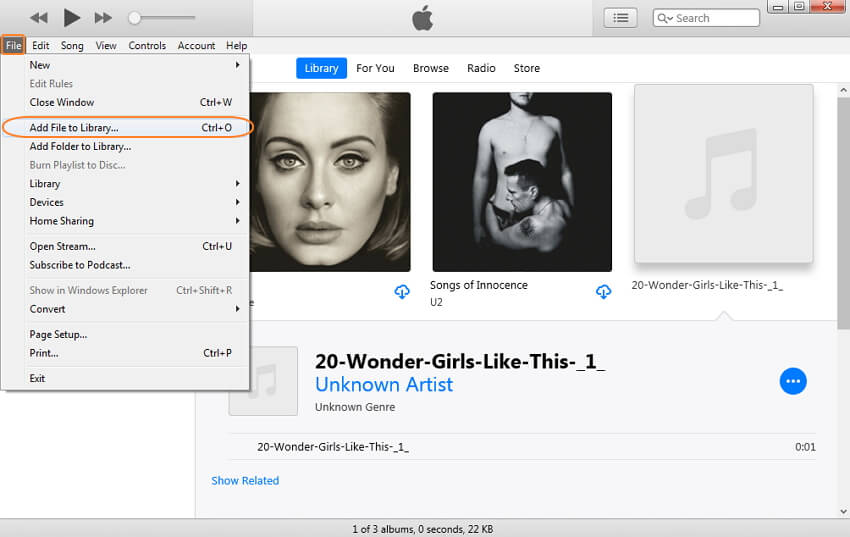
Step 1. Open the iTunes software on your PC that must be already installed.
Step 2. Then look for the option Edit in the menu bar. Once you locate edit, click on it and then continue to click on Preferences.
Step 3. After completing the second step, look for the general tab and then continue to click the option of import settings.
Step 4. In the next step, you need to select the menu adjacent to Import Using.
Step 5. Now, you need to select the format for the file that you want to use for conversion. Select the MP3 format and then continue to the next step.
Step 6. Click OK to save the settings and then select the songs already present in your library to change their format.
Step 7. Click on the Choose File and then select Convert and finally click Create Version. A copy of the file with MP3 formatting will appear in your music library.
Easiest Way to Convert MP4 to MP3 on Windows/Mac without iTunes using iMyFone Filme
If you do not have iTunes installed on your PC or Mac, there is no need to worry. iMyFone Filme is a wonderful application that is available on both Windows and iOS platforms and offers you a ton of features, in addition to easily changing the videos from MP4 to MP3. With the amazing software, you can change the format of your videos in just 3 seconds, and the best thing is that it is really simple and easy to use. It has a user-friendly interface and various functions that allow you complete control over how you want your file to turn out.
Using iMyFone Filme, which leads the list of the top MP3 converters, is as simple as riding a bike. Just follow the steps mentioned below to easily change the MP4 files to MP3 files in a matter of seconds.
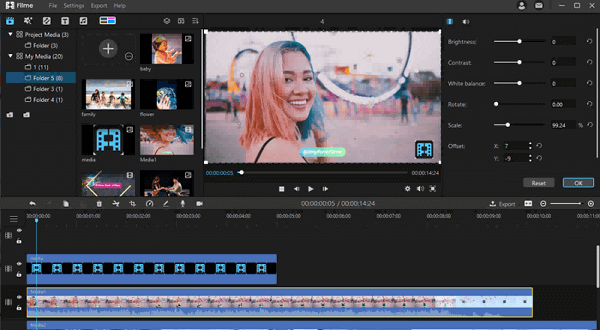
Step 1. Import Source Media
iTunes works only when you have the media in your iTunes library, which needs to be synced every time, but with iMyFone Filme, you can import any MP4 on your storage and change it to MP3. Open the iMyFone Filme app, and then in the menu bar, look for the import option. Click on the option and then select the media. It will be imported into your application.
Step 2. Add media to timeline
In the next step, you will have to drag the media you selected into the application's timeline to continue the process. Click on the media and simply drag it into the timeline or also right-click on the media and click move to timeline to add your selected media to the timeline of the iMyFone Filme application.
Step 3. Convert Video to MP3 in 3 seconds
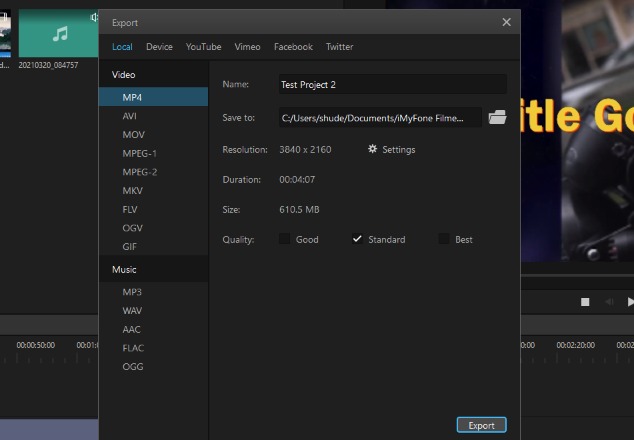
Once the MP4 file has moved to the timeline, you can change MP4 into an MP3 file in just three seconds. In the last step, just click on the option export as audio, and you select a destination location to save the audio file. Simple as that, you have created an MP3 file from an MP4 file.
Key Features
-
Easy to Use
Even for a newbie, using this application is like a piece of cake. You can understand all the functions of this application in a matter of minutes and edit your files however you like.
-
Quick and High-Quality Video Editing
Some software allows editing, but they reduce the quality of the video. iMyFone Filme, on the other hand, provides excellent quality videos and saves you a lot of time.
-
Cup of Tea
If you are an Instagrammer or a Gen Z member, you will find the use of this software the easiest thing that you do all day.
-
Effects and Transitions
It has more than 20+ different video modes, 110+ transitions, 170+ filters, and 50+ different audios.
-
Social Media Editing
You can edit videos for all the social sites such as Facebook and Instagram in a matter of seconds and then upload top-quality videos on your account to get a lot of views.


