Chromecast can be defined as a media player that is digital and it was developed by Google. It is a dongle which the user plugs into the HDMI port of the TV in order to stream all of one's media files as well as your media content but on your TV screen. You have an option of casting your computer or smartphone with your Chromecast and also use your computer or smartphone as a Chromecast remote. You can then stream high-definition TV shows and movies alike. Let's check out how to effectively cast a slideshow on Chromecast connected TVs.
Note
If you want to make your slideshows more special, iMyFone Filme would be the best advisable video editor for you. It is super easy to use even you are new in video editing. You can try it now for free!Part 1: How to Cast Slideshow on Chromecast Connected TV
The process of casting slideshow on Chromecast is not complicated in any way whatsoever. There are two known ways to do this:
1. Google Photos on Smartphone
To play a slideshow from your smartphone on Chromecast TV, you must use the Google Photos app and follow the steps below:
Step 1: Ensure you connect your Chromecast device to your TV.
Step 2: Connect your Chromecast device as well as your smartphone to the same WiFi network.
Step 3: On your smartphone, open the Google Photos app.
Step 4: Using your Google account, log into your google photos app.
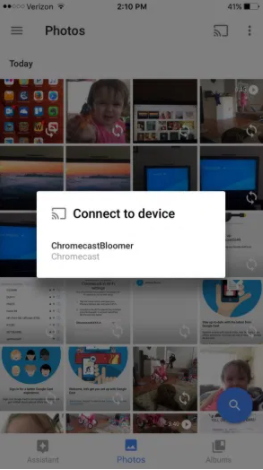
Step 5: There will be a cast icon appearing on the top corner to your right of the app screen. Click on that.
Step 6: It will then scan for the available Chromecast device. From the search result, select your Chromecast device.
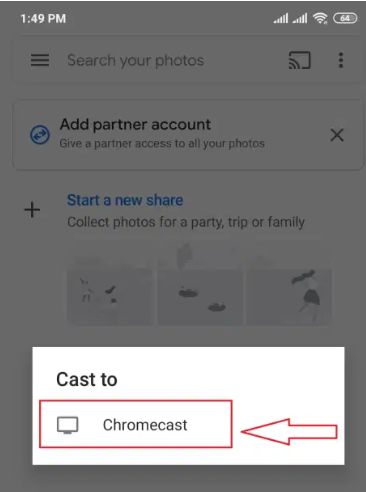
Step 7: Your mobile screen will by now be displayed on the Chromecast that is connected to your TV screen.
Step 8: Select the photos which you intend to play on the slideshow.
Step 9: On the top right, click on the + icon.
Step 10: You can now select animation and it will slideshow all of the photos you had selected.
2. Chrome Browser on PC
It is possible for you to slideshow your selected photos on Chromecast from your computer by following the steps below:
Step 1: With the HDMI port on your TV, plug in your Chromecast.
Step 2: Connect your Chromecast device as well as your computer with the same wifi network.
Step 3: Open your Google Chrome Browser and then right-click on it.
Step 4: Click on the cast option.
Step 5: It will scan for the available Chromecast devices.
Step 6: Click on the drop-down menu written as Source and then proceed to select cast desktop.
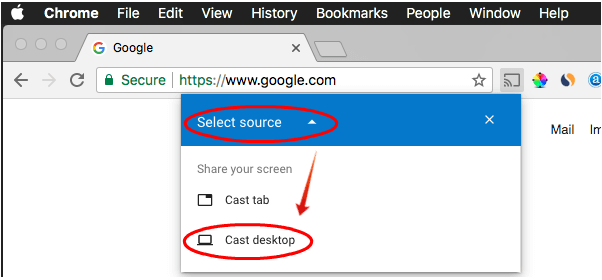
Step 7: You then choose the Chromecast device that is yours. Your desktop is then connected to the Chromecast device you just chose.

Step 8: Go to the folder where all your photos are and open it.
Step 9: Select the photos that you want to be part of your slideshow.
Step 10: From the top menu bar, click on the manage option.
Step 11: Click on the option that says slide show.
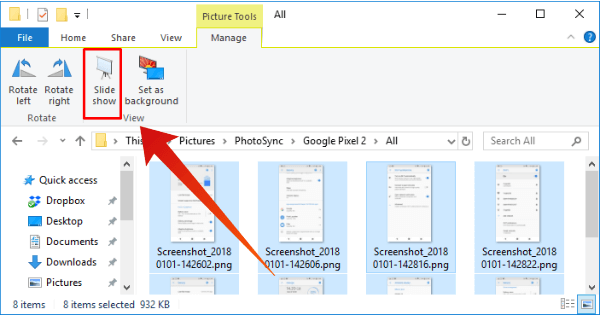
Step 12: The slideshow will now be seen on your TV screen.
Part 2: Chromecast Supported and Unsupported Video Formats
By default, Chromecast supports very few video formats such as MP4 and WebM. It also supports others such as MPEG-DASH, HTTP Live Streaming (HLS), and smooth streaming. Any other video format is unsupported by Chromecast. Below is a brief introduction to the information that is concerning the devices that are supported and unsupported by Chromecast.
The video formats that are supported by Chromecast include:
-
I. MP4- It is mostly used in the storage of video as well as audio files. The MPEG 4, otherwise known as MP4 video files typically use the standard extension of the .mp4.
-
II. WebM- This is a video format that is open and which allows the public to stream videos and audio.
The video formats that are unsupported include:
-
I. AVI- the Audi Video Interleave is the most used format for video/audio data on a general PC. It is a format with the multimedia container with video as well as audio.
-
II. MKV- The Matroska Multimedia Container. It holds audio, picture, video, or even subtitle tracks in a single file.
-
III. FLV- The Flash video formats refer to video files that are normally streamed using the Adobe Flash Player and over the internet.
-
IV. MOV- This refers to a file format that is multimedia and therefore contains either one or multiple tracks of data, for example, text, audio, or video.
-
V. VOB- This in full refers to Video Object. The VOB files are simply DVD-Video file formats. They contain, however, digital video, subtitles, and audio which are relevant to DVDs.
-
VI. 3G2- This refers to a container video file for video, audio, and also text which is simply an extension of MP4.
Part 3: How to Stream Format-Supported Videos to Google Chromecast
There are a variety of ways that one can stream the supported videos with the use of a Chromecast media player. The information offered below gives you intel on how to connect using a mobile device, a computer as well as through Youtube, the app.
1. Connect with your Mobile device
To stream videos with the use of your mobile device, the steps to be followed are:
Step 1. Download the Chromecast app on your Ios or Android tablet or smartphone from the App Store or Google Play.
Step 2. Open it. Your mobile device should be connected to wifi and not cellular data. Also, you must ensure you have the most updated app installed and you should be using the same network that the Chromecast digital media player is using.
2. Connect with your Computer
With Chromecast, you have the option of streaming videos on your TV either using your PC or MAC that is running the Chrome browser. The chrome browser is the only browser with which Chromecast has compatibility. The steps to successfully do this are:
Step 1. Open your Chrome browser on your selected computer and set up the Chromecast.
Step 2. To your computer, download the Chromecast app.
Step 3. Choose any of the instructions below which is most applicable to your computer.
-
I. If operating a Windows computer, save the file first then proceed to run the Chromecast app. After this, follow the instructions to complete the Chromecast setting up.
-
II. If you are working with a Mac OS X computer, you will need to drag and then drop the Chromecast app into the folder that has your applications. You will then open the folder and run the application. Afterward, select the device that is of the Chromecast. You then follow the instructions to finish the setup process.
3. Connect with YouTube
The steps to be followed are:
Step 1. On your HDTV, connect an available HDMI slot that should be already connected to your Chromecast device.
Step 2. After successfully connecting your Chromecast digital media player to your TV, the Chromecast Home screen will show the name of your Wi-Fi at the screen bottom.
Step 3. After this, go ahead and download the app for YouTube on your Apple or Android smartphone or tablet.
Step 4. You should now connect your Apple or Android device to the Wi-Fi network that your Chromecast device is connected to.
Step 5. You can now open the app for YouTube on your Apple or Android device. You then click the cast button to start streaming videos.
Part 4: Want to Make Your Slideshow Video More Special? Use iMyFone Filme
The point of focus in this article will however be on the creation of slideshows and the various formats included.
We can all agree that photo slideshows are the best way to put all your most memorable moments into a unique collection. If looking into making your slideshows more special, iMyFone Filme would be the best advisable video editing software. You can make beautiful nature photo slideshow, family slideshow and so on. You do not need any editing skills as Filme is super easy to use.
- Multiple editing modes - the application offers a wide range of editing modes to allow users to manipulate their videos and come up with satisfactory content for their target audience.
- Quick slideshow maker -this feature enables users make slides of different content. Users can use the application to make work or school presentations slideshows that are well edited.
- Adjust speed -this tool enables users to fasten or slow down the video according to the speed they like.
- Picture-in-picture effects - the effects allows users to have pictures in pictures, such that there can be a background picture and then the user can add another picture on top.
- Audio and text options - the application allows users to add texts on to the video at specific parts and audio such as music, own voices or reaction videos.
- Transitions - the effect allows users to manipulate the video by adding one video to another.
Professional Features:
How to Make Stunning Slideshow Video Using Filme
Method 1: Use One of the Pre-designed Templates
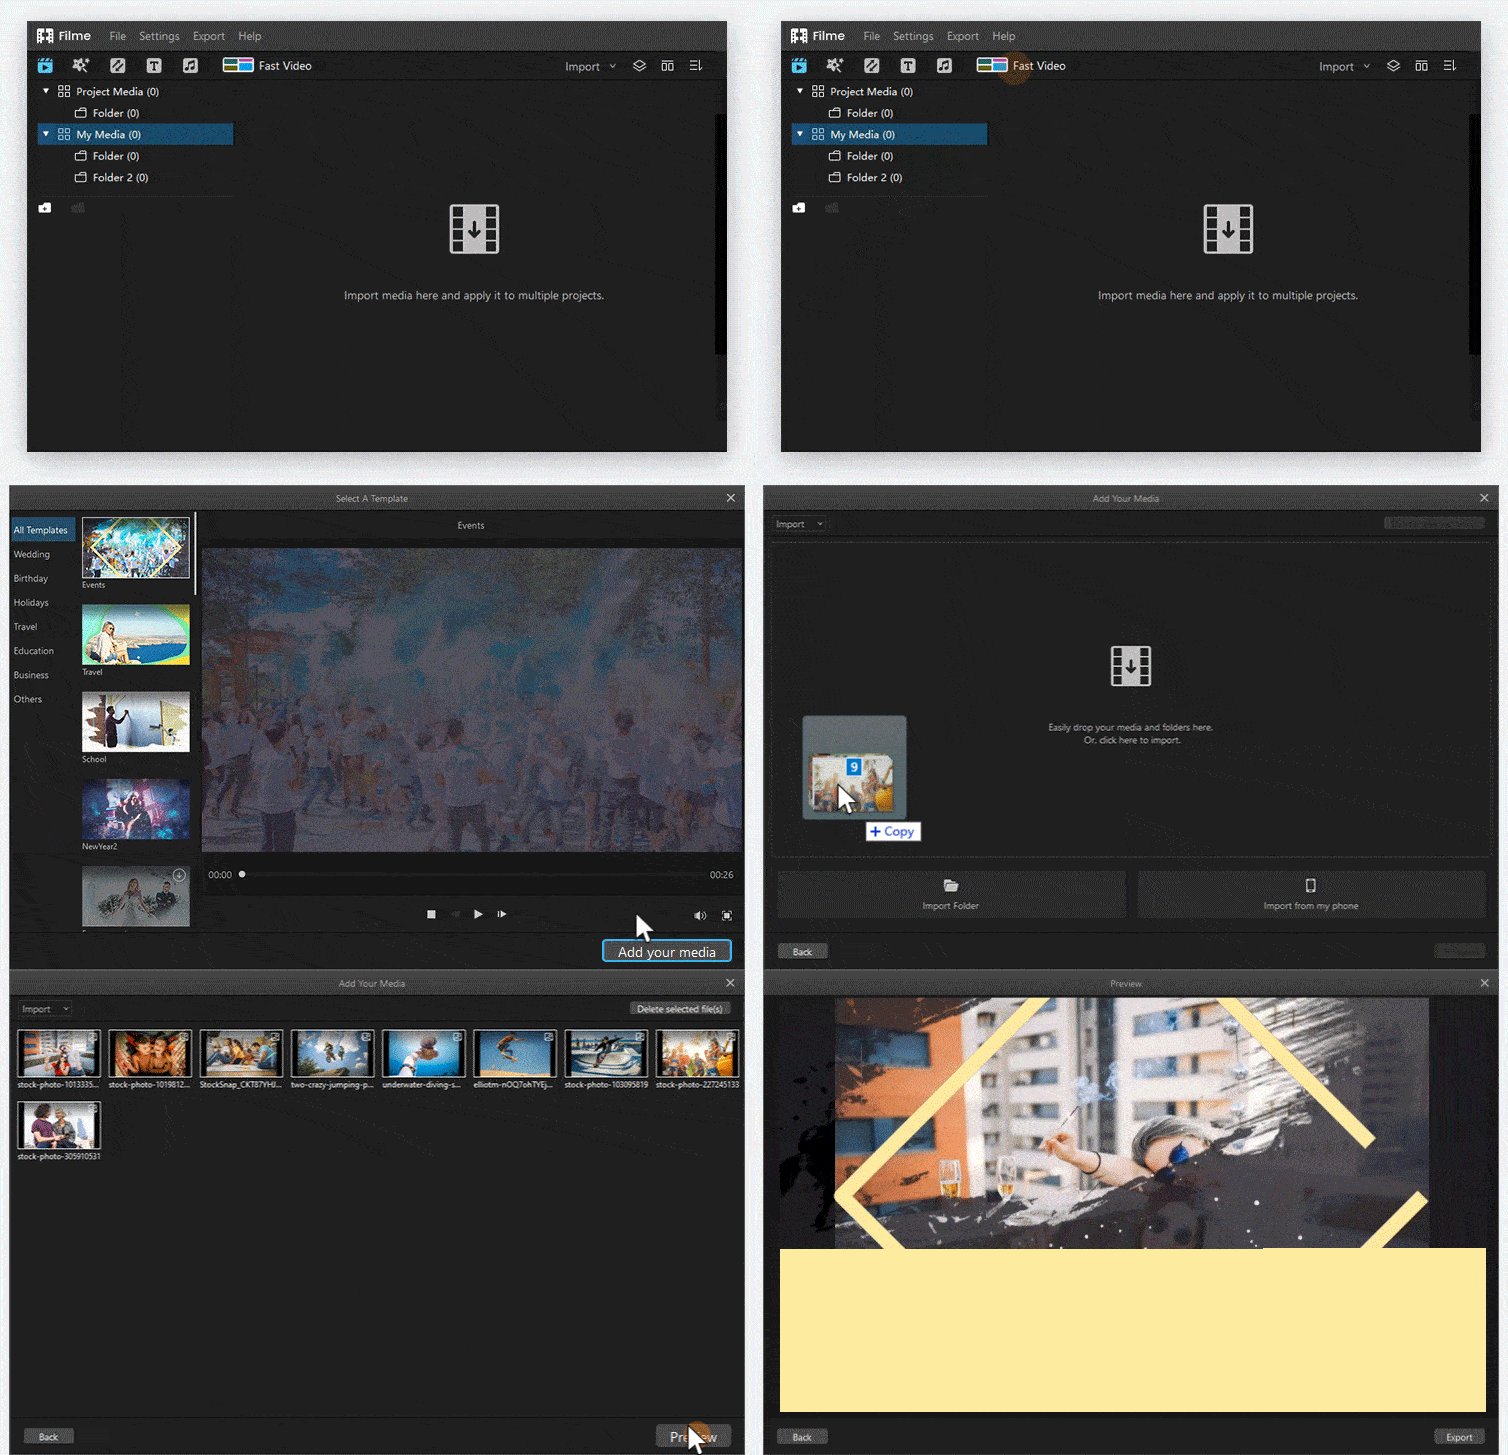
Step 1. Press on the fast video option at the top of the app.
Step 2. Select the kind of a template you wish to use. If you want to make a birthday slideshow, choose the pre-made templates for the theme and you will find making a slideshow cannot be easier.
Step 3. You then click on the add your media and import your photos.
Step 4. Click the review option and this will also allow you to change the background music and adjust the volume.
Method 2: Customize Your Slideshow the Way You Want
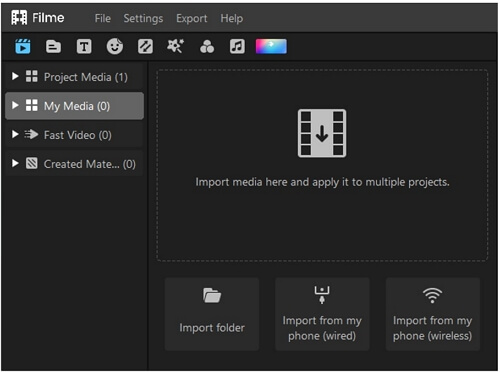
Step 1. Import the desirable photos to be in your slideshow to Filme first. You can either drag and drop all the necessary files into the media library, import entire file folders from your computer or even transfer the photos by connecting your phone to your desktop via USB cable.
Step 2. Add background music to increase the aesthetic of your slideshow. You can either use the music tracks available on Filme or import your audio tracks. Choose the best suited songs for your slideshow using the 50+ editable soundtrack in Filme or consulting to the list of top songs, for example, you can refer to the top songs for kids growing up when you want to give your kids surprise.
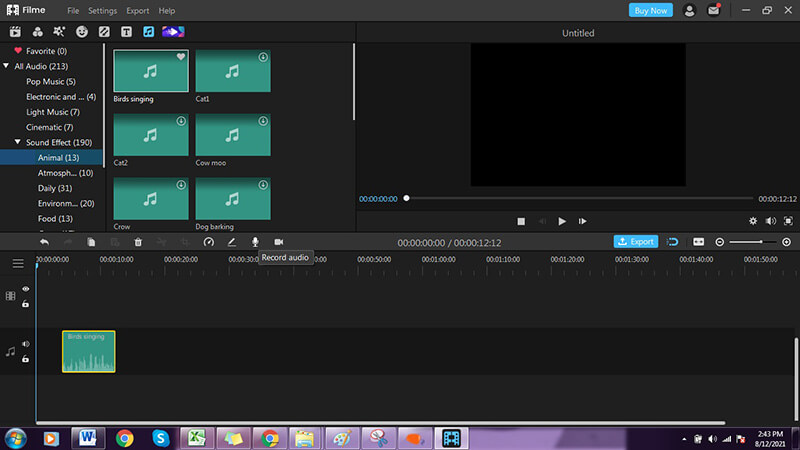
Step 3. You will then drag all your photos into the timeline and adjust the duration of the photos depending on the rhythm of the song you chose.
Step 4. Make adjustments to the photos. You can brighten and resize the photos, zoom in and out of the photos, add stickers, filters as well as other effects, and even adding transitions to your photos. You can also add texts and titles to your photos in the slideshow.
Step 5. Once you are done, you can export in Chromecast supported formats and share your edited slideshow.


