Often there is a need for screen recording to save shots so that they can be previewed later. 60 fps screen recorder windows feature helps video recording and allow you to save your favorite videos. This helps you with your office presentations or online lectures. There are several apps and tools for windows screen recording with a screen recorder 60fps free usage feature. Let us talk about the best screen recorder for pc 60fps in detail.
Part 1: Useful Built-in Tool: 60 Fps Screen Recorder
The Windows free screen recorder 60fps allows you to capture your screen footages quite easily. Screen recording using these useful built-in windows tools involves just a few simple steps, which include:
Step 1: Open the Settings App
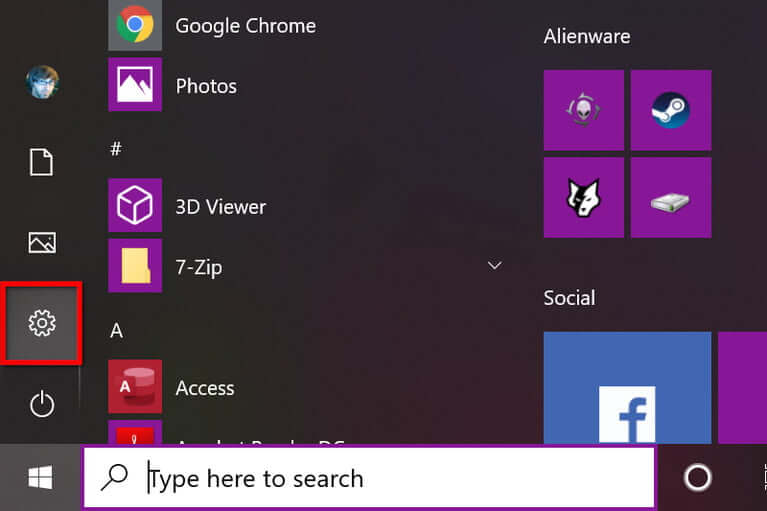
Firstly, click on "start" and then the gear icon present in the Start Menu. Or select the All Settings Tile and click the notification icon appearing in the taskbar. This will open the Settings app.
Step 2: Choose Gaming Option
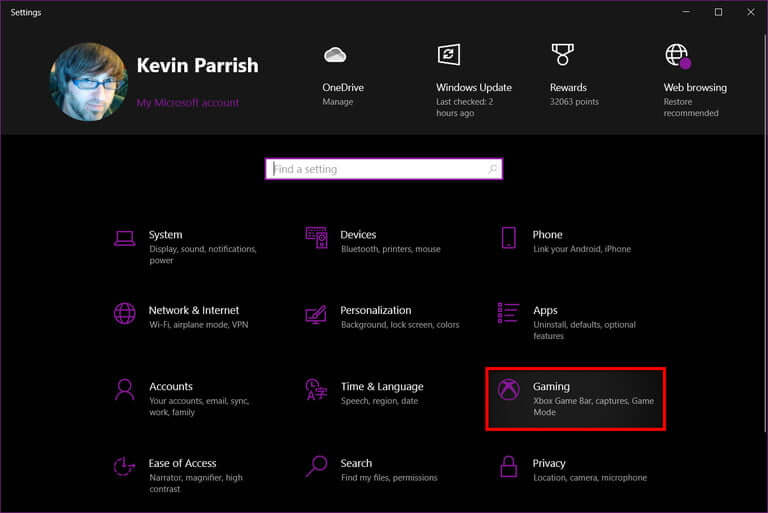
From the Settings App, choose the Gaming option
Step 3: Loading the Game Bar Section
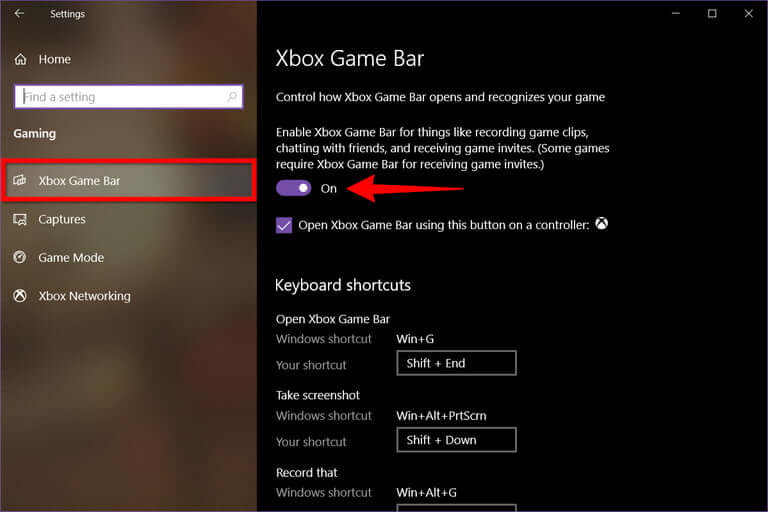
It is by default that the Game Bar section opens. Make sure that the toggle is set to "ON" settings. If it says "OFF," click on it to turn it on.
Step 4: Adjust the Customization Options
Now on the left, a list appears. Choose "Captures " from that list. Also, adjust the Customization settings as per your requirements. You can also choose to change the location where you want your saved recordings to appear. You can also enable background recordings with the help of 60fps screen recorder pc settings.
Step 5: Open the Game Bar
Use the keyboard shortcut Win + G to open the Game Bar.
Step 6: Change the Settings
On the top center edge of your screen, the Game Bar will appear. It has different buttons that allow you to access different settings and overlays. These include:
- The audio settings
- The capture button
- The performance score
- The widget menu
- The gallery
- Other settings
Step 7: Start the Recording
To start the recording process, type the Win + Alt + R key combination. Repeat the same when you want to stop the recording. You can click the Start Recording button with a round appearance for starting the recording on the capture overlay. The purple button appearing in front of you works as the stop button.
What you need to know is that all your recorded videos will be saved in MP4 format. You can access your recorded videos from the File Explorer section. Choose This PC from the menu, go to the Capture Folder, and access videos.
Part 2: Functional Third-Party Software: Record Screen with All-in-One Screen Recorder & Video Editor
iMyFone Filme
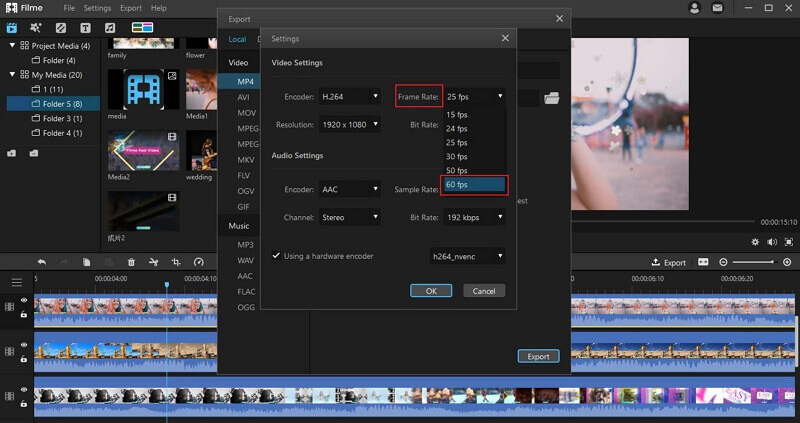
You can easily record your screen with the help of iMyFone Filme. This great screen recording software offers you the recording feature and helps you edit these recordings as per your choice.
The best thing is that you can choose to edit the recordings right at the moment or even later if you want to. iMyFone Filme has a wide variety of themes and templates that make video editing easier for you. Let us start with the features and advantages of iMyFone Filme to provide you with a better idea of how it works.
-
Easy interface
It comes with an easy interface that can be used without stressing your mind. This interface is great for beginners as well.
-
Dual functioning
The dual-functioning feature of iMyFone Filme allows you to record the screen and also edit your recording.
-
Free to use
iMyFone Filme has free designs and built-in templates, which doesn't ask you for any additional charges. So you can easily access these templates and designs totally free.
-
Efficient backup
This software is featured with efficient backup to ensure that your recordings are protected even if you lose them accidentally.
-
Instant preview option
You can use iMyFone Filme for instantly viewing your recording. This helps you view your recording as soon as you are finished with it.
-
Audio supported
iMyFone Filme has an audio enabling feature that allows you to add audio to your screen recordings resulting in a better audience engagement.
Key Features
How to Record Your Screen using iMyFone Filme?
Recording the screen using iMyFone Filme is a simple process involving a few easy steps. These include:
Step 1: Record Your Video with 3 Clicks
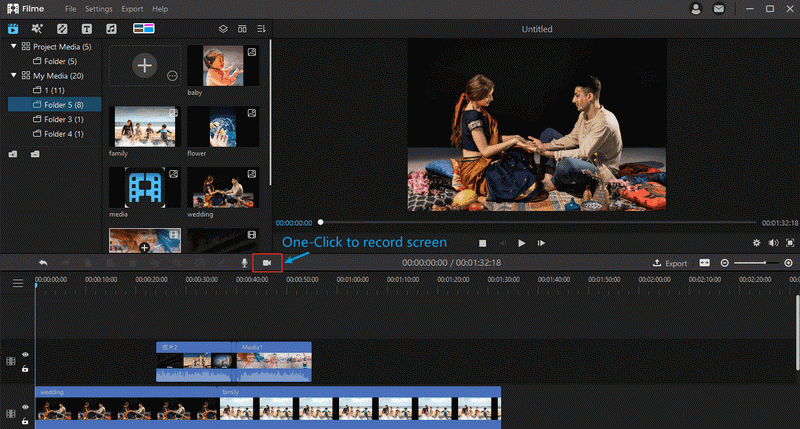
To record your screen using iMyFone Filme, first of all, you have to unlock your screen. Then open the app or the page where you want to record your screen. Now for starting the recording, click on the recording button. Once you have recorded your desired data, stop the recording by clicking on the stop button.
Step 2: Get the Video in Your Media Library at Once
Go to the media storage to access your recorded videos. All the recordings get saved there automatically.
Step 3: Cut the Videos, Add Filters, and Add Music and Text
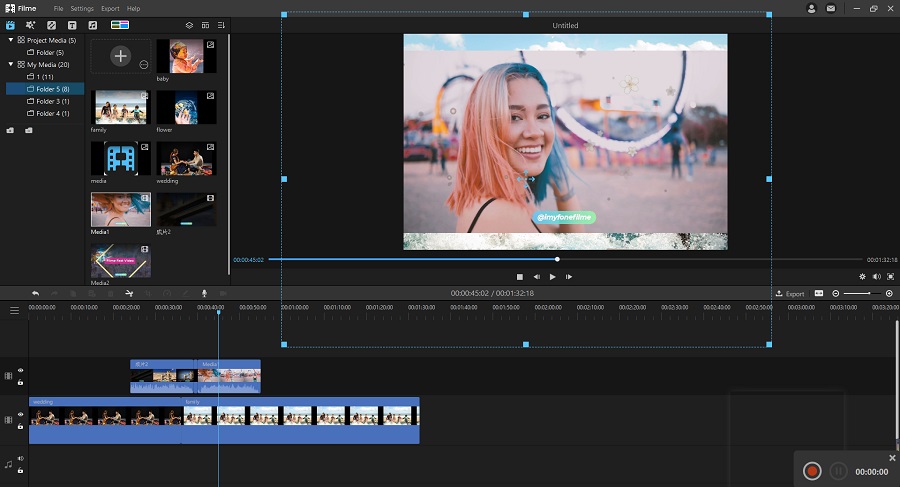
With the help of iMyFone Filme, you can crop, cut, apply filter and add a theme to your recordings. It also allows you to change the font style and colour used in your recordings.
Step 4: Export and Share Your Slideshow
Export the saved recordings from the media storage to your phone or other social media apps.
Part 3: How Do I Choose the Best Frame Rate for My Video?
The frame rate, or how quickly you "flip" through the book, is the pace at which those photos are shown. It's normally expressed in FPS (frames per second). For choosing the best frame rate, consider these factors:
1. Realism/ Style
The frame rate for the video has a significant effect on its appearance and feel, which in turn defines how realistic it looks. Things will start to look awkward if you select a frame rate that is too high. If you select a frame rate that is too low, the video will become choppy.
24 fps – This is the norm for movies and TV shows, and it was determined to be the minimum speed required to capture video while still preserving realistic motion.
30 fps – This has been the norm for television since the beginning. The extra frames per second will also help videos with a lot of motion, such as sports.
60 fps – Anything faster than 30 frames per second is typically used to produce slow-motion video or capture video game footage. Furthermore, as technology advances, many smartphones are now capable of shooting at 60 frames per second.
2. Motion
However, capturing at a higher frame rate means that the amount of motion captured is captured in greater detail. The higher frame rate also gives you more editing options.
30 frames per second (fps) – You'll see more clarity in fast-moving scenes;60+ frames per second – Anything faster than 30 frames per second is generally reserved for slow-motion filming of busy scenes with a lot of movement.
3. Delivery
The frame rate options you have are greatly influenced by how a video is transmitted, such as via YouTube or broadcast television, and the computer a person uses to view your video. It's best to check before you start filming because not all devices and distribution methods endorse all frame rates.
4. Streaming Video on the Internet
The screen refresh rate on older computer monitors might not be capable of handling higher frame rates. Television is an excellent source of information.
It's best to keep your video for television production between 24 and 30 frames per second. This means that your videos are as realistic as possible.
Television
The frame rate should be held at 24 frames per second. This will give your video a more "cinematic" appearance, and you can be assured that it will display properly on most projectors.
File Projectors
The stiller images packed into each second of the video, the higher the frame rate. More images imply more data, and more data imply larger files and longer export times.
When uploading videos to online streaming sites like YouTube, this is particularly important to keep in mind, appearance, Vimeo, and Screencast are two options.
Part 4: Top Screen Recording Tips That Will Rock Your Audience
You can improve your screen recording experience by following these great tips.
Prepare an Outline before You Start
Having a prepared outline will help in an uninterrupted screen recording experience because the outlines will save you from getting confused during your recording.
Make Sure It's Quiet
The recording environment has an important contribution to the overall quality of the recording. So what you need to ensure is that the recording environment is free of background noises and other disturbing sounds.
Practice Makes a Man Perfect
The best tip for a smooth screen recording experience is to practice your recording script again and again. This will help in filling the recording apps making recording smooth and maintaining its flow.
Choose an Appropriate Length
Another great thing to consider about your recording is its length. The audience never enjoys too long recordings. This will fail to engage your viewers and cause a significant decline in your user engagement. Make sure to keep your recordings to a considerable length so that they don't bore your viewers.
Audio Quality Matters
The quality of the audio that you are adding to your recording contributes to the final results of your recording. People always love to listen to HD audio quality rather than keeping themselves stuck to videos with a lot of audio distortion. Also, never forget to set different audio quality options for your listening so that they can choose the one that suits them the most.
Speak Slowly
We are always in a race and want to get things done instantly. But this is not preferable when it comes to recorded videos. People would only invest their time listening to the recordings that have been given proper time in their making.


