Do you want to slow down a video? After shooting the video, how many times did you realize that it would have been great if it was slightly slow? Of course, you'd have thought that way many times.
To convey a little bit of complicated things to understand, you may need to slow-track your video to help the audience get the point you're making.
To slow track your video clip, you'd need to look for a video editor with reliable output. Adobe Premiere Pro has been a massive hit over the few years, and people tend to utilize it to slow down the video.
In this article, you'll learn how to slow down a video or an audio clip using Adobe Premiere Pro. We'll also mention an alternative to Adobe Premiere Pro.
Part 1. How to Slow Down a Video Clip in Premiere Pro
Premiere Pro is an excellent video editor, but i would recommend iMyFone Filme, Filme is more cheaper than Premiere Pro. Filme is a much more comprehensive video editing tool. you can upload edited video to facebook,vimeo,youtube with single click. Filme has the best 4k HD support. Download iMyFone Filme below.
Whether you want to slow down wedding video or birthday video, Adobe Premiere helps you serve your purpose. You can slow down your video with three methods on Adobe Premiere Pro.
Let us discuss all three methods one by one.
Method 1: Slowing Down a Video by Changing Play Speed
Suppose you have a one-second video clip at 60fpe. When you play it at average speed, any platform or software will show 60 frames.
But if you want to play that video 0.5X slower, this process will take each frame twice. It means you'd see 30 Non-repeated frames in a second. And the video duration will increase to 2 seconds. You'll not see any quality loss in this scenario.
Here's the guide to slow down a video by altering changing Play Speed.
Step 1: Launch Premiere Pro
After launching Adobe Premiere Pro, you need to import a video you want to slow down. After uploading it to Premiere, move it to Premiere's timeline.
Step 2: Select speed/duration
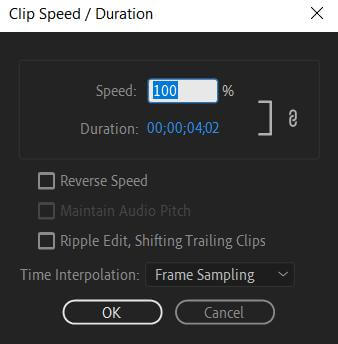
Press the Duration/Speed option after right-clicking the video.
Step 3: Change the speed
In this phase, you need to alter the speed percentage under 100%.

Method 2: Slowing Down a Video by Changing the Frame
In the first, you saw slowing down the video by changing speed. But that method will repeat or skip some clips.
Whereas when you try to slow down a video altering the frame, it means you're removing some frame from the video. This process will slow down a video to your preferences without any quality loss.
Here's a brief guide to get your job done.
Step 1: Navigate to the timeline.
After installing Adobe Premiere Pro, you need to open it in the first place. Later, you need to choose a particular video you want to slow down.
After selecting it, upload it to Premiere Pro. After importing it, you need to drop the video to Premiere's timeline.
Step 2: Select modify
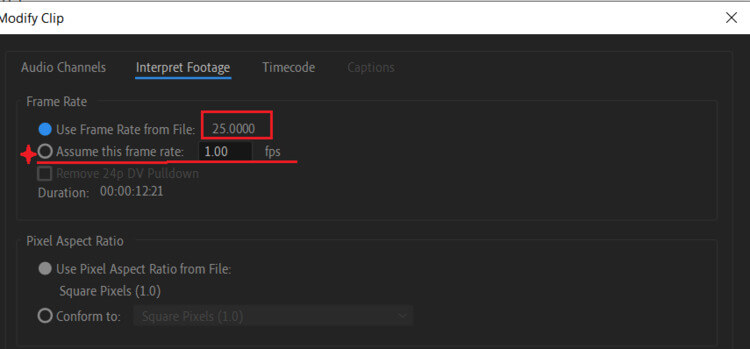
Choose Modify > Interpret by right-clicking the mouse.
Step 3: Press assume this frame rate
Now, you need to alter the frame information. Hit Assume this frame rate and enter a number smaller than the original video frame rate.

Method 3: Slowing Down a Video with Remapping Tool
The remapping tool is a pretty popular tool to create a slow-MO video. It offers you an opportunity to choose a specific part of a video clip and then slow it down.
Here's a simple guide to follow.
Step 1: Select a zone
After dragging the video to the timeline, you need to choose a zone you're looking to slow down.
Step 2: Select '' Key Frames''
Now, you need to click your video right and show the Key Frames and Speed.
Step 3: Lock the area
In this phase, you only need to lock the particular area you want to slow down by hitting '' Pen Tool'' and push the Speed Line via the Selection tool to slow down the video.
Part 2. How to Slow Down Music Audio in Premiere Pro
Premium Pro is a remarkable video editor that has earned massive popularity over the years. You can edit a video in any manner you want in Premiere Pro. Apart from editing a video, you can also edit audio in Adobe Premiere.
Whether you want to slow down music audio or speed up the audio, Adobe Premiere Pro offers all the features in the world to serve your purpose gracefully.
If you want to slow down audio in Adobe Premiere, you only need to follow simple instructions to put things in order.
Here's the step-by-step guide to slow-track Audio clips in Adobe Premiere Pro.
Step 1: Download Premiere Pro
After navigating to Adobe Premiere's official site, you need to download it from there. After, you need to install it straight away on your desktop.
Step 2: Launch the Program
After installing the program, you need to start the program in the first place.
Step 3: Import a File
Now, all you need to do is import an audio clip you want to slow down. After importing it, you need to drop the audio clip to the timeline.
Step 4: Select Speed/Duration
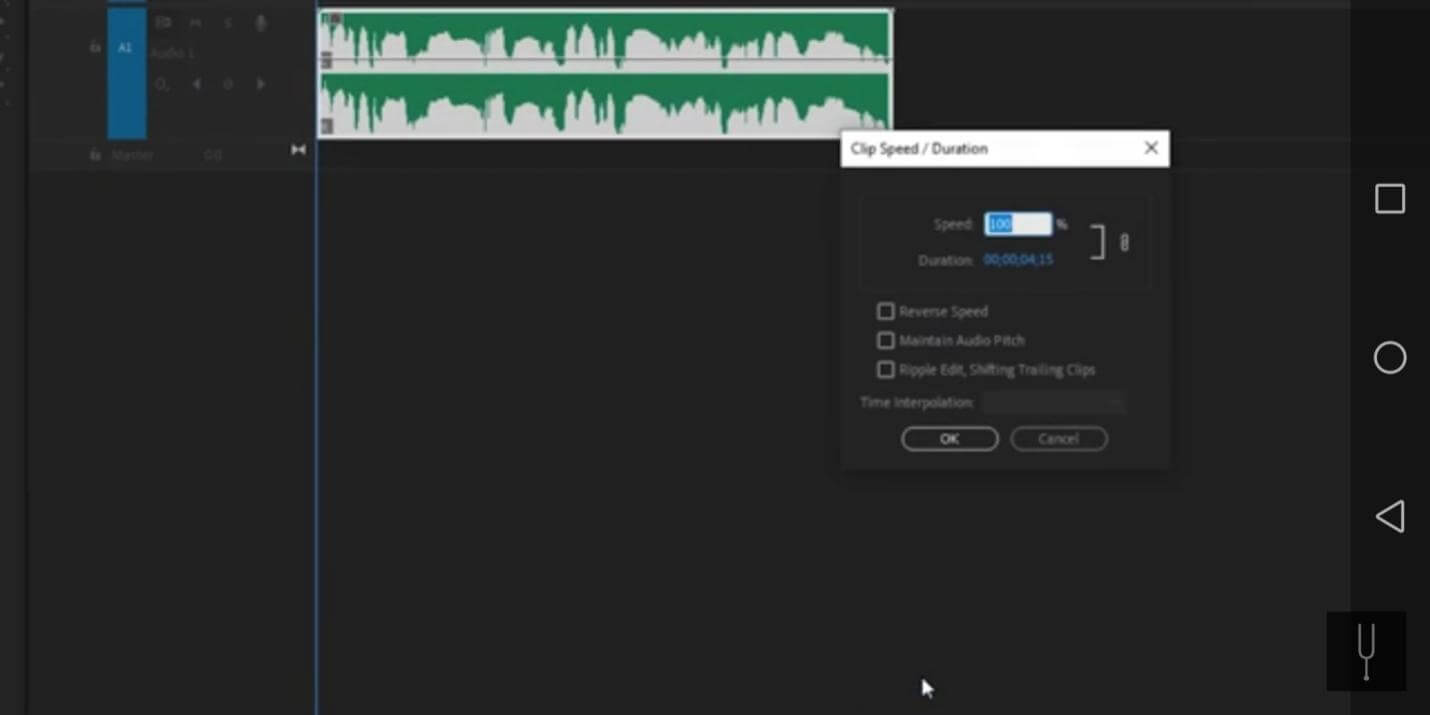
Choose Duration/ Speed after clicking on an audio clip. You can now adjust the speed from there.

Part 3. Best Alternative Video Editor to Slow Down Video - iMyFone Filme
Even though Adobe Premiere Pro is a reliable editing tool that can slow down your video and audio clip at your will, if there's ever a better alternative to Adobe Premiere, it has to be iMyFone Filme.
It offers remarkable features and an excellent interface to fast track or slow down your audio and video clips. The process isn't time-consuming. Instead, you only need to go through some instructions to put the things in order.
Another huge plus you carry with iMyFone Filme is that you can slow down your video without acquiring any premium version in iMyFone Filme.
Let us talk about the step-by-step guide to slow down your videos using iMyFone Filme.
Step 1: Start New Project
After installing and opening iMyFone Filme, you need to start a new project to import a video file. After starting the project, you need to import a file.
Step 2: Drag to Timeline
After importing the file, you need to drop and drag the file to Filme's timeline.
Step 3: Slow Down the Speed
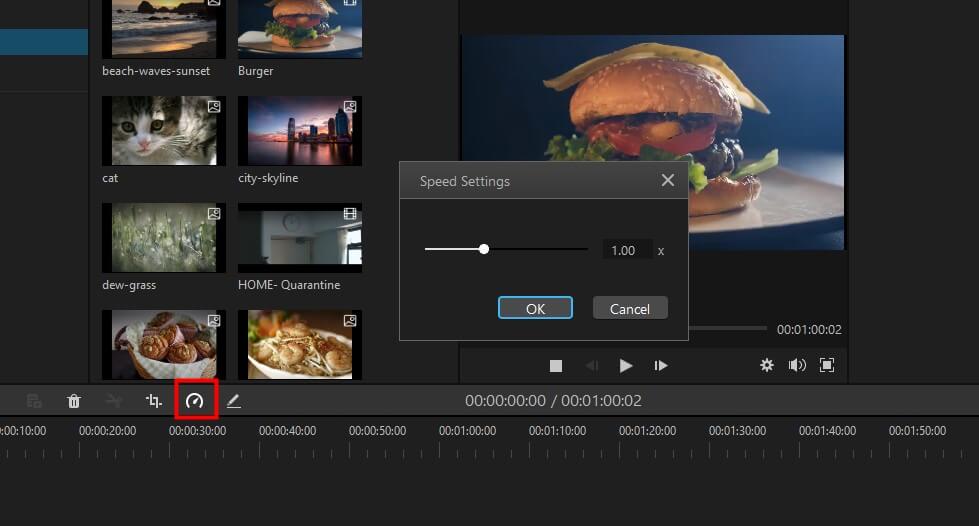
If you want to change the clip's speed, you need to right-click on the video and hit the '' Speed icon'' option in the toolbar. Now, you can see the speed window opening up.
To slow down your video, you need to move the speed slider to your left side. You can cancel the changes you make by clicking on Undo option.
After, it would help if you hit Ok to save the changes you've made. And download the file by pressing the'' Export'' button option.

Part 4. FAQ about How to Slow Down Video Clips
1. How Do I Slow Down a Video Clip?
People often ask whether it is practical to slow down a particular video. Yes, you can slow-track any video you want. You only need to install a video editor like iMyFone Filme or Adobe Premiere Pro to serve your purpose.
After downloading the software, you need to open and import a video file you want to slow. Drag the file to timeline and change its speed by right-clicking on the clip. Now, you can slow or fast-track video pretty quickly. After doing it, you need to export the file.
2. Which is the Best Software to Slow Down Your Video?
Slowing down a video is not a big deal nowadays. You'd have seen so many video editing tools offering you to slow-track your video clips with great effect. But a question arises '' which is the best option''?
An iMovie video editor slows down videos in iPhone, and Adobe Premiere Pro is quite popular can also slow down your videos.
But the stand-out video editor for us is iMyFone Filme. It makes things look pretty easy and pleasing to the eyes. And significantly, it doesn't compromise the quality of video while slowing it down.
Conclusion
You'd have used many video editors for creating mesmerizing content. But did you ever try iMyFone Filme? If not, then you've missed an enormous opportunity to explore one of the most prominent video editors. It offers a lot of fabulous things for users. Using this tool, you can make your video pleasing to the eyes.
Key Features
1. Edit your video with technical knowledge
Using iMyFone Filme, you can use the tool's resources to make your content relevant. For instance, it allows you to rotate, cut, split, trim, make pictures in Picture effect, and adjust the speed of your video.
2. Change the video color
If you want to change the theme color or soundtrack of your video, you can serve your purpose by exploring the prominent feature of iMyFone Filme.
You have a lot of prolific theme colors to choose from. And you'd get some fascinating audio features as well.
3. Add transitions
Using Filme, you can add an engaging and attractive transition to your video. It offers great transition effects that can stun your audience in a flash.


