Do you want to export Premiere Pro to MP4? People want to upload their videos on YouTube, Vimeo, and DailyMotion after editing them. But sometimes, when you intend to play the edited video on your mobile phone or tablet, it doesn't play and says the format isn't supported.
What to do in this scenario? MP4 is one particular video file format that is compatible with every device. You can download your videos from various video editors like Premiere Pro after editing them.
In this article, we've all it covered for you about the guide to convert, export, and save your videos in MP4 format. We'll also explore some other video formats to play with.
Part 1. How to Export/Save/Convert Premiere Pro Video to MP4
Premiere Pro is an excellent video editor, but i would recommend iMyFone Filme, Filme is more cheaper than Premiere Pro. You can convert video to MP4/AVI/MOV/FLV with single click in Filme. Filme is a much more comprehensive video editing tool. you can upload edited video to facebook,vimeo,youtube with single click. Filme has the best 4k HD support. Download iMyFone Filme below.
MP4 is a trendy video file format, and many users opt to save the video in this format. You can export your video to MP4 format using Adobe Premiere Pro.
Here is a brief guide to serving your purpose.
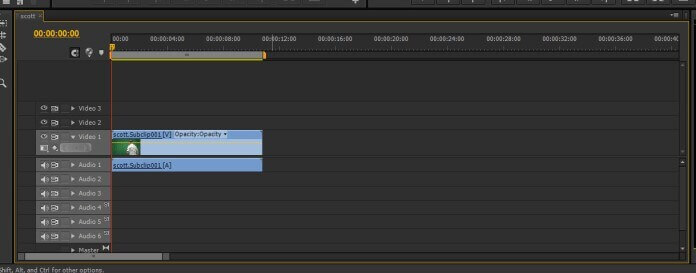
Step 1: Sequence Selection
After editing your video, you need to save the video in the Premiere Pro. Now, you need to choose the sequence to export your file. For this purpose, you need to select a range specification after clicking the Timeline.
Step 2: Exporting
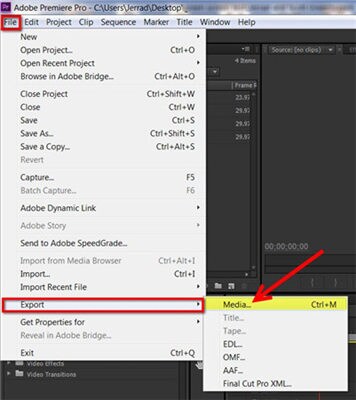
In this phase, you need to initialize Export settings windows. For this purpose, you need to hit '' file and select '' export'' from there.
Later, you need to navigate to 'Media.' You can also save time by using the shortcut key. For Mac users, the short key is CMD+M, and for Windows users, you can press CTRL+M to export the file.
Step 3: Format Selection
You need to choose the H. 264 value to export your video to MP4 format. This process will allow you an opportunity to save your video files in an MP4 format.

Step 4: Selecting Preset
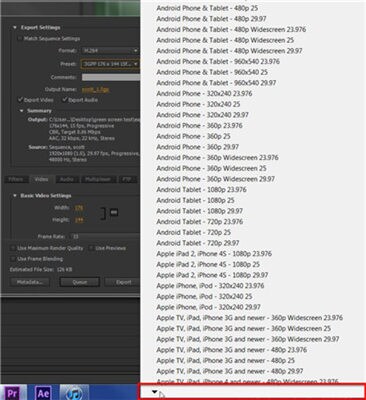
Adobe Pro can select a preset for you, but you can also pick it yourself. You may also have to limit the video's resolution to save it in MP4 format.
You'll be directed to a long list option after pressing the Preset menu option. Navigate to YouTube and Vimeo option at the bottom. Now you can select export mp4 1080p or standard resolutions.
Step 5: Naming your File
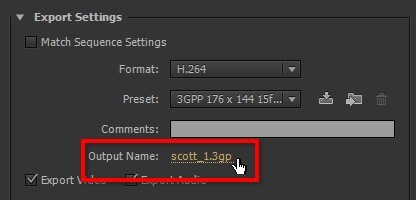
You need to name your video file to find it when searching for it. By hitting on Output name, you can give a custom name to your video.
Step 6: Queuing or Exporting your Video
After finalizing all the tasks, you can export your file. Close all your running functions before going into exporting the file. To export your file, you need to click export.
If you want to make more changes to your video, you can press Queue. It will allow you to save the files later.

Step 7: Verify your Video
Before exporting your video in MP4 format, you need to play the video and check its resolution quality. Is it the same quality you've been looking for?
If yes, then export the file without a second invitation.
Part 2. Best Alternative Video Editor to Convert Video to MP4 - iMyFone Filme
If you're looking for an alternative to Adobe Premiere Pro to save the video to MP4 or another file format, iMyFone Filme is a valuable option.
In Adobe Premiere, you'll have to perform several different tasks to export Premiere Pro to MP4, but iMyFone Filme offers you the simplest way to serve your purpose.
You can convert or export your video in MP4 video file format with ease. Here's the guide to convert videos to MP4 using iMyFone Filme.
Step 1: Launch iMyFone Filme
In the first step, you need to launch iMyFone Filme and import a video you want to edit.
Step 2: Navigate to the Export Menu
After editing the video and making some adjustments to it, you'll need to save it. Since you want to download it in MP4, you need to make slight changes using iMyFone Filme.
Step 3: Select MP4 Format
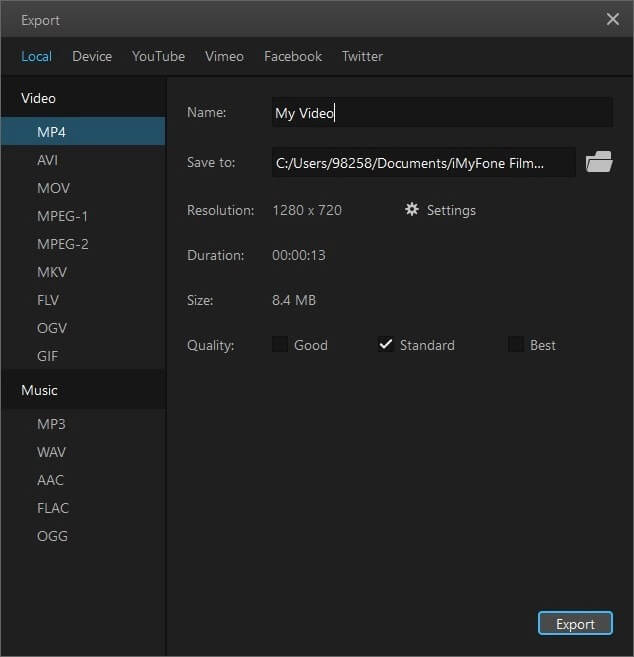
After entering into the export menu, you will need to select different Formats to save your video. Select MP4 format from there.
After, you need to open the title bar and rename your video. Click the folder icon for customizing the save path at the end of your '' Save t'' bar option.
Step 4: Export the File
You can adjust the resolution quality and set the duration of the video you want to download. You select either, Best, Standard, or Good option from there. After, it would help if you pressed the Export button.
Congratulations, you've downloaded your video in MP4 format.
Part 3. Export/Convert Premiere Pro to Another Format Like FLV/AVI/MOV
With few clicks, you can learn to convert Premiere Pro to other file formats such as MOV, AVI, and FLV.
Let us talk about a step-by-step guide to serve your purpose.
Step 1: Launch Adobe Premiere
After installing and launching Premiere Pro, you need to hit the File option after entering the main menu. Now, you need to tap the Export option. After, you need to choose the '' Movie Option''.
Step 2: Hit Output Buttons
Navigate to the export setting window and click the Output button option from there. After, you need to specify Premiere AVI, MOV, and FLV export setups.
Now, you can see all the export settings. From there, you can adjust the size and quality of MOV, AVI, and FLV format.
Step 3: Deselect Match Sequence Setting
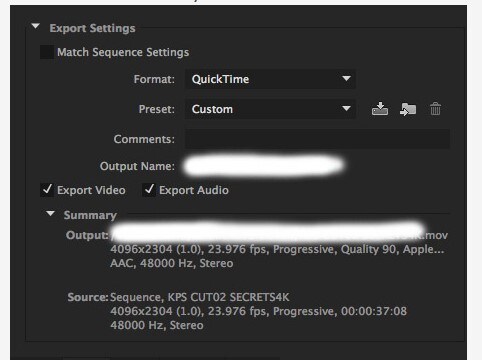
First of all, you need to deselect the Match Sequence Setting option. After going into the Format section, choose Quicktime and press the Custom button option below the Format tab and under the Preset option.
Step 4: Select Export Audio and Video
You need to select both the Export Audio and Export Video checkbox. Give the name of your media you want to export and specify the Adobe Premiere Pro, AVI, MOV, and FLV export's exact location on Window device or Mac.
Step 5: Press the Video Tab
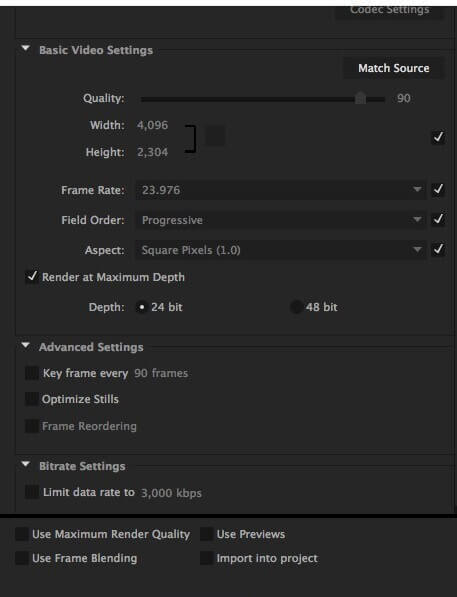
In this phase, you need to specify your preset media files by pressing the Video Tab. After, you need to navigate to the Video Codec section, select the "None" option, and set your Basic Settings option.
Step 6: Export the File
Hit the Export button file to save all the settings you've made. In this way, you'll be able to download your files in MOV, AVI, or FLV format.
Part 4. Tips for Export/Convert Premiere Pro to MP4
Many people opt to save video files in MP4 format after making changes to them. The majority of the users want to run the videos on their mobile devices, and some mobiles can't support videos with higher resolution than 1080p.
It is why MP4 has become pretty important. On the other, you'll find some mobile that will not support even 1080p resolution video. Instead, you need to think otherwise while downloading a video.
Here are some tips that might help you while downloading videos in MP4 format.
Tip 1:
Remember, there are some different resolution options available in the MP4 file format also. For instance, you can download your video in 480p, 720p, and 1080p resolution quality.
Some people undermine three resolution options, and they only concentrate on downloading MP4 videos. Due to this fuss, they sometimes can't run their videos on their cell phones due to unsupported format.
Tip 2:
Many people ask which resolution of the MP4 format is appropriate. You can choose a 480p format video if you don't possess enough memory space to save a 720p or 1080p resolution video.
If your mobile RAM is less than 1GB, you should save videos in 720p resolution videos because 1080 resolution will buffer most of the time.
And if you're carrying enough memory and your RAM is greater than 1GB, running 1080p resolution video won't be an issue at all.
However, it would help if you thought about what is best for you. Sometimes people pick the unsuitable resolution quality and end up being disappointed.
Conclusion
Have you ever imagined how much value a video editing tool can add to your video?
An appropriate video editing tool can determine the outcome of the video, meaning you need to select a worthy video editor for you. It is why choosing iMyFone Filme is imperative for you.
Using this excellent video editor, you can achieve the goals you must have been looking for. It offers some sensational and mouth-watering features to explore with.
Features
1. Compatibility
You can download a video in almost every format using iMyFone Filme. Whether you want to download a video in MP4, AVI, MOV, or FLV format, iMyFone Filme provides you with this opportunity to get your job done.
2. Filters and Picture-in-Picture effect
Using iMyFone Filme, you can apply many breathtaking features to your video. For instance, you can see some remarkably excellent filters and unbelievably composed transitions. These two things will make your video mesmerizing.
3. Simple User interface
If you're looking for a video editor with a beginner-friendly user interface, iMyFone Filme is the perfect option for you. Whether you're a newbie or pro user, you'll find Filme's interface pretty straightforward.


