


Screen recording allows us to share our screens with other viewers to share the content. Whether you are teaching through a PowerPoint slide or whether you want another distant person to view the process you are performing on your screen, you may record your screen.
This post will review the best software for screen recording with full steps about record screen on laptop and do video editing. Moreover, this post also contains nine amazing tips that any beginner or expert screen recorder must keep in mind before recording the screen. So, let's start reading.

Part 1: Record Screen on Laptop with the Windows Game Bar [with Shortcut Key] (Win)
Many times we all face a lot of trouble in recording our screens. It gets difficult to find a screen recorder that is fast and provides good quality video also. Windows 10 provides the screen recording feature known as the Xbox Game Bar.
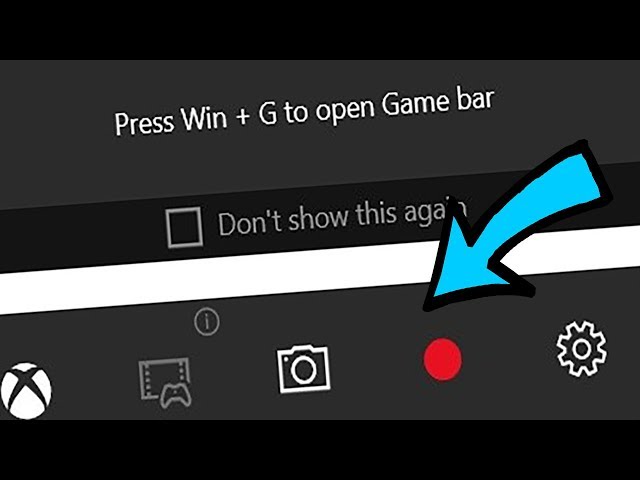
It allows you to make a recording of any windows app you are using on your laptop. If you want to know about how to screen record on a laptop with the Windows Game Bar, you are at the right place. The following steps will surely guide you about how to record your laptop screen.
Step 1. The first thing is to open the app that you want to record in your system. But it won't allow you to record the whole desktop or the file manager application.


Where to find the recorded video?
Recording with Windows Xbox Game Bar is fairly easy. However, if you have difficulty finding the recorded video, there are two ways to access your recorded video. Below are mentioned those two ways, choose whatever suits you the most.
To find the recorded video, you will go to your computer media. Click on the capture subfolder, and here you will find your MP4 videos.
Another way to access the recorded video is to open the DVR Menu. Then select the Xbox subfolder to preview your recordings. It is also possible to edit, cut or trim your video.
Part 2: All-in-one software to Record Your Screen and Edit Video for Laptop or Macbook(Win&Mac)
iMyFone Filme
If you are looking for an all-in-one software that allows you to record and even edit the recorded videos, iMyFone Filme is a great option to consider. iMyFone Filme also offers great themes and templates that are absolutely free to add to your videos.
Let's have a look at the features and advantages of using iMyFone Filme. Moreover, let us also read about how to use iMyFone Filme to record your screen and edit the video for a laptop or Macbook.
Key Features
-
The interface is easy to use by even beginners.
-
The two-in-one function allows screen recording as well as video editing.
-
For the convenience of the user, it offers free pre-made designs and templates.
-
It allows you to layer images or videos, even a recorded one.
-
You may get your accidentally lost files from iCloud or iTunes.
-
The crop, split and rotate tool allow better adjustment of the recorded video.
-
It allows you to quickly export your recorded or edited video to your system's media.
-
Using the instant preview feature, you can view your screen recording video right after stopping it.
-
You can add multi audios to make your screen recording video engaging and more understanding.
How to Record Your Screen using iMyFone Filme.
Let us know read the steps that will help tell us how to screen record on a hp laptop using the iMyFone Filme software.
Step 1. Record Your Video with 3 Clicks
The first thing is to open the screen or app which you want to record. Then click on the recording button to start the recording. Once you are done, click on the stop or recording button to finish the recording.

Step 2. Get the Video in Your Media Library at Once
Now, access the recorded video in your system. Go for exporting the recorded video to the media library of your iMyFone Filme.
Step 3. Cut the Videos, add filters, and add music and text
Filme allows you to edit your screen recordings amazingly. You are free to add filters and effects, along with templates that are available free of cost. To make the recording more engaging, you may add a piece of slow background music. To better understand the listener, it is good to add text in various colors and font styles.

Step 4. Export and Share your slideshow
Now, to receive this file in your Windows or Macbook, you have to export it. Go to the media library of the iMyFone Filme software, and enter the media library there. Then from there, preview your recorded file and preview your video. And finally, you have done the exporting and sharing of the slideshow or recorded video.
Part 3: Record Your Screen in Macbook Using the Capture Tool(Mac)
Recording your Macbook screen is easier and much convenient now. Many times we don't find a suitable app or software to record our screen, so the best thing is to have self-built software in your system. The Macbook Mojave and upgraded models possess a self-built screen- recorder.
How to Record Your Screen
If you are interested in knowing about how to record your Macbook screen using the Capture Tool, give a read to this section. Read out the following steps carefully to get a perfect recording.
Step 1. The first step is to open the window or application that you want to record on your screen.
Step 2. Now, you have to simultaneously select three keys that are Shift, Command, and 5. This shortcut code will open the Capture Tool screen recorder system.

Step 3. Now comes selecting the portion of the screen you want to record. At the bottom of the window, there will appear a toolbar. This toolbar contains an icon that allows you to partially or fully select the screen area for recording.
Step 4. Now, from the options menu, select your recording storage folder. Also, set down the timer for recording.

Step 5. You have to choose one from the two options; click on "Record selected portion "or: Record entire screen."
Step 6. Now, you have to start the recording, and At the top right of the screen, there is a recording button. Click on that button to start recording the screen.
Step 7. Now, pressing the recording button again will stop or end your recording.Step 8. Now, you can access your recorded video from your laptop's media.
Step 9. To preview your video using your local or default media player, you have to double-click the screen recording video.Part 4: Top 9 Screen Recording Tips That Will Make You a Pro
Screen recording is not a technical thing; even a beginner can know how to screen records on lenovo laptops with minimum effort. However, if you keep in mind these nine tips, you will surely get a perfect screen recording.
Short and concise
Try to make a screen recording of minimum length or break down a longer video into smaller parts.
Quality microphone
Use a good quality microphone for a clear voice in the recording.
Use engaging text outlines
Before getting in the depth of your screen recording, present short outlines in text form to engage the viewers' attention.
Keep the microphone at a suitable distance
Firstly, make sure that your voice is fresh and energetic. Secondly, make sure that you don't keep the microphone too close nor too far from your mouth.
Use zoom feature
You can use the zoom-in feature at various points to provide ease to the viewers in watching the screen recording.
Webcam position
If you have to explain something, it will be better to come up with your own video also. While doing this, you have to assure that your webcam position is absolutely suitable for all the viewers. Moreover, your webcam is clean and clear so that no one has to experience a blurred image.
Choose a calm environment
If you want a quality screen recording, you have to choose a quiet place. The nicer and peaceful the environment will be, the higher will be the quality of the recording.
Practice yourself
Practicing your content to be delivered will help you in staying confident in front of many people.
Test check your software
Testing your software will help you know about any flaws in it. Before testing your software, make sure you've chosen the right one for your system from the list of the top screen recorders. For some circumtances that are precious and once in a lifetime, you don't want to miss it only because that you chose a wrong recorder. Test, test, test!
iMyFone Filme
Record Your Screen with Simple 3 Clicks
Download Now


