A recent study has discovered 53% of people watch two or more informational videos every week. With the help of a screen recorder, they can save these videos to review them in the future or share them with someone else.
Screen recording requires system resources from CPU, RAM, GPU, and even SSD. You can record your screen smoothly if you are working with a high-config PC. Here is how to screen record video on Mac and how you can reduce lag later in this article.
We also recommend a easy video editor called iMyFone Filme, which can also record computer screen without lag. Download it and try it out now!
Best Free Solutions For Screen Recording on Mac Without Lag
How do I encounter lag while screen recording? This is a common challenge for Mac users.
How to screen record on MacBook air with QuickTime
If you are using external software to record your Mac screen and still facing issues like lag- it is time to get back to your in-built recorder.
QuickTime is an efficient screen recording tool that is free and comes built-in with Mac. It is a handy tool for capturing any online videos, streams or games.
Though it is in-built for Mac and well-optimized, your recording might lag.
Let's see how to screen record a video on Mac and eliminate the risk of lagging with QuickTime.
1. Launch the Application
Open QuickTime Player, either from launchpad or spotlight, applications folder for Mac. Remember that you cannot screen record with QuickTime 7 or 7 Pro.
For effective screen recording on Mac, you must use QuickTime 10 or any higher version.
2. Select Screen Recording Option
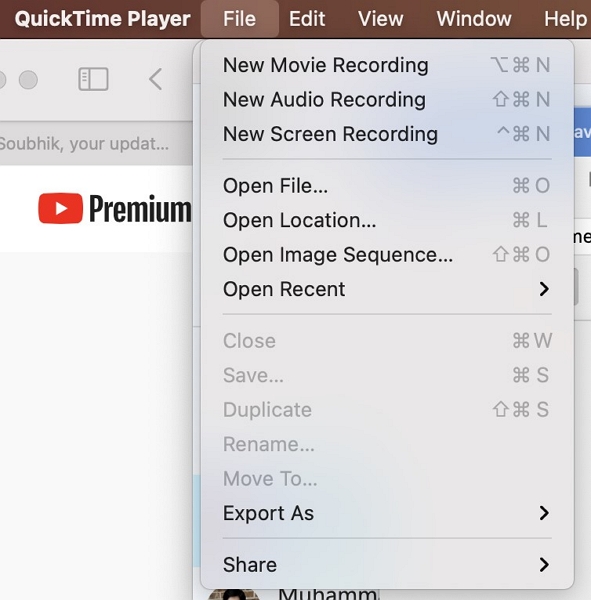
Once you have launched the application, go to File in the menu and click on New Recording (ignore any finder popup window that may appear on your screen). Or, you may also use the shortcut- Cntrl+ Command+ N.

3. Add Audio
It depends if you want audio for your recording. You can add it manually.
To record audio, click on the bottom arrow on the right of the red record icon to make all options visible.
Next, you shall find a microphone option that you can enable to capture your voice while screen recording. A volume meter is attached to the microphone option, which you may use to adjust your recording's sound levels.
4. Start Recording
Once you have adjusted all the settings, you can start screen recording on your Mac.
On clicking the red recording icon, the QuickTime window will minimize automatically. You are now ready to record your screen.
You need to left-click anywhere on your screen to begin recording. In case you have multiple displays, click on the display that you want to record.
If you want to capture a particular area from your screen, drag your cursor to define the boundary instead of clicking on it. You can click on start recording after you have selected the area that you want to record.
5. Stop
After the recording has started, you do not have to do anything to support the recording.
When your recording is over, hit the stop button to finish the recording. You may watch a preview of your recording before saving the file.
Important Notes: Press the Esc key to go back to the QuickTime window before you start recording. But if you press the Esc button while recording, the window will pop up and become a part of your recording.
There are several other QuickTime features to handle a video post-recording, such as saving, editing, speeding up video and sharing.
Now that you have learned how to screen record on MacBook let's learn how to reduce lag while recording.
Step 1: Set the record video resolution to average. High-resolution videos tend to lag more often while recording. On the other hand, you do not want to record a blurred video with low-resolution.
Step 2: If you want to record anything from your browser, always use a well-optimized browser like Google Chrome or Mozilla Firefox to minimize lagging chances.
Step 3: If you have an NVIDIA graphics card, select 'Prefer maximum performance' to ensure smooth screen recording.
How to Record Your Screen on MacBook Using iMovie?
iMovie is amongst the few screen recorders for Mac that are suitable for beginners. You will need to use either your in-built mac camera or an external webcam to screen record with iMovie.
Before moving on to the steps of how to record your screen on MacBook using iMovie, let's delve on three ways to avoid lag using iMovie:
It is an unsaid rule to have at least 25 GB space on your hard drive for iMovie to be able to run smoothly without any hindrance.
To avoid lag while using iMovie please make sure to close all other programmes as it slows down iMovie. It is a quick hack to close all other tasks and applications to speed iMovie.
Deleting all the idle files or files that are not required presently will provide you with enough space and help iMovie function better without all the overwork.
The lag reduction process for iMovie remains the same as the QuickTime player. Here is how to record screen on mac using iMovie,
Step 1: Launch the iMovie application
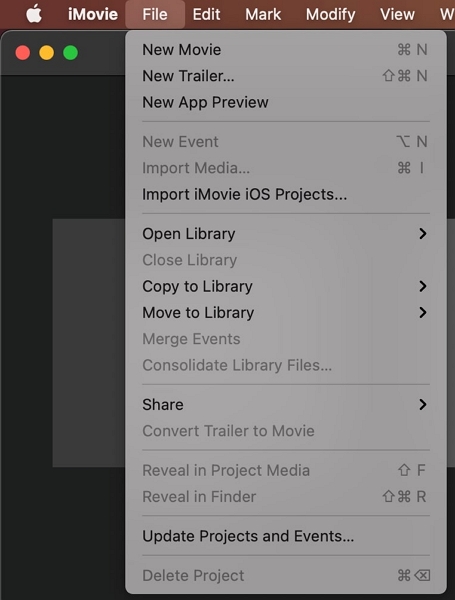
Step 2: Go to the File option and click on New Movie.

Step 3: Select Import media icon
Step 4: Choose FaceTime HD Camera
Step 5: Click on the red record icon to start recording.

Step 6: Hit the same icon again to stop recording
Step 7: Once finished, click on Save to save the recording to your device.

Also Read: Best 2 Ways to Create a Picture-in-picture Video in iMovie [9/10/11]
A Reliable Tool for Recording Screen [Editor's Choice]
You can use iMyFone Filme for recording screen and it is one of the best software you can find.
All you need to do is download the software from the website and start recording.
You can crop a section of your desktop to record only the specified portions with this.
Click on the red button to record. You can pause the video anytime too.
Click on the red button to stop recording.
Drag and drop your saved video to edit the project.
FAQs on How to Screen Record on Macbook air
1. Why is my screen recorder lagging on Mac?
The primary reason for lag during screen recording on Mac is the excessive use of RAM memory from your CPU. However, there are several other reasons that contribute to lag while screen recording.
In case you are using low graphics cards, lagging is inevitable during screen records. Even if you have high-end NVIDIA graphics cards, it may cause lag during heavy operations if it is not appropriately configured.
Other reasons may include your screen recorder- using the suitable screen recorder is crucial, especially when it comes to Mac.
2. Which tool should I use if I want to record screen for free?
In this article, we have discussed how to use two free screen recording software for Mac. QuickTime, Mac's in-built screen recorder, and iMovie- an intuitive free screen recording tool.
Both the software are free, and with our article, you can learn how to use them in no time.
You must evaluate which software is more suitable for you. As both of them are free, you can try both alternatively.
3. What is the easiest way to record your Mac screen?
Screen recording on Mac is simple if you know how to use your recorder. With our 'How to screen record on Mac', you can quickly learn everything that you need to know.
There are several screen recorders available in the market. We have come up with two of the best and free Mac screen recorders and discussed how to use them in detail.
You may use whichever software you like to record the screen on Mac, ensure that you follow the steps correctly while using a screen recorder.
4. How long can you screen record on Mac?
Except for a few, all screen recording software does not include a time limit for screen recording.
If you are using QuickTime or iMovie to record your Mac screens, you can continue recording until your drive runs out of memory.
However, you shall remember that long recording will use more RAM, and the chances of lag will be increased. To avoid this, we recommend recording for 10-15 mins.
If you need to record a long video, say 60 minutes, you may divide your recording into three twenty minutes sessions.
For live streams or games that you cannot pause- you can record it for as long as the content runs, but you might encounter lags.
Final Words
Screen recording is the new way to save content. People often screenshot an image instead of downloading it because it saves a fraction of seconds. But downloading videos may take hours and a lot of data, so you would definitely like a less time-consuming alternative.
There are several online contents such as live streams that you cannot download at all, so screen recording is the only option to save these contents.
We understand that a lot of Mac users face lagging while recording their screens. Now, we have put an end to your worries.
We hope that this article will help you learn how to screen record on Mac without lag.


