By splitting a video into small clips helps with uploading, putting up some creative effects, carrying out audio adjustments, and inserting a video transition. The focus of companies or individuals to split a video is to use them in their projects or brand promotion. Now, to put audio according to your requirements, the splitting is necessary.
Are you looking forward to the best video splitter? If yes, go ahead with iMovie. The iMovie split video in half. It's free and excellent for Mac and iPhone users. Other features that make iMovie the first preference for the people are because it instantly shares your beautiful moments, helps in creating Hollywood style trailers, easy browsing of clips, and much more.
iMovie helps in creating stunning movies in 4k resolution. People like it because it's easy to use, can adjust volume, provides options on changing the quality of the video, and much more. If you want to learn how to split video in Windows, then opt for iMyFone Filme.
1. How to Split Clip in iMovie (Mac)
iMovie is a video splitting tool for Mac users that helps users create videos in small clips to be used on social media platforms, for personal use, or website purpose. It consists of amazing features like provision of 4k resolution clips, Hollywood-style trailers, fancy texts resources, seamless sharing of video clips on other platforms, helps with rearranging, trimming, cropping, and overlaying.
Moreover, iMovie helps with video clip splitting into two or more parts. Here's how:
1 iMovie Splits Video in Half
If you want to know how to split video in iMovie into two pieces or half, then you can follow the following steps:
Step 1.Open your video in the project browser.
Step 2.Now, rest the playhead or the red vertical line on the point from where you want to split the clip and press "Command-Shift-S". Hold the control key, bring to the point where you want to split, and choose "Split Clip" from the shortcut menu.
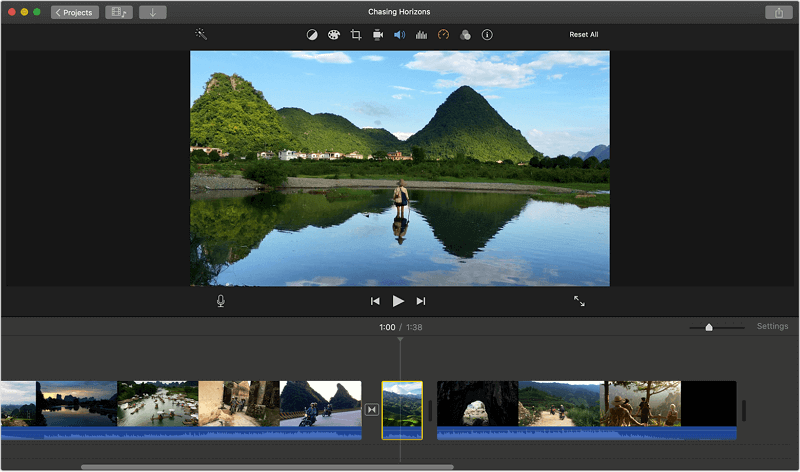
Step 3.Alternatively, select the video clipping region at one end from where you want to split the clip. Choose "Clip" and then "Split Clip". Here, the clip menu bar will appear in the light gray bar.
2 iMovie Splits Video into Three Parts
Step 1.Open your video clip in the project browser.
Step 2.Now, select the frame range that begins and end in the middle of the clip. Do not choose to the end.
Step 3. Do the following: Choose the clip, and then split the clip. The clip menu will appear in the light gray bar across your computer screen.
You can also split the video by pressing "Command-Shift-S", if you have selected more than 5 frames.
Note: To undo the split, press "Command-Z". If you have moved a piece of the clip, then place it next to each other in their original positions. Select any one clip and then "Join Clip".
Split and Delete the Unwanted Part in iMovie
As with the previous process, split the video on either side of the unwanted portion and delete it. The remaining clips can be moved together.
2. How To Split Video in iMovie (iPhone)
iMovie for iPhone means the software helps the users to record and edit the high-definition video so that it can be published directly to YouTube or send via email. There are versatile features of splitting video on iPhone as you can insert transition effects, background, advanced video effects, carry out audio adjustments, and much more.
To split a video in the iPhone, you need to adjust the duration of each section, remove any unwanted sections, add different titles to the section, and edit the duplicate clip. The editing of the video clip in the iPhone must be done separately from the original.
The users can split the video in iPhone using iMovie through following steps:
Step 1.Open iMovie on your iPhone and click on the "Projects" tab on the top and create the "Project". Upload a video you want to split and click on Movie.
Step 2.Slide the "playhead" and position it from where you want to split the video on iPhone.
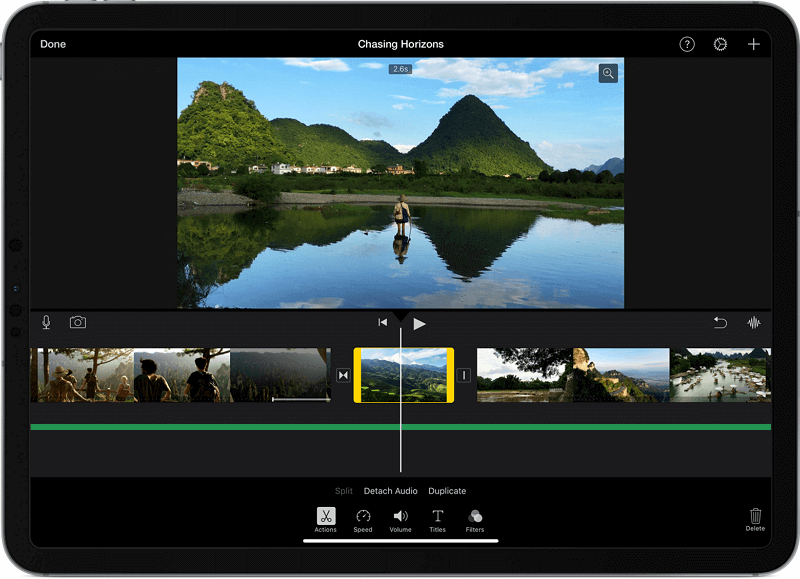
Step 3.Tap the clip to be split in the timeline, and the editing tools will appear at the bottom of the screen. Now, click the "Split" in the bottom right corner.

Step 4.Here, the clip has been split with iMovie on your iPhone.
Split and Remove the Shaky Parts in iMovie (iPad/iPhone)
- Tap the clip and select the scissors icon, which is the Actions button. Tap on Split. You can also swipe down with an Apple Pencil or even your finger where you placed the playhead, but do it after tapping the clip.
- Next, do the same action at the end of the unwanted portion and split it again.
- You can now select the unwanted portion - which will be separate - and delete it by tapping on Delete or dragging it out of the timeline.
Differences between iMovie for Mac and for iOS
iMovie is a great video editor for macOS and iOS devices. Although it's not a professional-grade tool like Final Cut Pro, it has a lot of basic functions that are useful and easy to use. However, there are some differences in the process for how to split a video in iMovie when you're using the Mac version versus the iPad/iPhone version. There are also other minor differences, as shown below:
- The split or cut function is touch-based in iPhone and iPad. You can bring the playhead into position, pinch out to zoom, and slice the clip with your finger as if you're actually splitting the clip at that position. On iMac, the process and controls are different, as we've seen above.
- The interface and layout are different in the two versions of iMovie. For example, on iPhone or iPad, you'll see the controls in a row at the bottom of your screen; on a Mac, you'll see that they're at the top. There are several other differences like this one.
- The controls are very different since the iOS/iPadOS version is primarily touch-centric, while the input method for the macOS version of iMovie is essentially a mouse or trackpad and the keyboard. If you're used to one version, the other one takes a little getting used to.
Although there are fundamental differences between the two versions of iMovie, the functions are essentially the same in terms of how to add a project, how to edit videos, and how to export them to your local device or to iCloud. In short, it's the same app on all devices but how you interact with it depends on the device you're using it on.
3. Vital iMovie Split Tips
Here are a few tips for splitting video using iMovie:
- Select the particular frame instead of the whole video while splitting.
- Use the Command keys or the Control Key to split the video manually.
- Drag the entire file into your project timeline.
- Position the clips back to back instead of clipping it and then creating a video split.
- Add a transition, effects, or texts between the clips to make them look personalized and attractive.
- Adjust the duration of the split video clips to make them look good or add a background image too.
Of course, there are more functions available in iMovie: make picture in picture efffect, speed up the whole or part of the video. Keep digging and learn more advanced skills!
iMovie can be good, but not handy enough for begginers. Wanna know what tool is best suitable for beginnners? Keep reading...
4. Best Splitter for Beginners - iMyFone Filme (Win & Mac)
iMyFone Filme provides video editing solutions for the Windows as well as iOS devices. It includes elegant templates that one can include in their videos. Moreover, one can edit the videos by adding many resources and effects like the animations, filters, music, and much more. Through these videos, you can share your personal moments like parties, weddings, festivals, etc.
Let us now see how iMyFone Filme helps you with video split:
Step 1.Add the video's frames that you want to split
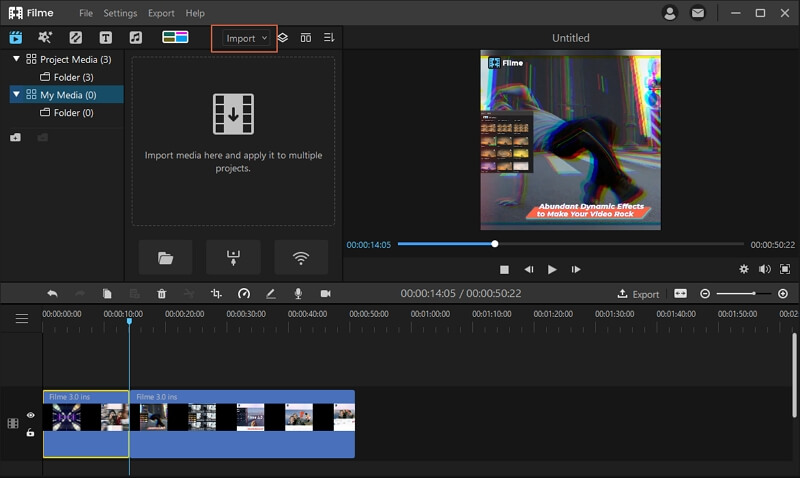
Step 2.Either manually copy the video clip or arrange the playhead in the timeline from where you want to paste the clip.
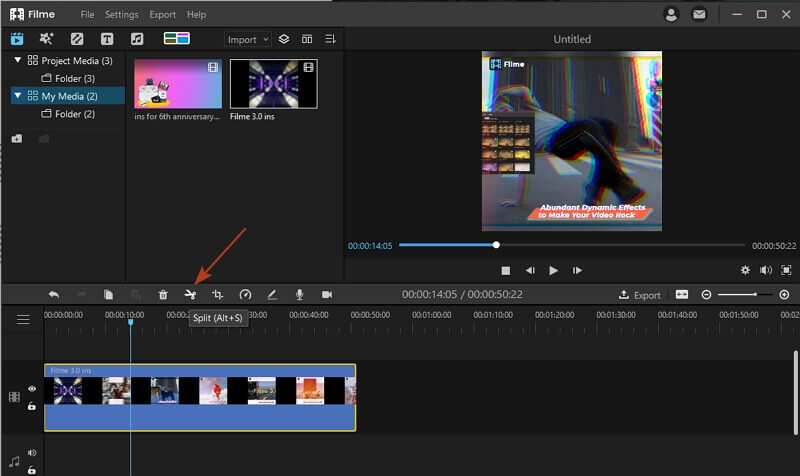
Step 3.Press on the delete icon to remove the clip.
Step 4.Trim the video clip and after that move to split it. Split the video clip by moving it to the playhead, press the split icon, and then split the particular frame.
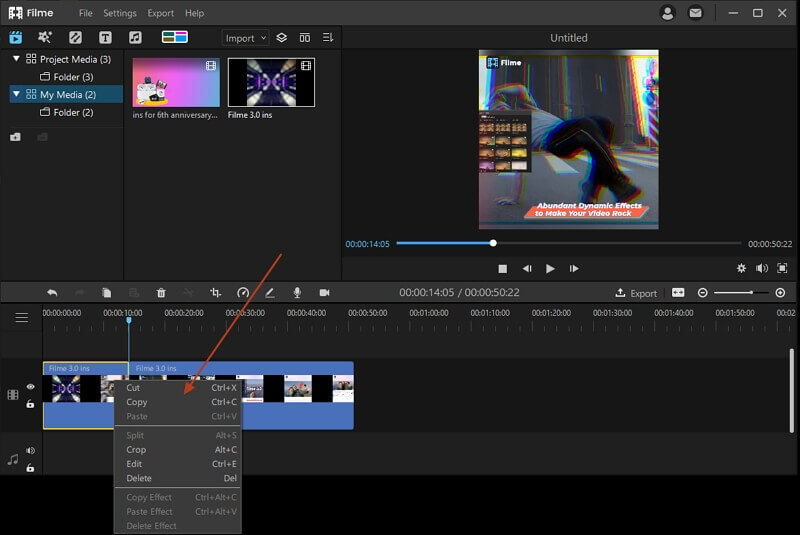
Step 5.Now, crop it, resize it, change the speed of the clip, add effects or transitions, change the playback quality, and after this, click "OK".
Along with editing the videos or exporting it to destination files, Filme also helps with data transfer, restoration of data, data backup, data cleaning, and much more. This tool helps in uniquely creating things. Some of its essential features include:
- Fast Video Mode: It provides fast video mode as you can create great slideshow with music, pictures, and videos. You can share these videos on your social media platforms or with individual connections too.
- Add Stunning Video Effects: Filme helps with editing as you can carry out basic editing, use stunning features, fantastic video effects, and carry out transition too.
- Adding Audios: You can add audio in the videos from music or YouTube videos.
- Basic Editing Features: Even you can carry out basic editing of the video like cropping, splitting the video, rotating, adjusting the speed, editing, and picture-in-picture effects.
FAQs about How to Split Videos in iMovie
01 Why can't I split a clip in iMovie?
If your iMovie is working normally, you should be able to split a clip into two or more sections. If the option is greyed out for you, try moving the clip to the main (center) row to see if that solves the issue. If not, see if you're on the latest version of macOS because that might be the issue. You can also shut down your Mac and restart it. Then, hold down the Command and Option keys when launching iMovie. You'll see a box where you need to delete any existing preferences that might be causing the problem.
02 How do I cut out parts of a video on iMovie on iPhone?
You can easily do this by first splitting to the left and right of the parts you want to remove. Once they are individual parts, you can delete them and drag the remaining clips into position next to each other. You can then add a transition between the remaining clips so the cuts don't look unnatural or jerky.
If you only want to cut out the beginning or the end, you can use the trim function. Tap the clip and pull the left or right trim handles inward to reduce the size of the clip, either at the front or in the end.
03 Is the Split function the same function as Split Screen on iMovie?
No, the split-screen function is like the picture-in-picture function where one video is overlaid on top of the other, while the split function allows you to cut a single clip into two or more parts. The split function is useful when you want to remove some parts of your main video or rearrange the sequence. The split-screen function lets you play one video on top of another, which is useful if you need viewers to see two different clips simultaneously.
04 Can I join the clips that were accidentally or wrongly split in iMovie?
Yes, you can. It's a simple process, too. Just select both clips by holding the Shift key while selecting them. Next, click on Modify and look for a click the Join Clips menu item in the contextual menu. If you just did a split and you want to roll it back, you can choose Edit → Undo Split. You cannot use this second method if you did another action after the split.
Conclusion
Video split helps the users to save their pictures in the format they like. The best part of using the video split tool or software is that it helps in adding effects and transitions to your video. Another best feature is, you can add versatile features by using the software like iMyFone Filme or iMovie. These tools help you to design a great video that not only beautifies your video, but you can share it seamlessly on third-party platforms too. Moreover, these tools support creating videos that are useful for branding and individual project purpose also.


