In this article, we will demonstrate how you can export video in Premiere Pro with the best export settings or best export format. It is a professional video editing tool, so beginners find it difficult to export the video. We will explain every step. Moreover, we will introduce a user-friendly tool to edit the video.
Part 1. How to Export Video Premiere Pro with Best Export Settings
Premiere Pro is an excellent video editor, but i would recommend iMyFone Filme, Filme is more cheaper than Premiere Pro. Filme can export video in 4K HD format. you can upload edited video to facebook,vimeo,youtube with single click. Filme has the best 4k HD support. Download iMyFone Filme below.
Recording and editing a video are undoubtedly important, but export settings are also essentials. Export is a crucial part of video editing. Your whole video editing will go in vain if you don't export your video in the right settings. There are certain things about exporting a video. We will discuss it, and we will also teach you the best export settings for Premiere Pro or best export format in which you can export your video from Premiere Pro.
Same Resolution in Every Phase
The first is that you should make sure that the video is recorded in an optimal resolution and high frames per second, for example, 1080p. Then, make sure that you edit your video in 1080p as well. And when you export the video, change the setting to 1080p. Thus, you need to keep the resolution in every phase. In this way, you will not lose the quality of the video.
You can also record the video in a 4K setting and also edit in 1080p. You can export it in 4K, or you can also export it in 1080p. Now, recording in 4K, editing and exporting in 1080p, what this will do is that the export will look better because you have added resolution to 1080p. But it does not work the other way around. You cannot record a video in 1080p and edit in 4K and then export it in 4K. It will only expand the frame of 1080p to fit in 4K.
The best way is to record, edit and export the video in the same quality. For example, record the video in 1920 x 1080 (24 FPS), edit it in 1920 x 1080 (24 FPS), and export it in 1920 x 1080 (24 FPS) for the best possible outcome.
Export Sequence of Timeline
If there are multiple videos and audio clips on your timeline and you only want to export a certain sequence, then you can do this easily with Premiere Pro. With the help of a mouse, select the clips you want to export and press the question mark key on your keyboard. This will mark the in and out point of the video. And when you export the video, it will only export the selected portion of the video on the timeline.
You can also mark in point and out point of the video by dragging the playhead. Go to the timeline and move the playhead to the point from where you want to start the video, press "i" to mark the in point and go to the end where you want to finish the video, and press "o" to mark the out point. It will create a selection of videos where you have marked in and out points. When you export the video, it will only export the selected track on the video.
Best Export Settings for Premiere Pro for Video
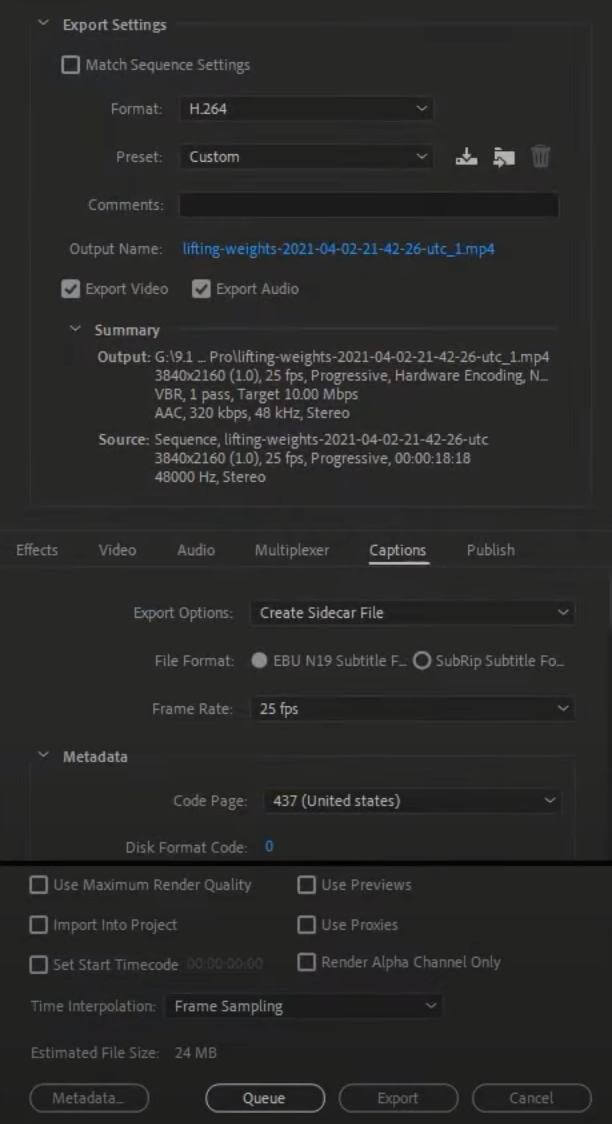
Go to File > Export > Media to export the video or press "Ctrl + M". It will open an export window with multiple options. These are the best settings that you can do to export video.
You need to select "264" as the format.
Select "High-Quality 1080p HD" or "High Quality 2160p 4K" as preset, depending on your video. See your sequence of the video in which it is recorded, and then select the preset according to it.
The output name will define the destination where it will be exported to. It will tell you the location of the file.
Check the boxes of "Export Video" and "Export Audio" so that the exported video is both video and audio.
Select the aspect ratio according to the platform where you will upload the video. For YouTube, you can select 16:9. Check the requirements of the platform to select the best aspect ratio.
Select profile to "High" and level to "2".
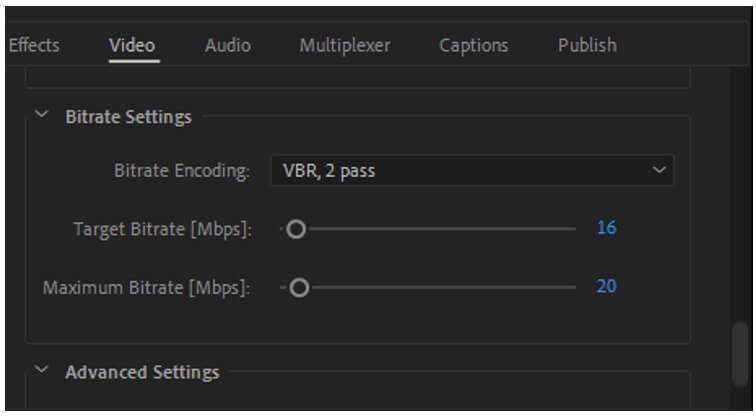
Choose bitrate encoding to "VBR, Pass 2" and set the bitrate to 16 MBPS as 1080p requires 15 MBPS but to be on the safe side, we will increase it by 1 and set the maximum bitrate to 20.
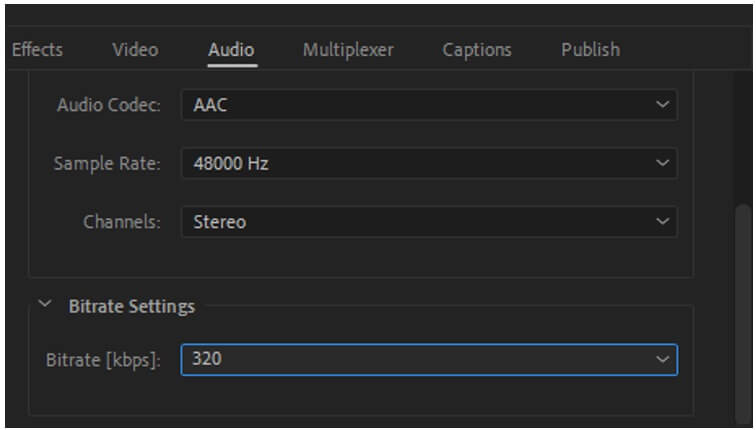
When it comes to audio settings, don't change anything except bitrate (kbps) and audio quality. Set audio quality to high and bitrate to 320 kbps.
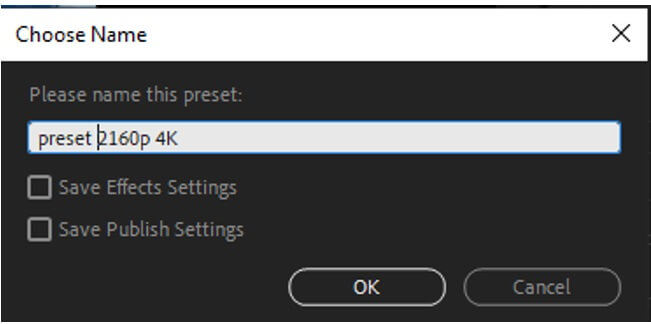
Tick the box of "Use Maximum Render Quality". If you want, you can save this setting as a preset so that it will be easier for you in the future. Press the export button to export the video in these settings.
Video Setting:
Bitrate Setting:
Audio Setting:
Preset Saving:
Part 2. Best Alternative Video Editor to Export 4k HD Video - iMyFone Filme
iMyFone Filme is an alternative video editing tool that is simpler and easier than Premiere Pro. You can edit the video with iMyFone Filme professionally without any trouble.
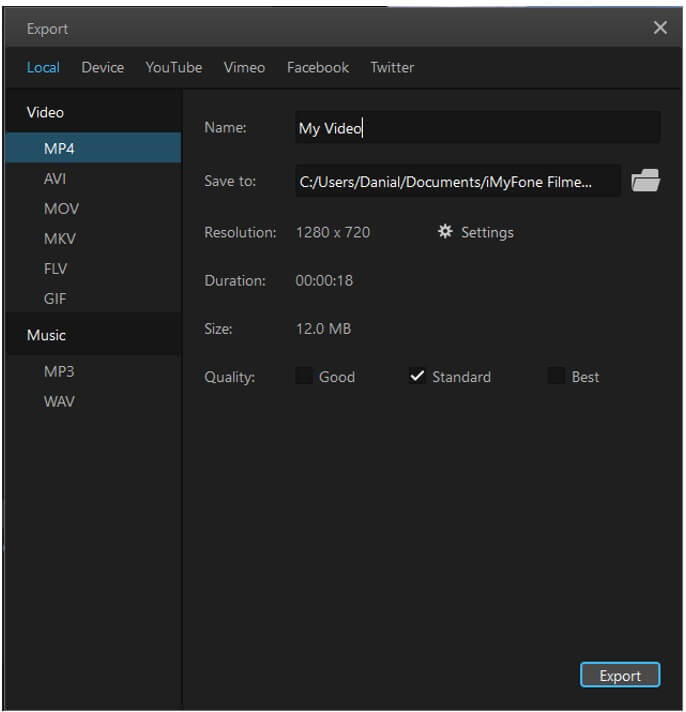
Let us see the best settings in which you can export the video. iMyFone Filme allows editing up to 4K resolution and does not compress the video. When you click on export, a window will pop up with multiple options.
Firstly, you can choose the format in which you want to save the video. But we want the best settings, so select "MP4" as the format of the video.
When it comes to resolution, the trial version only allows the user to export video in 720p. But in the paid version, you can export videos above 1080p. So, you can select 4K as well.
Now, select the quality of the video to be the best. When you select the quality as best, you will see an increase in file size.
Select the format of audio in the video. You can either select MP3 or WAV (there are more formats as well). Either one is suitable for the video.
There are three qualities available: Good, Standard, and Best. You can choose whatever you want. We recommend Standard and Best.
You need to click on Settings to see more options. You can change resolution, codec, bitrate, frame rate, sample rate, and other settings. You can leave these things as they are or change them according to your needs.
You can also change the file name and its destination. Select the destination where you want the video to be exported.
Lastly, you can also select social media platforms, including YouTube, Vimeo, Facebook, and Twitter, to upload videos directly.
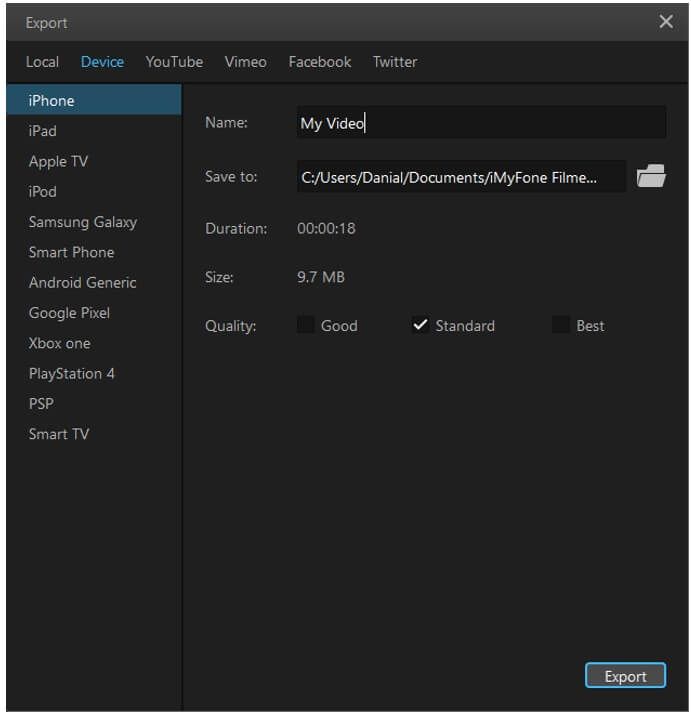
However, iMyFone Filme has a unique feature of "Devices". It automatically adjusts the file size depending on your selection of the device. You can either select iPhone, iPad, PlayStation 4, or any other from the list.
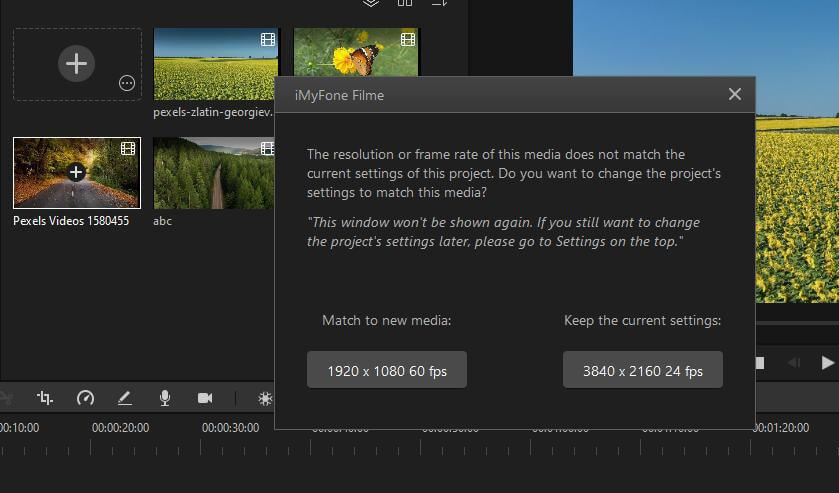
Resolution Matching:
Video Setting:
Device Setting:
Part 3. Where Does Premiere Pro Export Go?
If you want to export the video from Premiere Pro, then you go to File > Export > Media. It will open an exporting window with a setting you can adjust. You will see an option of "Output Name". Click on it. By clicking on it, you can change the name of the file and choose its destination where you want it to be exported.
By default, any video that you export from Premiere Pro goes into the directory of Adobe > Premiere Pro > 15.0. But you can change the destination of the file as per your liking.
Part 4. Tips for Export Video in Premiere Pro
1- Match Resolution
The first and most important tip is to know your video. You should know the resolution of the video in which you have recorded it. Try to edit the video in the same resolution and export it in the same resolution. This will maintain the consistent quality of the video. Avoid changing the resolution while editing and exporting. It will reduce the quality of the video, and you won't get the best out of your video editing.
2- Select Perfect Bitrate
Bitrate plays an important role in the exporting of a video. There are two types of bitrates which are CBR (constant bitrate) and VBR (variable bitrate). VBR is much better than CBR because it adjusts the bitrate according to the requirement of the video.
VBR is of two types. One is VBR 1 pass, and the other is VBR 2 pass. Those who are in a hurry to export the video can choose VBR 1 pass. It only passes one sequence of the video and exports it. VBR 2 pass takes time to export because it does two passes of the sequence. In the first sequence, it assesses how to render the video properly and then makes the second pass for better output. Select the target bitrate and maximum bitrate according to the resolution of your video.
3- Select Appropriate Aspect Ratio
It is also an important thing to select the perfect aspect ratio of the video. It is decided on the basis of the platform where you will upload the video. For instance, YouTube requires 16:9, while TikTok requires 9:16. So, you need to select the aspect ratio according to your needs.
4- Save Preset
If you frequently edit videos, then you can save these settings as presets. Go to "Preset" and press the icon of saving preset. Name the preset so that you can recognize it in the future. It will save you time, and it will be easy for you next time whenever you edit the video and export it.
Conclusion
iMyFone Filme is the best alternative video editing tool that you can get. It edits the video up to 4K resolution and also matches the resolution of multiple videos. You can add different types of effects and transitions to make your videos more appealing. Moreover, it allows the user to export this video in the best settings. You can export the video in 4K resolution. You can also adjust the bitrate, frame rate, codecs, file containers, and other settings.


