The project of VideoLan developed the VLC media player. It is very famous because it is absolutely free and accessible. It is also considered as an open source software. It is also one of the best streaming video servers. You can use it for systems operated by desktop. It can also be used by different kinds of mobile platforms including Android, IOS, Tizen, Windows 10 Mobile, IPadOS and many others. You can also access VLC on different types of digital distribution platforms such as Google Play, Microsoft Store and Apples app store. You can also know how to record your screen with vlc media player in this article.
Step by Step tutorial: How to Record your Screen with VLC Media Player
One of the most important questions is how to record desktop screens using VLC. As a VLC record screen, it is considered as one of the best screen recorders for desktop users. Most of the users do not know that VLC record screen. Many users use this VLC media plate only to watch videos.
In this tutorial, you have to follow the following steps to know how to record your screen using VLC.The video recorded by it has high quality. You can not only record the screen but also record the audio of your video.
STEP#1: Firstly, open it.
First of all, to record your desktop screen, you have to open the media player.
STEP#2: Media and Capture Device.
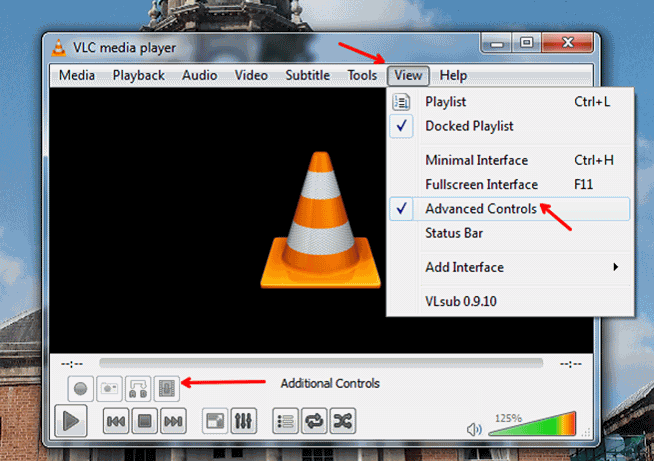
After opening the VLC media player to record the screen, you can see the icon of the media on the left corner of the screen. Click it. After clicking it, you will see Capture device. Click on it
STEP#3: Convert Capture Mode to Desktop.
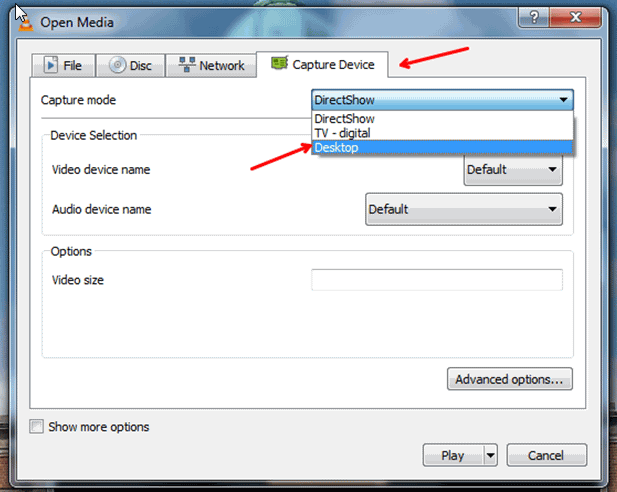
After clicking on the tab of the capture device, you can see different options to select. Click on Desktop!
STEP#4: Set the Desired Frame Rate into 30 fps.
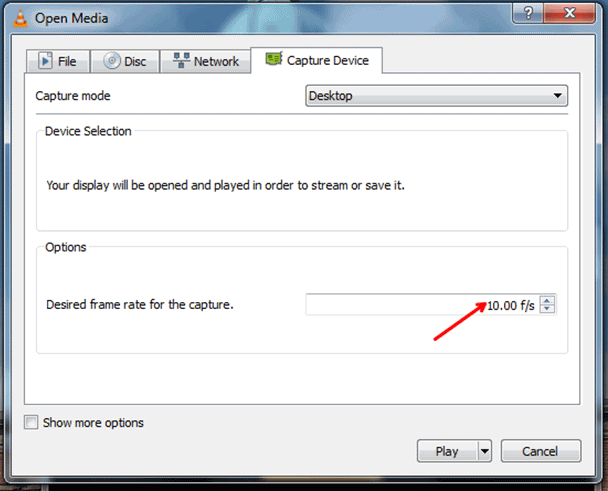
In the bar of the desired frame rate, you can set it according to your choice. The most preferred choice is 30.
STEP#5: Click the Small Arrow Present with Button of Play and Select Convert.
You can see the small arrow near the button of play. Click it. After clicking it, you can see different kinds of options. Click on the Convert button.
STEP#6: Select the Folder for your Output Destination.
You can select the destination folder to save your video. Name your file as you wish and then save it by clicking the save button.
STEP#7: Click the Button of Start.
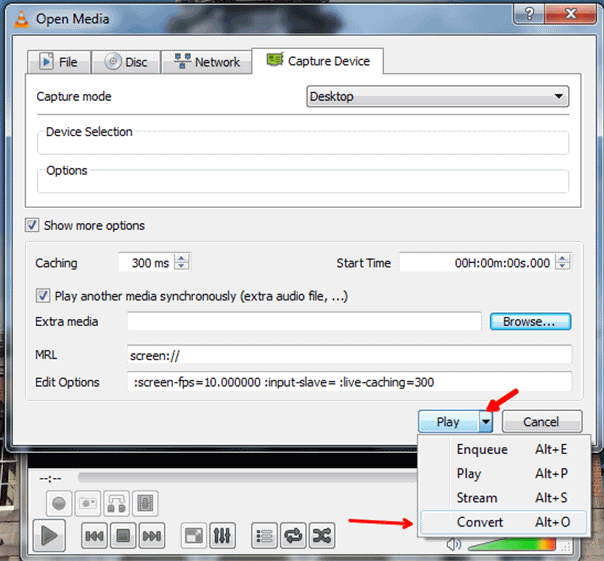
To start the recording of your screen, click the button of start.
STEP#8: To End the Recording, Click on the Stop Playback Button.
After finishing your recording, you can click on the button of the stop playback. You can see this button on the bottom left corner of the screen.
8 Useful VLC Hidden Features you don't want to Miss
There are a number of incredible features of VLC. One of them is that you can use VLC to record screen. Some of its amazing features are as follows:
1. You can create audio and video effects.
Most of the time, the audio is not synchronized with the video. It is very unpleasant. To create customized videos, you need to fix this issue along. You also need a number of different kinds of effects. For this purpose, use VLC Media Player. You can even cut or trim the video in VLC with ease.
2. Desktop can be recorded by VLC.
It is one of the best parts to have a VLC Media player that you can useVLC to record screen. You can easily use it as a VLC record screen and sound. If you want to know how to record your screen using VLC, then do not worry as it is very simple. Firstly, go to the media and then select convert or save. Select capture mode in the capture device tab. A menu will be dropped. Select recording. You can stop it according to your choice.
3. VLC can stream media over the Internet and local network.
One of the incredible features of VLC is that you can use it to stream your media over different local networks. It also helps you to stream over the internet.
4. Take a Snapshot.
You can use VLC media player for different kinds of purposes. VLC media player record screen and can also take a snapshot. You just have to press Shift+S if you are a window user. OS X users can use the command of CMD+ALT+S. You can see your snapshot in your photos.
5. Create Video Wallpaper.
If you want to create video wallpaper, then you can do this task very easily by using VLC.
6. Convert Video files.
You can easily convert the formats of your video files using VLC.Watermarks can be added.You can add your personal watermark for your customized videos by using the Media Player of VLC.
7. Assist in downloading YouTube videos.
It cannot allow you to download video from YouTube directly but can be considered helpful in assisting you in downloading it.
8. Podcast Manager.
The one of the eBay features of VLC is that it can help you to subscribe to podcasts as it is considered as Podcast manager.
Bonus Tip: How to record your webcam with VLC.
You can also use VLC screen recording with audio windows. The media player of VLC allows you to play any kind of video content. It can help you to stream over different types of networks as it is one of its important and incredible features. It has a number of capabilities and one of them is to play everything in it. It can even help you in downloading any YouTube video.
If you have installed a webcam then you can also record your webcam with VLC as this is also considered as its amazing feature. You can follow the following steps to record your webcam by using VLC.
STEP#1: Open VLC Media Player.
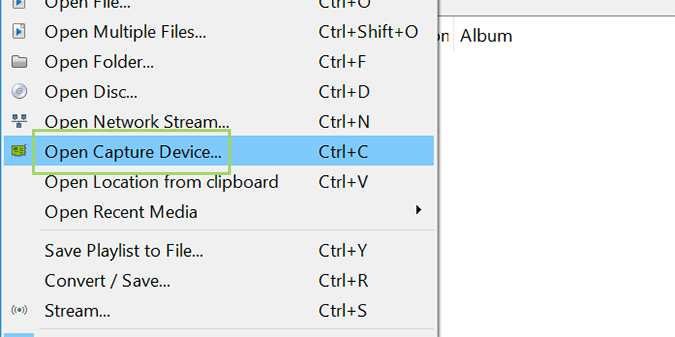
First of all, you have to open the VLC. After opening the software, you can click the media menu and then click on capture device by using the command of Ctrl+C
STEP#2: Capture Mode in Directshow.
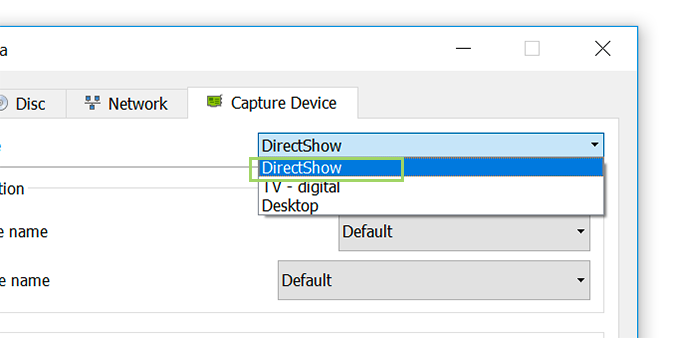
The Capture mode should be in the form of DirectShow as the pop-up window is opened. Select one of the divide but you can leave it in Default if you have only one in installed form. If you want to record only video then select none in audio. You can leave it in default if you have no external webcam installed in your desktop.
STEP#3: Click on the Button of Playdrop.
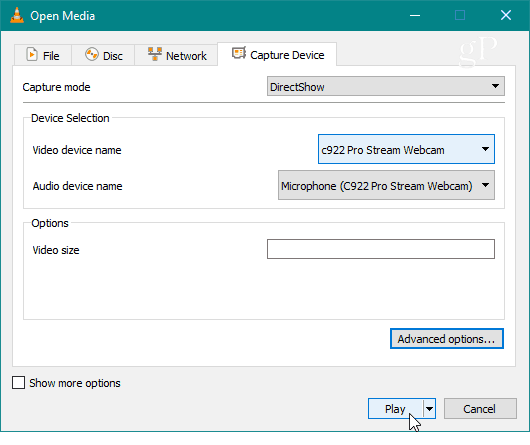
To get the best result, keep your settings in Default. But for adjustment, you can have them in Advanced Options. After selecting video and audio, click the button of play drop and click the Convert Option.
STEP#4: Click Start.
Name your destination file after selecting. Set the setting for video + MP3 for video and audio recording and click the button of Start.
After following the above steps, you can share your webcam recording anywhere after its ending.
Best Alternative to VLC:All in One Screen Recorder and Video Editor.
One of the best alternatives to VLC for recording screen is iMyFone Filme. You can use this all in one screen recorder and video editor to record the screen and edit the video. By following some simple and easy steps, you can easily customize your movie trailers, music videos and many other types of videos. VLC is one the best and friendly video editors as it is used by number of different kinds of users and gamers to record their screens and after recording, edit them.it is compatible and accessible for both windows and mac because of its best and incredible features.
Key Features:
There is no doubt that it is considered as the most significant, unique and best among all other types of screen recorders. It is considered as one of the best all in one screen recorder and video editor. It is absolutely free and accessible.
-
For every beginner, it is very easy to operate.
-
The video is recorded and saved in very high quality.
-
By using some unique and smooth steps, you can customize your video into amazing form by editing.
-
You can record your screen on the computer or mobile in faster mode very easily by using iMyFoneFilme.
-
It has many Different types of incredible editing features.
-
You can easily record your screens for computers and mobiles by following some simple steps.
iMyFone Filme can be operated in different kinds of systems including windows and mac. It is considered very simple and easy to use. It is a cup of tea for kids of gen-z as they can smoothly operate all of its amazing features to record and edit the video.
How to record your screen using iMyFone Filme:
For screen recording and editing your video, you should give a try to iMyFone as it is very easy and has all important options and modes. Because of its simple built features, gen-z faces no problems to operate this screen recorder and video editor. Due to its amazing features and simple built in, you can perfectly and smoothly edit your video after recording. As you begin to start this all in one screen recorder and editor, you can customize your video after recording by using amazing transitions and layouts. It has no complications and confusion because of its simplicity. You can create different types of videos for different kinds of platforms by using this all in one screen recorder and editor.
By following simple 3 steps, you can record your screen of mobile phones or computers.
Step# 1: Open Filme
In your computer, firstly, open it! You can clearly see the icon of the recorder for video and audio both.
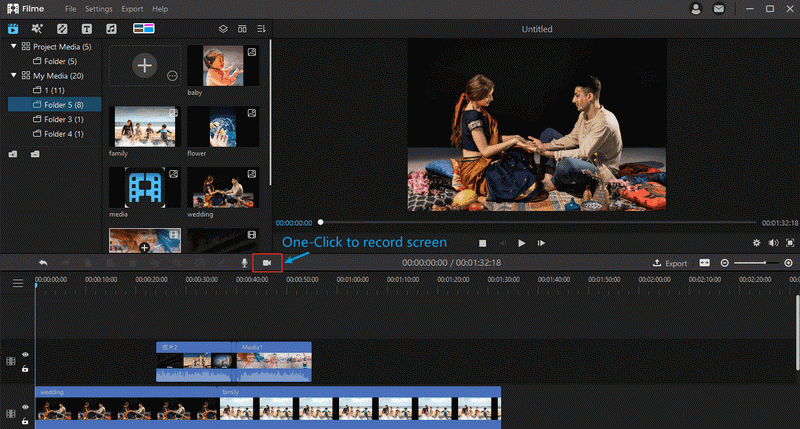
Step #2: Start Screen Recording
As you click on them, the recording of your screen will be started without any problem. After the screen recording is finished,you can go to the media library to see your recording. Its internal gallery is also considered as one of its best features.
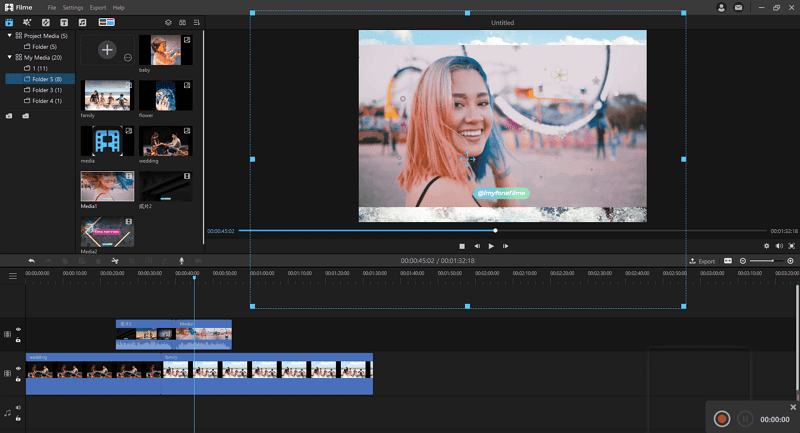
Step 3: Customize your video
By applying different kinds of texts and transitions, you can create the best video. You can use your videos created in this software for different purposes.
The above mentioned points arethe things that you need to know everything about recording your screen. This step by step tutorial will help you to record the screen very easily and efficiently. I hope it was of some help!


