Differences Between Internal Audio and External Audio
It's common knowledge that Apple offers a built-in screen recorder, QuickTime Player. However, QuickTime comes with a set of challenges, the most severe being that it doesn't capture internal audio.
QuickTime doesn't capture audio playing on your Macbook's internal audio card: for example, it won't record the sound coming from programs like games or music interfaces. This is a serious problem for most people trying to record their screens since it is impossible to make engaging content without any audio.
The difference between Internal and External audio is easy to understand: Internal audio uses an audio chip built into your motherboard. Audio generated by any running programs comes under the definition of internal audio. External audio, on the other hand, comes from a sound interface connected to your system via USB, HDMI or other ports. The most common example of external audio is audio input through a mic.
If you need to know how to screen record with internal audio on mac, keep reading to discover working ways to record your screen and internal audio too!
3 Working Ways for Screen Recording with Internal Audio on macOS
You don't have to go without recording any internal audio just because Apple's built-in screen recorder doesn't record it: for most content, internal audio plays an integral part in helping viewers get immersed in your video. You can easily download one of the many screen recording applications entirely, giving you a quick solution on how to record mac screen with internal audio.
Here are some of the easiest ways to record your screen with both Internal and external audio on your macOS:
1. BlackHole: An open-source virtual audio driver allowing you to pass audio between applications with zero latency
BlackHole is a third-party plugin for QuickTime Player. You can download the plugin from their official download page here . Read the following steps to learn how to configure your audio setup to run BlackHole:
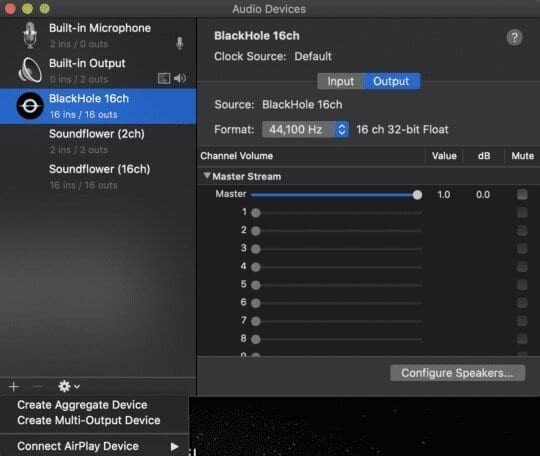
a. Open the Audio Devices Window by searching 'audio midi setup' in Spotlight Search.
b. Successful installation of BlackHole adds a virtual BlackHole 16ch device. Create an 'Aggregate Device' by first clicking the plus icon at the bottom of the menu, and rename the newly created device to Quicktime Input. Under QuickTime input, tick the 'BlackHole 17ch' checkbox.

c. Create another virtual device, choosing 'Multi-Output Device', and rename it to QuickTime Output. After that, enable the 'Blackhole 16ch' option and 'built-in output'
d. Lastly, navigate to Sound in System Preferences and the 'Output' tab therein. Select 'QuickTime Output', the virtual sound device created earlier.
Following these simple steps allows you to use QuickTime Player to answer the question of how to screen record with internal audio mac!
2. Soundflower: A plugin for older macOS platforms with perfect sound capture
Like BlackHole, Soundflower is a plugin for macOS answering how to record your screen and audio on mac. The steps for installation are the same: you can download the plugin here, and after installation, use the following steps to set up your plugin:
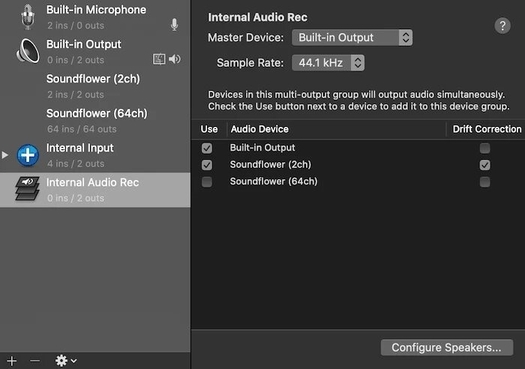
a. In Audio MIDI setup, create an Aggregate Device and rename it to 'Internal Input'. Check both options on the left for 'soundflower 2ch' and 'built-in mic'.
b. Create a Multi-Output device and change its name to 'Internal audio rec', checking both options under it for 'built-in output' and 'soundflower 2ch'.

c. During the actual recording, click the volume button and choose 'Internal audio rec', and make sure to choose 'internal input' as the sound source for QuickTime Player!
Using this method also captures external audio, meaning you can add voice lines to your recording!
3. Background Music: A macOS audio tool to adjust volumes of individual apps and record system audio
Background Music offers a simple, streamlined method on how to record mac screen with internal audio without having to create virtual devices. Besides allowing you to easily record system audio for screen recordings, Background Music also gives you the option to adjust the volume for each app on your macOS.
You can use Background Music to enable system audio for screen recordings through the following steps:
a. After launching the app, open QuickTime Player and select File, selecting New Screen Recording from the menu.
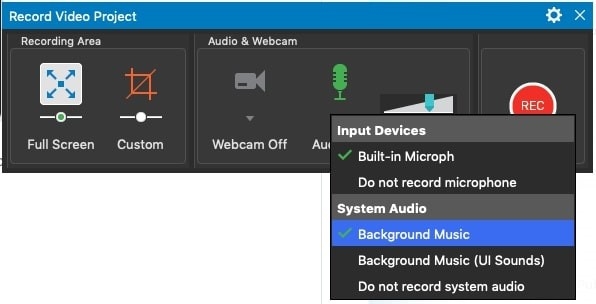
b. There, open the drop-down menu beside the Record button and choose 'Background Music' as the Input Device.

c. You can also enable recording external audio through a microphone by creating an aggregate device to combine your input device with the Background Music Device.
BlackHole, Soundflower, and Background Music are some of the simplest methods out there for recording. You can use any of these methods to record both internal and external audio with your screen recording, but all of them require heavy, complicated setup processes that people new to the field will definitely find hard.
Recommended Screen Recorder for Beginners- iMyFone Filme
Sure, you can use a whole host of plugins to discover how to record screen on mac with internal audio using QuickTime Player, but the main drawback of QuickTime Player is that it doesn't offer any editing options. Instead of having to download a separate video editor, it's better to use a screen recorder app that allows various forms of editing, such as iMyFone Filme.
iMyFone Filme is a newly developed Video Editor/Recorder that offers a whole range of benefits and editing options. Perhaps one of the most important features offered by iMyFone Filme is a comprehensive and easy-to-learn screen recording option.
It captures both the internal audio generated by games and other programs (often called system audio) and external audio input through devices like a microphone.
You can choose different devices for audio input and, when you're done recording, you can even edit the video using iMyFone's range of editing options.
Editing Options with iMyFone Filme
Here are some of the things it allows you to do easily, without requiring any experience in video editing:
Smooth, flowing transition effects that add a colourful vibe to switching between scenes.
iMyFone Filme also allows you to edit your videos with a Picture-in-Picture effect. This lets you present multiple things at once for a smoother, more concise delivery.
Creating exquisite slideshows from templates customized for hundreds of different kinds of presentations.
Changing the soundtrack of the video with any audio files you like.
Allows you to multi-layer different elements of your video or slideshow, such as audio, text, transitions, overlays and animations.
iMyFone Filme allows you to play up to 8 different audio tracks at the same time.
iMyFone is widely considered as one of the top Screen Recording softwares for macOS, a fact reflected in it being ranked in top video editor/screen recorder lists for quite some time.
Part 4: Practical Tips for Screen Recording on Mac
Even if you know the best software to use for screen recording, it won't help a lot if you don't know some of the basic tips and guides to follow for screen recording on Mac. Things like cleaning up your desktop interface, making sure no notifications pop up at the wrong time and others are just some of the various things you should know before attempting screen recording.
Follow these practical tips to learn how to record your screen without messing up the video:
1. Clean up Your Desktop
This is perhaps the most basic, essential tip: always make sure that your desktop is clean and free of pesky icons. You can have the most engaging, interesting content, but audiences will still be disgusted by desktops that are cluttered up with hundreds of icons and folders.
2. Disable Notifications
It's also a good idea to disable notifications for a short time so you can conduct your recording without interruptions.
3. Don't Use a Built-in Microphone
More common sense than anything, using a built-in mic will definitely harm your video. The main reason for this is the fact that most built-in mics are of middling quality, and often obscure your words entirely. It's a much better option to invest in a good external Microphone that you can easily use with iMyfone Filme!
4. Mind Your Cursor
A cursor is the first thing that eyes are drawn to during a screen-cast or screen recording, which is why you should take care to always keep your cursor over the relevant content. Don't loiter your cursor just anywhere when trying to learn how to record mac screen with internal audio.
Final Words
Screencasting is the most basic level of creating videos. A short, simple method that only requires software capable of recognizing both Internal audio (also called system audio) and external audio (input through a mic).
iMyFone Filme, one of the best screen recording plus video editing programs for macOS, allows you to perform your task easily and without any previous instruction.


