PowerPoint is an essential skill for all professionals. A PowerPoint presentation with audio or video will be easily understood by your audience and hold their interest. Still, making PowerPoint record presentations with audio or video is not an easy task. This tutorial tells you how to record a PowerPoint presentation with video with help of iMyFone Filme Ponopto Express.
Contents
Part 1: How to Record a PowerPoint Presentation with Video
Microsoft PowerPoint 2016 has a feature that allows you to record yourself presenting a PowerPoint and they already added the feature to PowerPoint 2013. However, if you are using an earlier PowerPoint version such as PowerPoint 2010 and PowerPoint 2007, you will need a third-party tool to record yourself. iMyFone Filme is currently one of the best tools you can use to record yourself presenting a PowerPoint.
iMyFone Filme is simple by a very powerful tool that makes video files that are compatible with Mac, Android, and Windows operating systems. It also offers a fast slideshow maker that facilitates quick conversion, managing, and editing of PowerPoint presentations. This tool will help you reach a wide audience and access your files easily. Here is how to record yourself presenting a PowerPoint.
Steps to Record a PowerPoint Presentation with Video
PowerPoint 2007 allows you to record narrations for your slideshows but it does not allow recording of video. Here is how to record yourself presenting a PowerPoint if you are a user of this version.
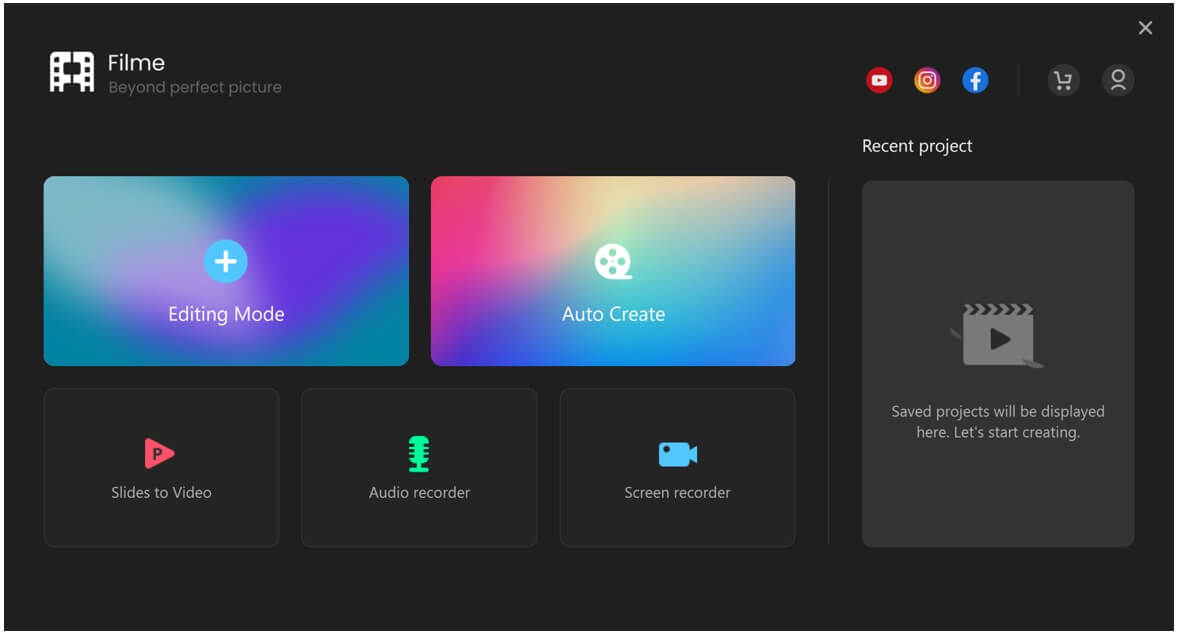
Step 1: Click the Screen Recorder
After opening iMyFone Filme, it will display several options. Click on the "Screen Recorder" option.
Step 2: Launch PowerPoint
Launch your PowerPoint presentation and click on the slideshow button situated near the lower-right corner of your computer screen. If you choose a full-screen slideshow, the PowerPoint slideshow will occupy the whole screen.
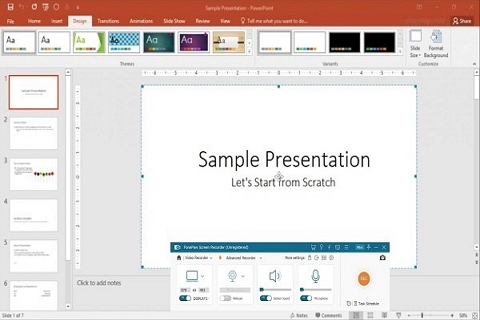
Press the Enter button, the Page Down, the spacebar, the down arrow or click the mouse to advance to the next slide. You can alternatively open the Slide Show tab situated on the Ribbon.
Step 4: Choose Start Page
Click "From Beginning or "From Current Slide."
Step 5: Start to Record
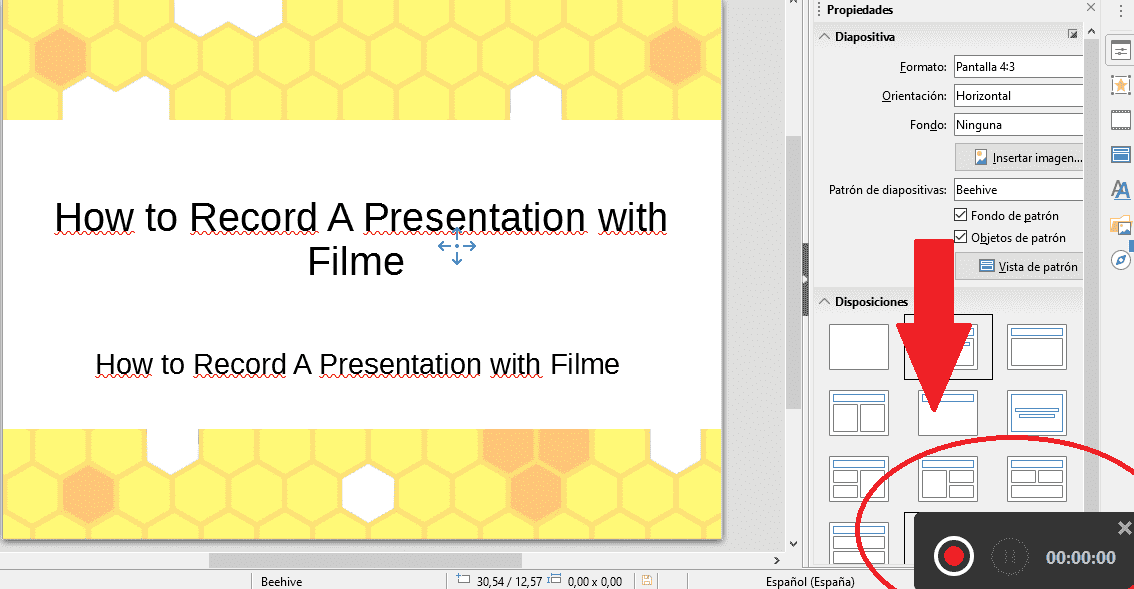
Find a rectangle with a red button near the bottom right corner. Click on it when you are ready to start recording. iMyFone Filme will show the video of yourself presenting the PowerPoint at the bottom right of your presentation if you have the camera attached.
Step 6: Stop the Recording
Press F7 when it is time to stop the recording. The Filme Editor will appear
Part 2: How to Record a PowerPoint Presentation with Audio
At times, you will only need to record a PowerPoint presentation with audio narration only. In such cases, you will not need a third-party tool because all PowerPoint versions allow you to do that.
Tutorial to Record Voice Narration for PowerPoint
This tutorial will guide you through the steps of including voice narration in your PowerPoint presentations. But before you start adding the narration, you have to prepare several things. Here are the things to prepare and the steps to follow when recording the narration.
1. Things to Prepare
There are two things to prepare before you start recording the narration for your PowerPoint presentation. Here are the two things.
- Prepare the Script
The first and possibly the most important part involves creating the script. A script is a document containing everything that you plan to say in the PowerPoint record presentation.

- The Microphone
The microphone and how you use it can affect the quality of your audio recordings. So, position the microphone at the right distance from your mouth before you start the recording.
2. Steps to Follow
If you have a microphone, you can record a slideshow voiceover narration for the whole presentation. That is important if you are planning to use the slideshow for self-running presentations or videos. Here is how to record a PowerPoint presentation with audio.
Step 1: Start to Record Narration
Open the presentation you would want to add the audio narration and select "Slideshow" and move to "Record Narration."
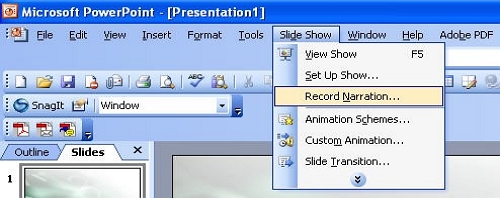
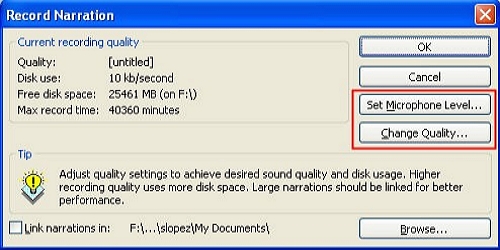
The "Record Narration" dialog box will pop up.
Step 2: Set the Microphone Level
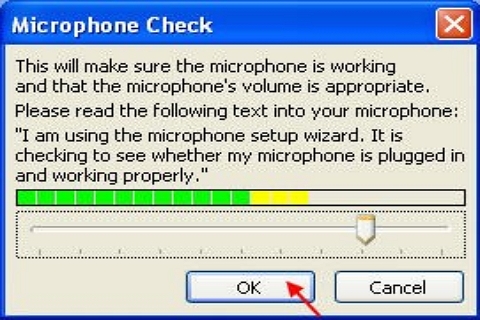
Click on "Set Microphone Level" to launch the "Microphone Check" dialog box. Position the microphone several inches from your mouth and not directly in front of it and the microphone will adjust automatically. Click "Ok" to return to the "Record Narration" dialog box.
Step 3: Selecting the Sound Quality
Click on the "Change Quality" option to launch the "Sound Selection" dialog box. If you plan to use a compressing software tool, choose "Attributes" – to be 44.100 kHz, 16 Bit, Stereo, 172 kb/sec.
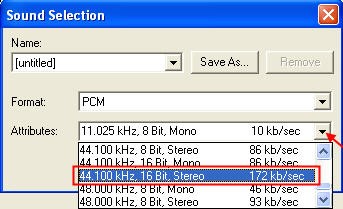
If you have no plan of compressing the files, choose "Attributes" – to be 22.050 kHz, 16 Bit, Mono, 43kb/sec. Click "Ok" to return to the "Record Narration" Dialog box.
Step 4: Embedding or Linking the Sound Files to the Presentation
PowerPoint allows you to link your audio files or narrations or embed them into your presentation. Check the "Link narrations in" box if you prefer linking the sound files to your presentation.
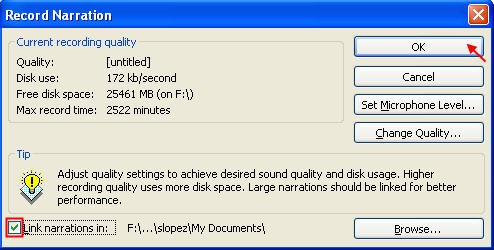
If you prefer linking your sound files to the presentation, PowerPoint will save your (.wav format) sound files separately. However, they will stay linked to the slides and the presentation file will remain in the original size.
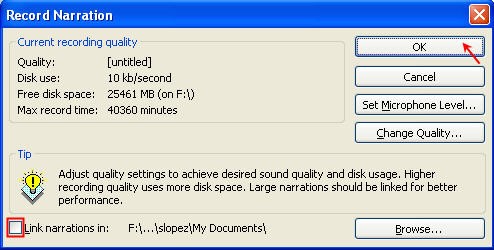
Leave the "Link narration in" box unchecked if you prefer embedding the sound files to your presentation but that will make your files larger. Click "Ok" and PowerPoint will launch the first slide as a slideshow.
Step 5: Start Recording the Narration
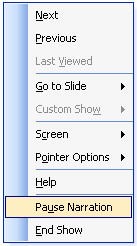
(1) Start recording your voice. You can pause the narration to catch your breath or collect your thoughts by right-clicking anywhere on your screen. When you do that, the "drag down" menu will pop up. Click on the "Pause Narration" option.
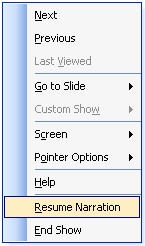
(2) To resume the recording, right-click on any place and select the "Resume Narration" option.
(3) After the last slide, a message will pop up informing you that all your recordings have been saved to the slides. The message box will also require you to save the slide timings. Click on "Save."

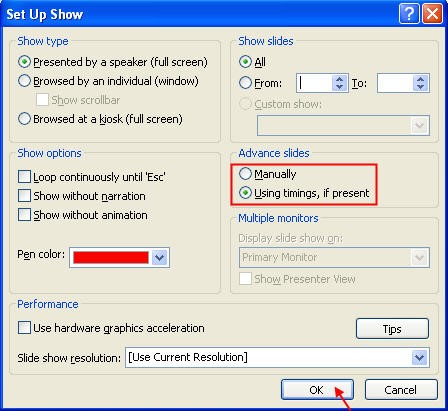
(4) After launching the slideshow, it will play the narrations automatically. If you would want to run the slideshow presentation without timings, go to "Slide Show >> Set Up Show and click on "Manually" under "Advance Slides".
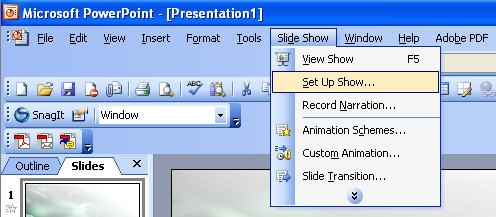
(5) When a need to use the timings arises later click on "Using Timings, if present"
(6) If you want to change when to play the sound, go to Slide Show >> Custom Animation.
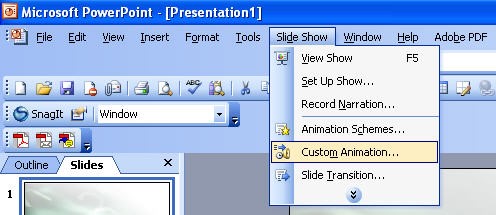
(7) Choose the sound icon situated under "Modify: Play> and pull down the "Start:" bar. Choose the options.
Also Read:
How to Screen Record with Microphone >>
Part 3: What Should You Do After Recording PowerPoint Presentation
After recording your PowerPoint presentation you have to do several things before sharing it with your audience. That will ensure that the video will present the information in the best way possible. Here are some of the things to do.
1. Check for the Mistakes in the Presentation
After recording your presentation video, you have to look for mistakes and fix them. Some of the commonest mistakes include a weak introduction, speaking too fast, too much material, reading the slides, and not pausing.
2. Convert to Video
After recording your PowerPoint Presentation with Audio narration, you will have to convert ppt to video. To do that on PowerPoint 2010:
Open Your PPT file click on File >> Save and Send >> Create a Video.
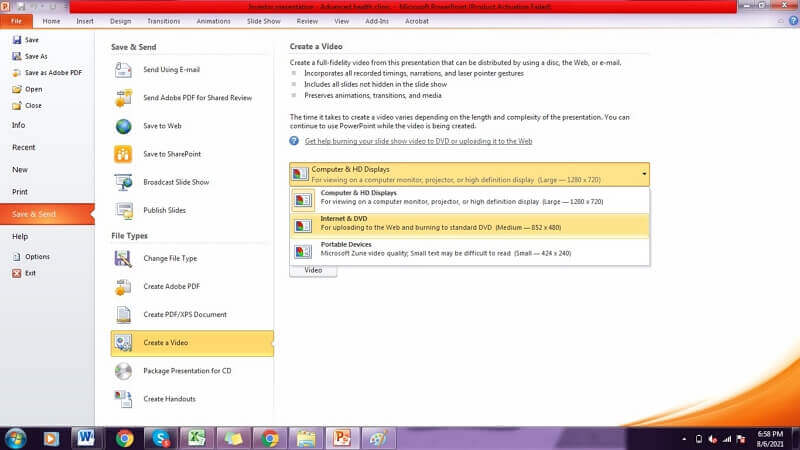
Click "High Definition and PC Display" and choose the PowerPoint video quality. You can choose PC and HD display, Portable devices, Internet and DVD.
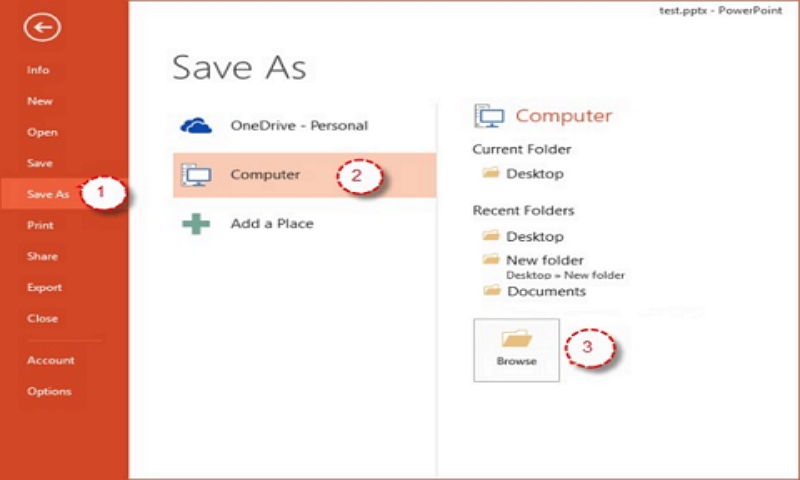
To record the presentation with Narration click on "Use narrations and recorded timings".
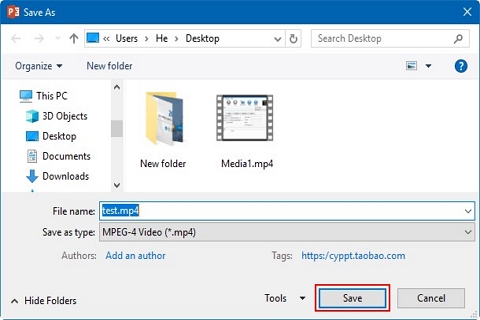
Finally, click on "Create Video" and save your video. Remember to save the video in MP4 for easier sharing.
3. Futher Edit Steps with Filme
iMyFone Filme works with projects. Therefore, after recording your presentation, a new project will open. You can import any additional video or audio to the project at this stage.
4. Publish to Different Platforms
After creating a PowerPoint presentation video with your narration, you can post it on a video-sharing site such as YouTube, the social media, or post it on your website or blog. That will allow your target audience to view and share the video. Ensure that the video is in a format that is easy to share.
Part 4: People Also Ask
PowerPoint presentations are common and they help educators, marketers, and business owners communicate their message easily. When creating a PowerPoint presentation, here are the two frequently asked questions to keep in mind.
1. What Makes PowerPoint Presentations Effective?
People are visual, meaning that they take in more information when watching than they do when reading. PowerPoint presentations also convey emotions in a better way and cement the information. The presentations allow people to digest the information easily, particularly when the information relates to complicated concepts. They will also allow you to establish a good relationship with your audience easily. Adding a video of yourself presenting the PowerPoint will help you achieve that.
2. How Do You Start a PowerPoint Presentation?
You can start your PPT presentation in various ways. You can start by sharing an anecdote or a short personal story. Also, you can kick off the presentation with a provocative statement, a startling statistic or data, telling clean jokes that suit your audience, and asking loaded rhetorical questions. Show a compelling visual to the audience and hook them with a fascinating quotation.
Conclusion
That is how to record a PowerPoint presentation with a video of yourself narrating the presentation or audio narration. If you have one of the latest PowerPoint versions such as PowerPoint 2013, 2016, and 2019, the Record Slide Show option will provide you with many options. Keep in mind that recording your presentation with audio and video will increase the size and you may need to compress it before sharing. You can use an online tool to do that.


