Discord is a fascinating plate-form known for bringing lots of people to talk to each other. It offers countless communication tools.
The only downside will be its inability to record content for future use. That's where the need for OBS generally comes. You can record Discord audio with OBS devices with ease.
This method is so easy to operate, offering the best possible results for you. But some people don't know how to record audio using OBS devices. That's why we've created a guide telling about how a person can record Discord audio using an OBS tool.
Let's begin it.
What is OBS?
OBS is the abbreviation of Open Broadcaster Software, an open-source live production tool supported by a massive community of developers worldwide.
You can use OBS for live streaming, video production, and video recording. OBS also supports many plugins meaning its functionality can extend to include various features such as Stream deck controls, VST plugins, and NDI support.
How to Record Discord Audio with OBS on Mac
If you want to know how to record Discord with OBS on Mac, we'll give the complete in-depth detail to follow. You only need to follow the exact instructions to get your job done.
Let's begin it.
Step 1: Install OBS
In the first phase, you'll need to install OBS on your system. After installing it, the step will be to sign up.
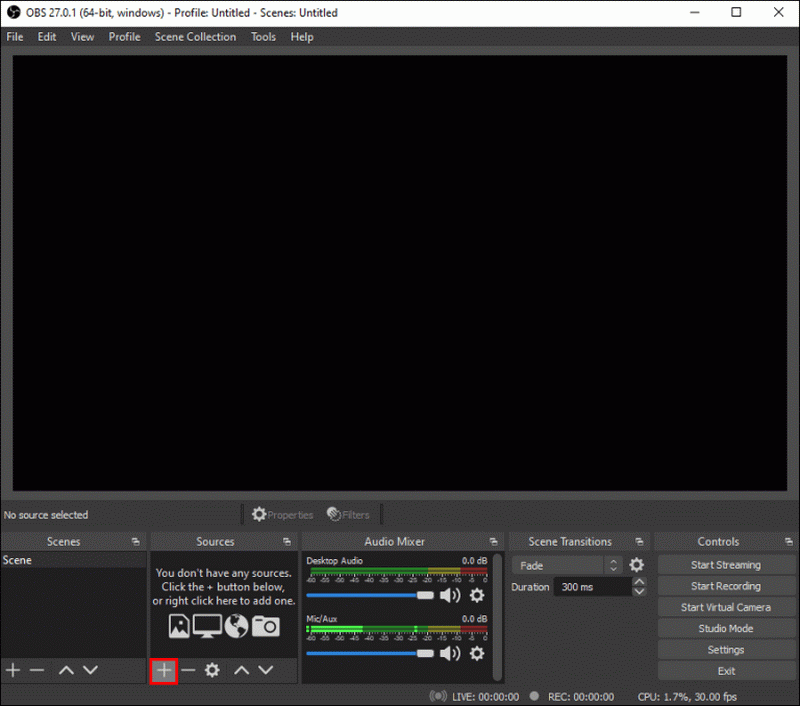
Step 2: Press the Plus icon.
Now, you'll need to move towards the'' Sources section'' in OBS and hit the + icon at the bottom of the screen.
Step 3: Choose Audio Output Capture
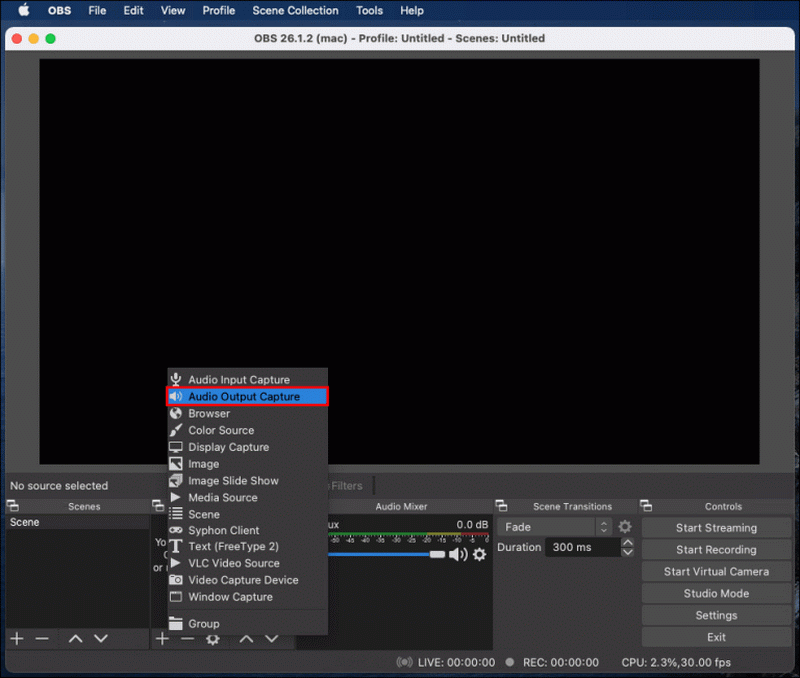
Now you need to press '' Audio out Capture'' from the dropdown menu.
Step 4: Click OK
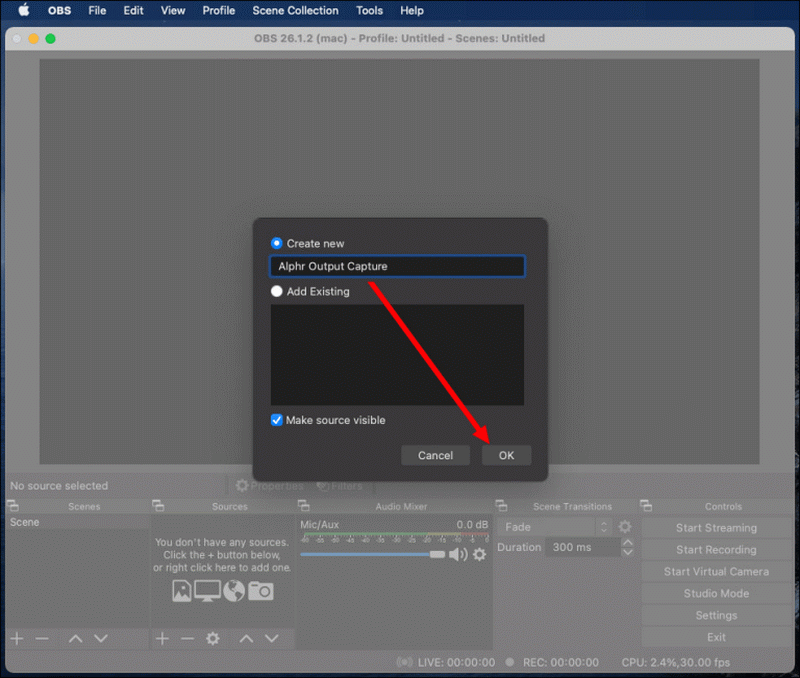
Now, you'll need to name your audio source and make sure the '' Make source visible'' option stays enable. After all, hit the' OK' button.
Step 5: Select Audio output device
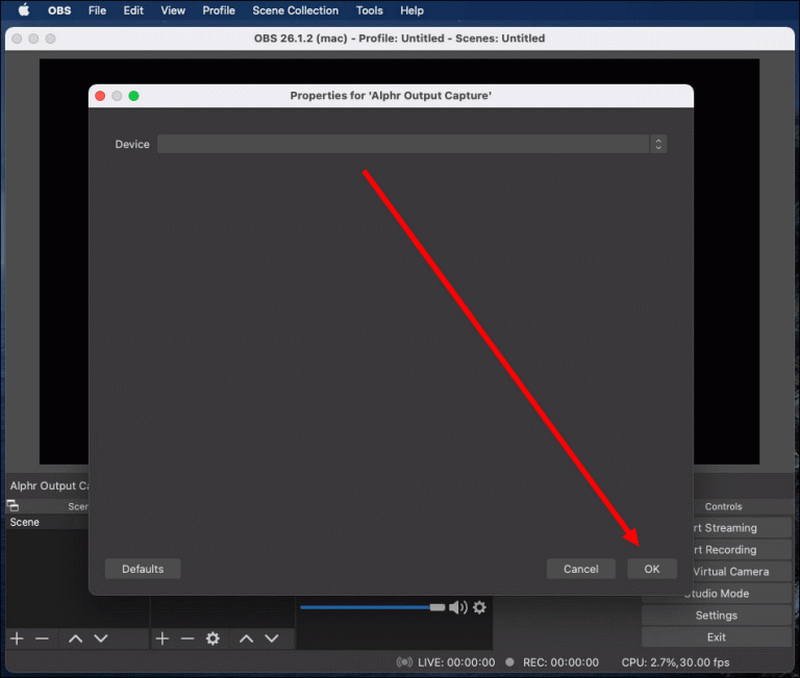
You're supposed to select an audio output device by expanding the dropdown menu, for instance, speakers or headphones. Later, Click '' OK''
Step 6: Start Recording
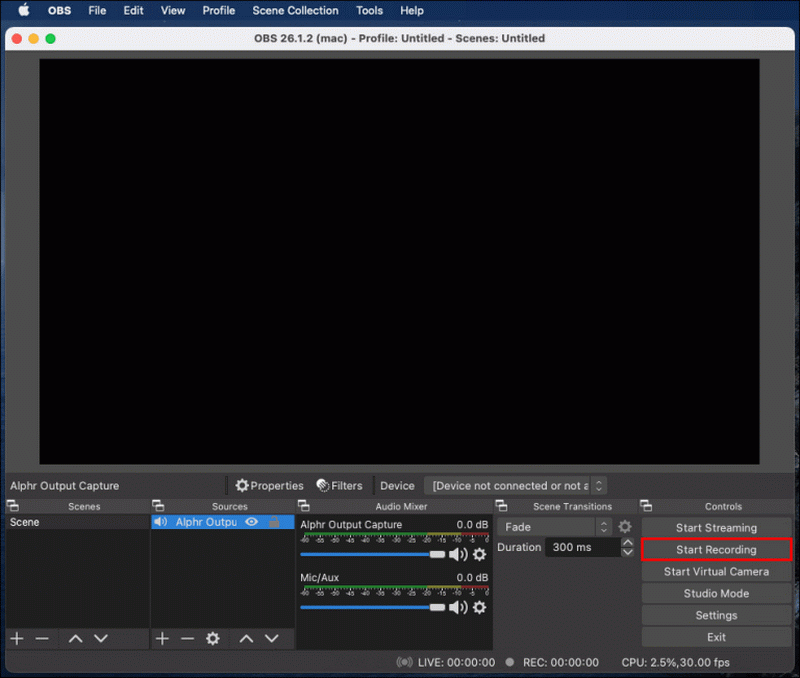
Press on the '' Start Recording icon''. You'll find that option in the 'Controls'' sections at the right corner of your screen.
Step 7: Choose Format
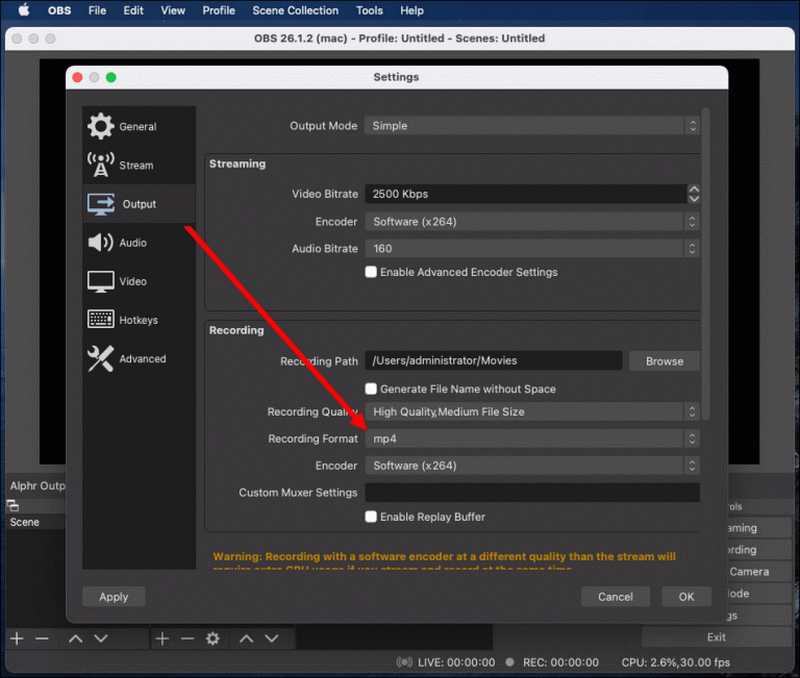
By default, your audio will now be recorded as a black video file. MKV format. If you want to select a different format, you can select it by clicking output. Now you can select your preferred format from the Recording format.
Step 8: Press the loudspeaker icon.
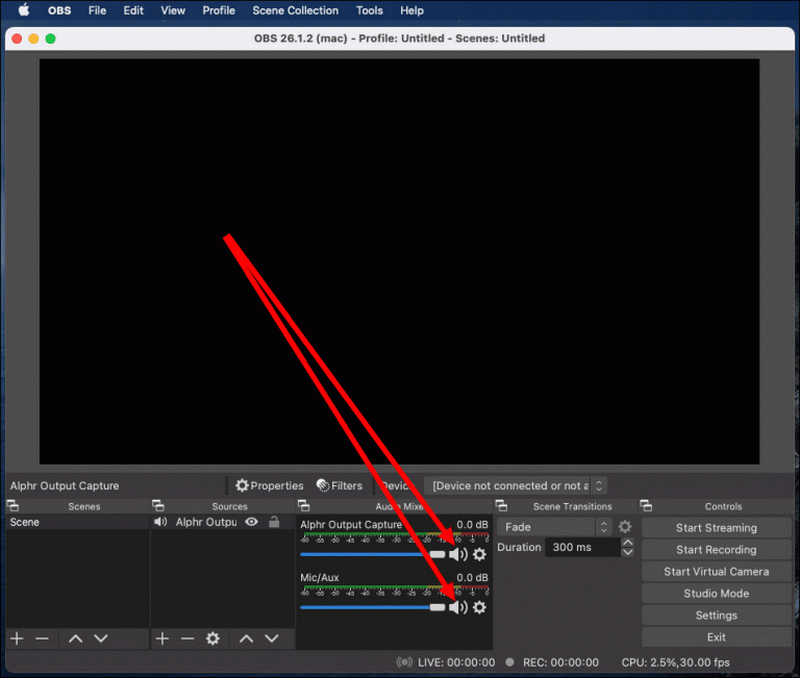
If you want to enable or disable microphone recording, you'll need to press the loudspeaker icon in the audio mixer section.
Step 9: Shift blue slider.
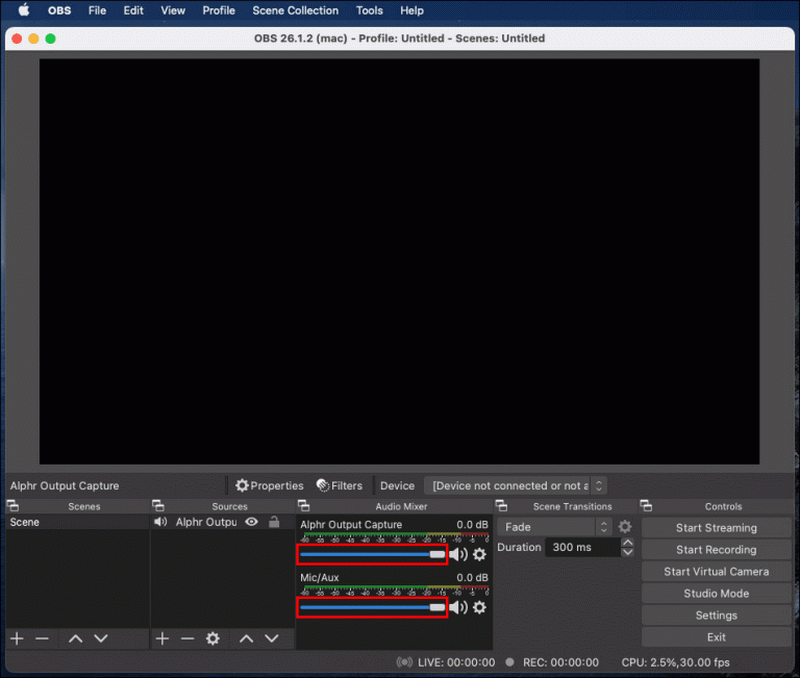
You'll need to shift the blue slider next to your loudspeaker icon to regulate your recording volume.
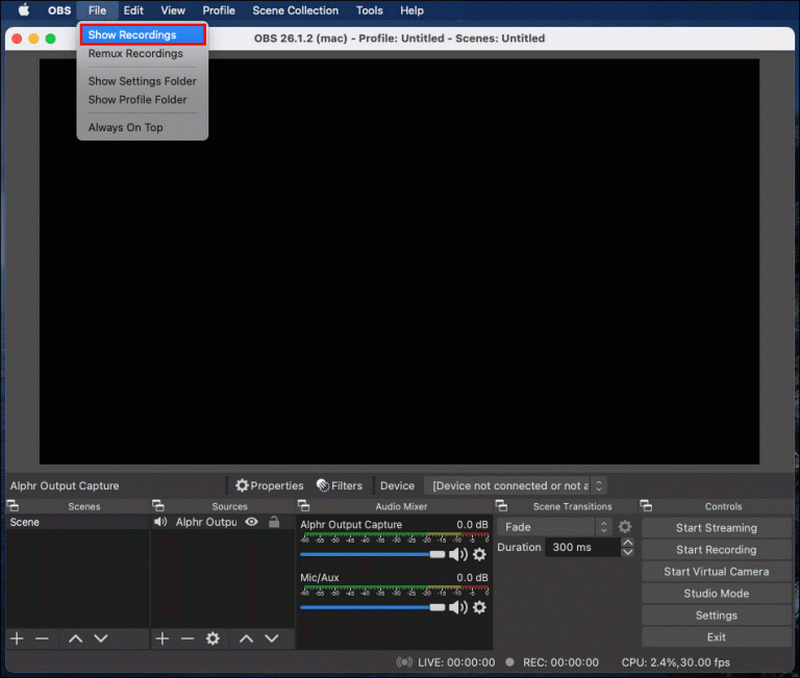
Step 10: Click File
If you want to watch your recordings, you'll need to press the File and Show Recordings icon.
Also Read:
Record Audio on Google Slides >>
Record Audio on Final Cut Pro >>
Record Internal Audio on Mac >>
How to Record Discord Audio with OBS on Window
OBS for Windows 10 is quite similar to Mac. You'll need to follow these steps to know how to record Discord audio with OBS on Windows.
Step 1: Install OBS
Install OBS, and sign up.
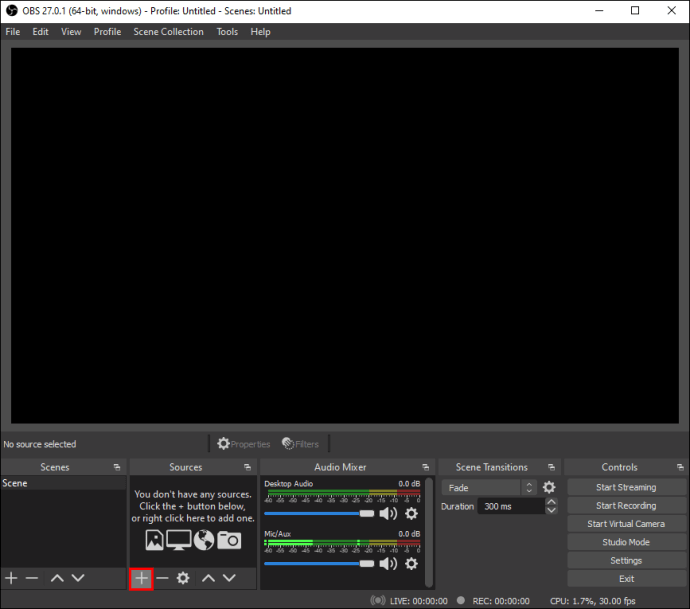
Step 2: Press the Plus icon.
Now, you'll need to move towards the'' Sources section'' in OBS and hit the + icon at the bottom of the screen.
Step 3: Select Audio Output Capture
You need to hit the'' Audio out Capture'' option from the dropdown menu.
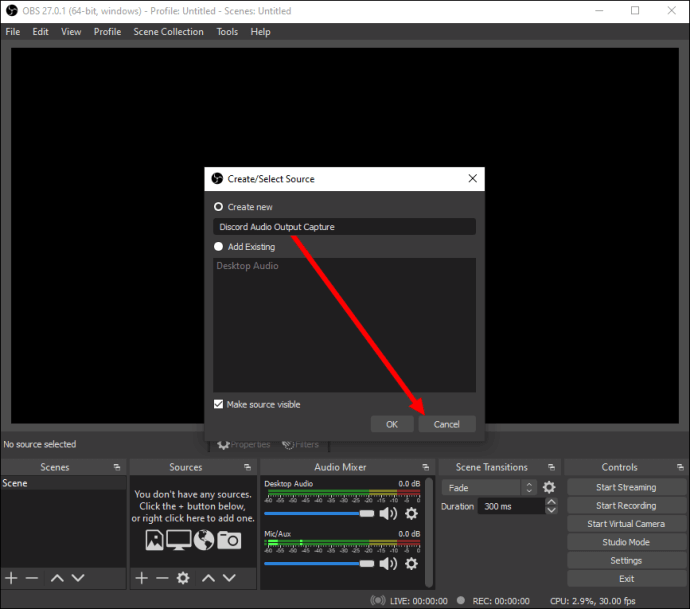
Step 4: Hit OK
Now, you need to give a name to your audio source and make sure the '' Make source visible'' option is enabled. After all, this, Click the' OK' button.
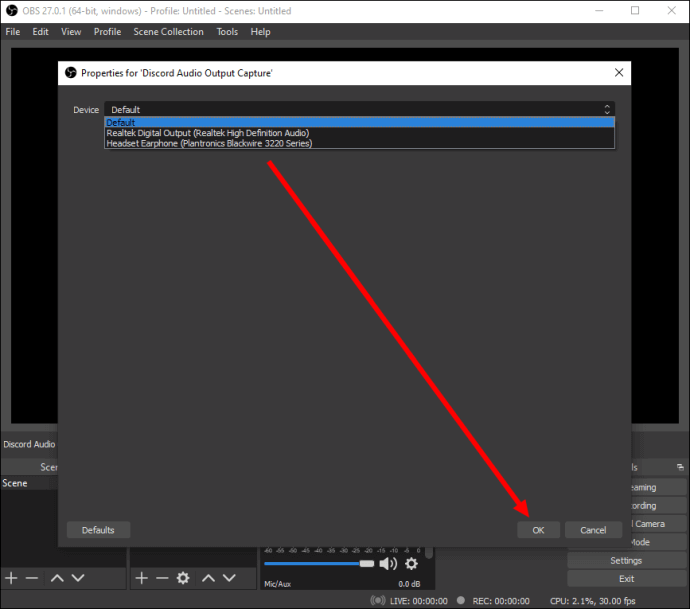
Step 5: Choose Audio output device
Now, you need to choose an audio output device by expanding the dropdown menu. Later, Click '' OK''
Step 6: Click on Start Recording
You'll need to hit on the '' Start Recording option''. You'll see this option in the 'Controls'' sections on the right side of your screen.
Step 7: Select a favorable Format.
By default, your audio is recorded as a blank video file.MKV format. If you want to choose a preferred format, you can select it by hitting the Output option. Now you can select your preferred format from the Recording format.
Step 8: Select the loudspeaker icon.
You can enable or disable microphone recording by the press on the loudspeaker option in the audio mixer.
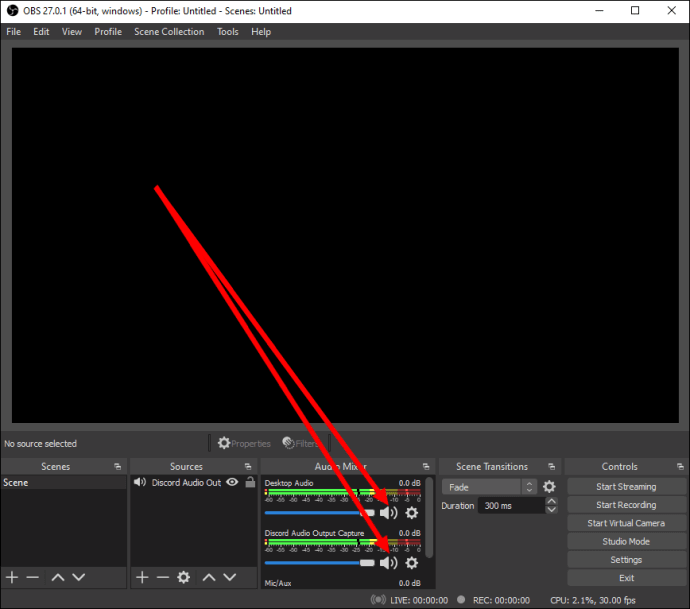
Step 9: Shift blue slider.
You can regulate your recording volume by shifting the blue slider located next to your loudspeaker icon.
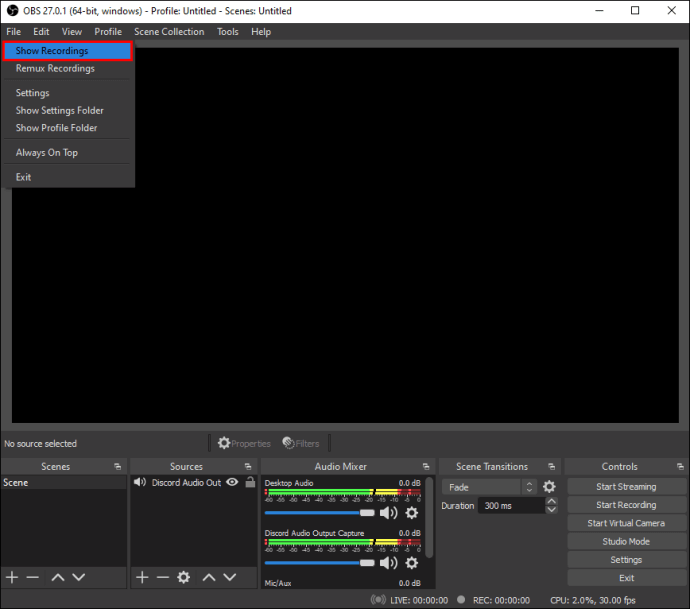
Step 10: Click Show Recordings
If you want to find your recordings, you'll need to hit the File and Show Recordings icon.
How to Record Discord Audio Separately with OBS
If you want to know how to record Discord audio separately with OBS, you'll need to follow these simple steps.
Let's start it.
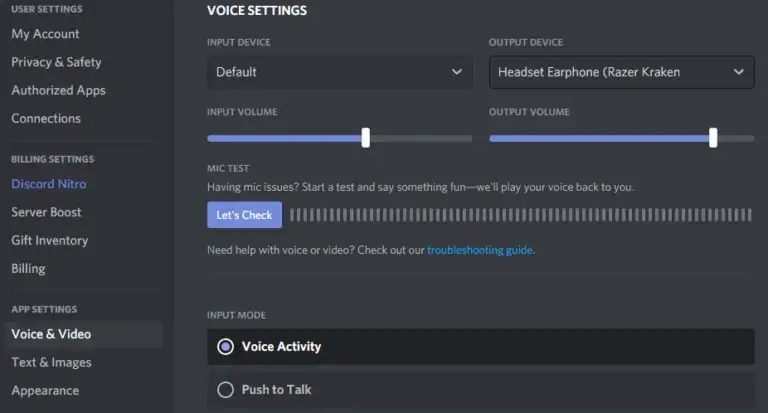
Step 1: Check output device
You'll need to check your output device in your Discord settings. For this, you need to press the'' Voice&Video'' option on the bottom of your screen.
Step 2: Add the device to the OBS scene
Now, you'll need to add your device to OBS as a source to allow your OBS to access Discord audio. After going into the source pane, you'll need to press the'' +'' icon and add '' Audio Output.
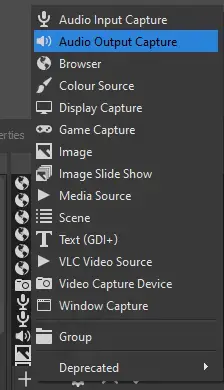
A new window will appear. If you have already added your audio device from Discord to your OBS, you can easily choose it from the'' Add Existing'' icon. Otherwise, you need to create a brand new audio device. After doing it, click on OK.
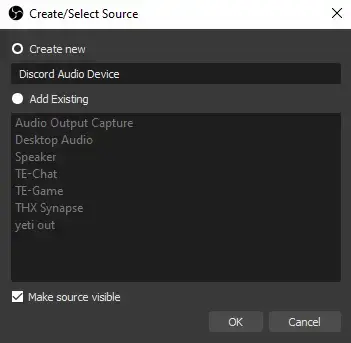
When you create a new audio device, you'll see a window popping up asking you to choose an audio device. You'll need to make sure the device you're selecting must match with the device used by your Discord for output.
Step 3: Test your added device.
Now, you can check the credibility of a device you've added. You can make a call or chat with your friends having OBS open. If your bar is lighting up, meaning your system is now ready.

Step 4: Add Discord device
Before going live, you'll need to make sure you're adding your Discord device before changing any plans about chats. This process will protect you from being in an awkward situation like you're having an awful conversation with someone, but chat doesn't have any idea what's going on.
Best OBS Alternative to Record Discord Audio -iMyfone Filme
If you're looking for an appropriate OBS alternative to record Discord audio, iMyFone Filme is probably the best one that comes in our mind.
Its excellent feature and ability to make changes in your audio make it a notch superior to any other editor. It offers countless audio features, meaning you'll not face any trouble recording Discord audio.
Features
Simplicity
One key factor that makes iMyFone Filme stand out is its simple interface and marvelous framework. You'll not see any problematic things in this tool that might be hectic to operate. It possesses a smooth interface, allowing beginners to understand it with no fuss.
Crop Tool
If you want to crop your videos, iMyFone Filme is pretty keen to provide you with this feature. You resize or crop your video using the easy interface of Filme.
Adjust Speed
Creating a video with real-time footage won't make your video entertaining and engaging. You'll need to adjust the speed of your clips to make them relevant. IMyFone Filme is offering the facility to slow down or fast-track your video anytime you want.
Steps of Recording Discord Audio
Step 1: Launch iMyFone Filme
After installing Filme on your PC, open it. Now, you'll need to import an audio track and move it to the tool's timeline. After moving it there, select it.
Step 2: Click the Record Audio icon.
Now, you'll need to press the Record Audio option to proceed.
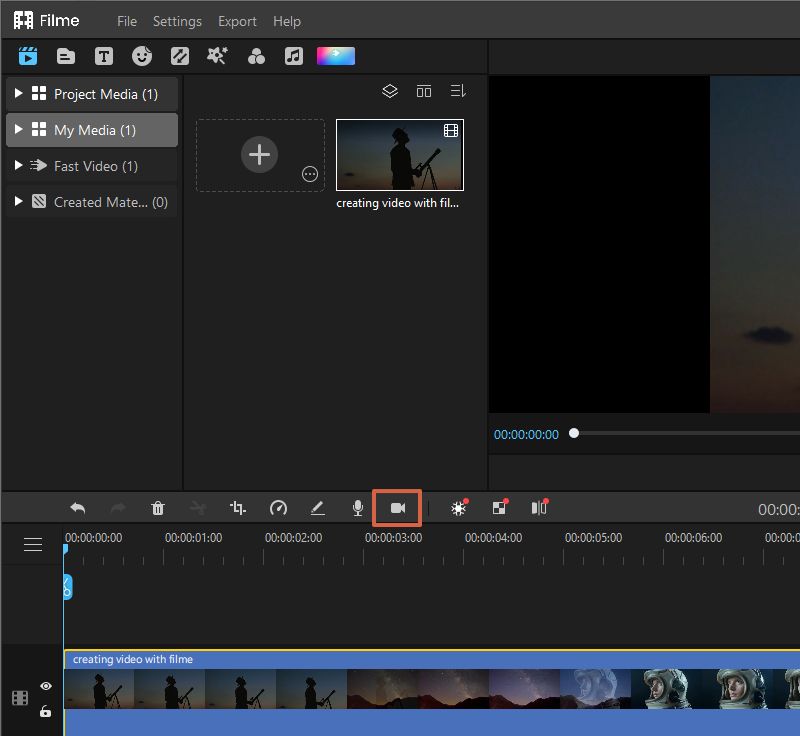
Step 3: Apply Voice change effects
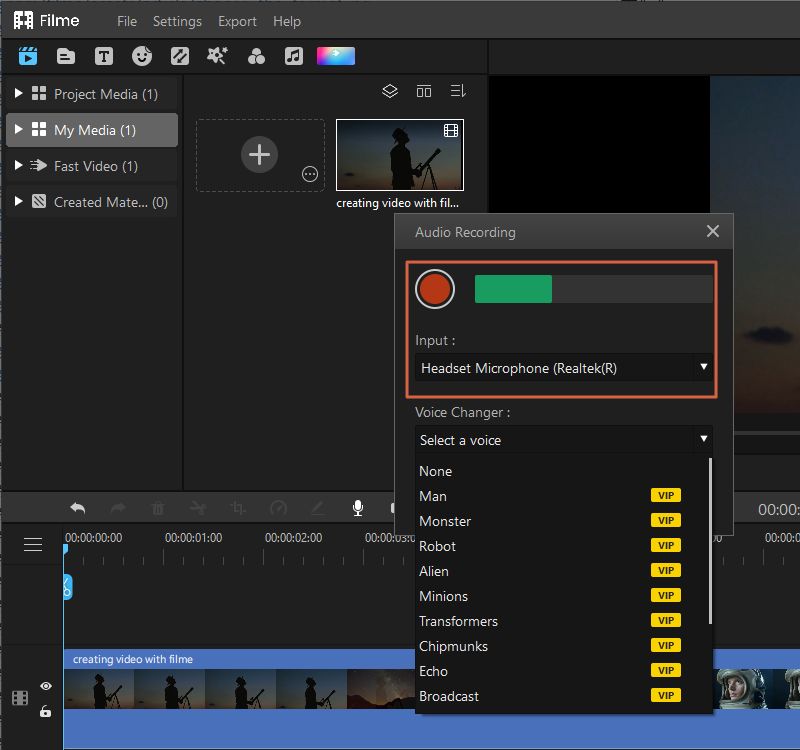
Now, an Audio Recording option will pop up. You need to select the input to Headset Microphone. You can add some fascinating voice changer effects if you want. Suppose you want to record audio in your original voice; select none.
Step 4: Click the red play button.
Now, you only need to click the Red play button to start the recording process.
Step 5: Click the Stop button.
After you're done with the Discord record, click on the Stop button. You can also trim, add fascinating sound effects from there.
Final Words
OBS is a pretty famous broadcasting that has earned huge appreciation off-late. Using OBS devices, you'll be able to record Discord audio without any fuss.
However, you can only record Discord audio with OBS on Mac, Linux, and Windows. We've explained about Mac and Windows 10 in this article.
Moreover, if you want to look for an OBS alternative, there is a tool available in the shape of iMyFone Filme. It's a prolific tool capable of serving people what they could have hoped for.


