Transitions can make your videos more attractive, and you can easily add transitions using iMovie. It has various preset transitions available that you can add to make your videos more appealing. In this article, we will see how you can add transitions in iMovie.
For your ease, we will also introduce a better and user-friendly video editor, Filme.
Part 1. Add Transitions in iMovie [iOS & macOS]
Adding transitions in iMovie is pretty simple. You just need to follow a few simple steps. You can easily add as many transitions as you like.
Steps to Add Transitions in iMovie
Step 1: Open iMovie
After downloading and installing iMovie, open it. You will see an interface having a "+" sign. Tap on it to start your project.

Step 2: Select Movie
When you click on the + button, you will be provided two options to select either you want to film it like a Movie, which combines photos or videos, or a Trailer, where you can add Hollywood templates to your project. Tap on Movie.

Step 3: Create a New Project
After selecting the movie option, you have to select your desired photos or videos. Tap on Create Movie.
Step 4 (iOS): Add Transitions
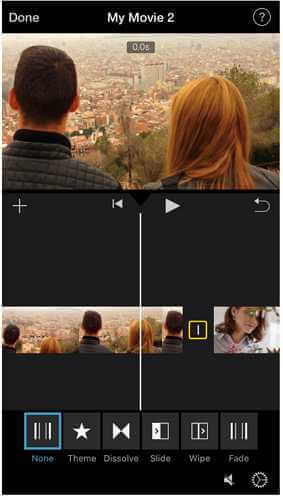
When the pictures or videos are added, you will see a screen having a timeline. You will have many options for editing, but our main concern is transition. You will see a transition icon between two pictures or videos. Just simply tap on that icon. You will have many options for transitions; select the transition.

Step 4 (Mac): Add Transitions
Step 1 and Step 2 are the same for iMovie Mac. After that, you will have the video editor. Click on the down arrow button to import videos. Drag the videos to the timeline.
Now, you are ready to add transitions. For that, go to the Transitions tab. You will have many transitions. Select the one you like and drag it to the timeline. The transitions can be added between two video clips.
Part 2. Delete Transitions on iMovie
We have learned to add a transition to a video, but it is also important to learn how to delete that transition. It's our choice to select a better transition for our editing, but if you don't like that transition, you can delete it.
Deleting transitions in iMovie is not a difficult task. You can delete the transition within a minute.
Delete transition in iOS iMovie:
Deleting transitions is far easier on iOS as compared to Mac. The steps below will define how to delete a transition.
Step 1: Select the Transitions
You will see the transition icon between the video clips. Tap on the icon. You will have many options to select.
Step 2: Tap on None
Tap on None; your transition will be removed successfully.

Delete transition in Mac iMovie:
On Mac, you have to use a shortcut to delete your transitions.
Step 1: Select the Transition
On the video editor, you will see the transitions which you have inserted between the photos or videos. Click on the transition to select it. If you want to delete multiple transitions in one go, hold the command key and select the transitions.
Step 2: Delete It
After selecting, hit the delete button to get all your transitions deleted.
Make Blurry Videos Clear on iMovie/iPhone >>
Part 3. Best Alternative to Add Cool Transitions – Filme
We got to know iMovie is a very helpful application in making your pictures and clips look attractive. You can easily add a transition with a few clicks. However, there are only a few preset transitions in iMovie. If you want more, then you need to select a better video editor.
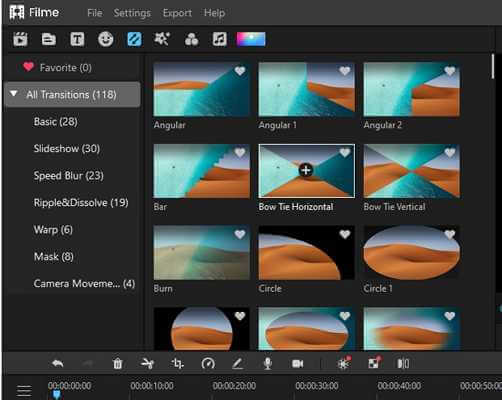
We recommend iMyFone Filme for adding transitions to your videos. It has almost 110+ transitions to make your movie more creative and engaging. There are multiple categories for different transitions, and you can easily find a suitable one for your video.
The best part is that you can add a transition with one click. You can apply the transitions at one end or both ends of the video. You can also adjust the duration of the transition.
Features:
-
Filme has all the basic and advanced tools. You can make all types of changes to your video and make it more appealing.
-
There are dozens of slideshow templates that can be used for different types of videos, such as birthdays, anniversaries, parties, presentations, resumes, and events.
-
You can edit audio using Filme. You can change the voice and record your own voiceover.
-
There is a wide collection of effects, filters, transitions, stickers, GIFs, sound effects, and text styles. There are separate libraries for all these.
Steps to Add Transitions Using Filme
Step 1: Open Filme
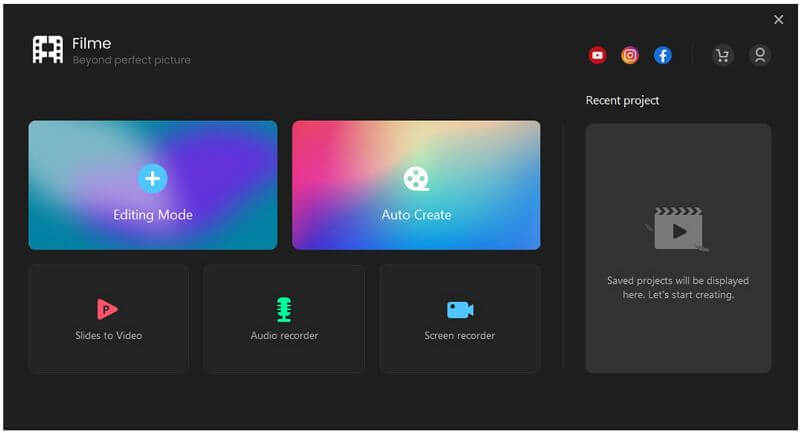
Firstly, download and install Filme from here. Once it gets installed, open it. You will see an attractive interface containing few options, but you have to go on Editing Mode.

Step 2: New Project
It will open the video editor. Click on the File menu, go to New Project and select a suitable aspect ratio.
Step 3: Import Videos
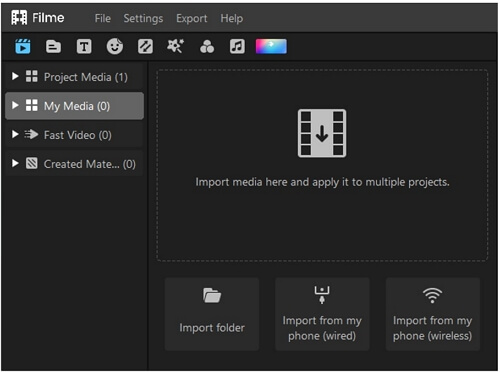
On the left, you will see the Media menu. Click to import videos from your computer. After that, drag and drop the videos or photos to the timeline.

Step 4: Apply Transitions
On the top left, you will see a few menus. Click on the transition menu, and you will have a wide collection of transitions. Select the video timeline. Now, select a transition and click on the "+" button. The transition will be added to the video.

Step 5: Export Video
Filme is a complete video editor. If you need more changes, you can edit your video as you like. Finally, click on the Export button and export the video.
Part 4. Can't Make a Transition Longer in iMovie? Try This
You can make longer transitions in iMovie. It is possible to extend your transition up to 2.0 seconds, and it is enough for a transition to be extended this much. You can use the GoPro Test feature for a longer transition.
You will find the GoPro test at the corner left menu bar, and it will work as a time-lapse for you.
For iOS:
Step 1: On iOS, you have to select the transition icon
Step 2: After selecting the transition icon, you will see the duration at the bottom left corner. It will give you a range of duration from 0.5-2.0 seconds.

For Mac:
On Mac, by default, a transition lasts one second, but you can change that.
Step 1: Double-click on the transition icon in your project to bring up the Inspector.
Step 2: In the Duration field, enter the number of seconds (as little as 0.1s).
Step 3: There is also an option to apply it on all clips, so by selecting it, you can apply it to all clips
Part 5. 4 Tips to Help You Know When and How to Add Transition
Keep It Simple
Try to use simple transitions at first, like fades or dissolves. Do not overdo it. The duration also plays an important role; you cannot make it too long. It is better to keep the length to only 1-2 seconds.
Use According to the Content
There are dozens of transitions available, but you need to use them according to the content. Choose the one that suits your video. Make sure to see the preview; you will get the idea.
Use a Single Type of Transition
Most of the time, it is better to use a single type of transition. For instance, you can use different types of blur transitions in a video but do not mix them with warp transitions and others. Filme has different categories of transitions to make your work easier.
Use Them Wisely
Use transitions when you need to join two clips together. Transitions are very useful because they make our work attractive and cool. If you use them randomly and add multiple transitions, it may distract the viewer. Thus, use transitions as long as the video looks appealing.
Final Words
iMovie is a perfect free video editor for beginners to advanced users. You can easily add transitions using iMovie, and we have discussed the simple steps to do that and adjust it according to your needs. But if you need more transitions and pixel-perfect video, then we recommend using Filme. It is an amazing video editor with splendid tools and features. You can use it even if you are a beginner.


