Video editing requires a good PC with good specs. It takes up a lot of memory in your disk and needs a good amount of RAM to render the graphics of the video. Most of the video editing tools require 4 GB of RAM at least so that the software can run smoothly.
However, your PC should be fast enough so that it can process the editing in less time and not have much impact on the disk space. For this, you need to be careful because, during video editing, your disk space can fill up very quickly. Let us see how we can fix this issue and make sure it does not take a hefty amount of disk space and make the PC slow.
Tips
If you need a comprehensive video editor like Final Cut Pro but takes up less disk space, iMyFone Filme is our recommendation. It comes with advanced video editing tools and is very easy to use. You can try it out for free and download it below.Before You Start: Why does Final Cut Pro Take Up So Much Space?
1- How Much Ram does Final Cut Pro Use
RAM is something on which the speed of your PC depends. It can never be enough. But when it comes to Final Cut Pro or other video editing tools, there is always a requirement for such software. For example, Final Cut Pro requires at least 4 GB of RAM. But it is not enough if you want to edit 4K videos with it. If you are looking to edit 4K videos, then Apple recommends that you should have 8 GB of RAM because it takes much time and processing power to render and edit 4K videos rather than simple High-Definition videos.
2- Why is Final Cut Pro Taking Up so Much Disk Space?
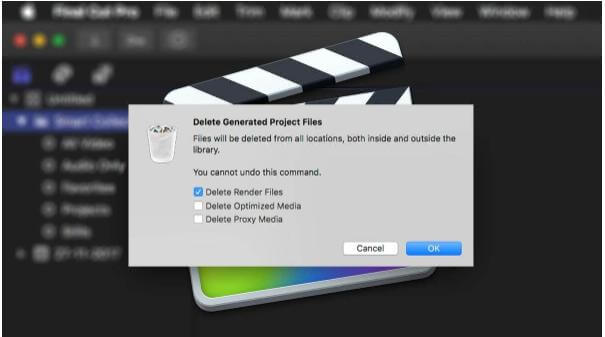
Final Cut Pro creates a render file when you add in effect or transition to your video. This allows Final Cut Pro to smoothly display the effect when you scroll on the timeline. Although it is a great feature, it takes up a lot of your disk space. You can free up the space by deleting these render files. Go to Files > Delete Generated Render Files. But this is not a permanent fix as it again re-creates the render files.
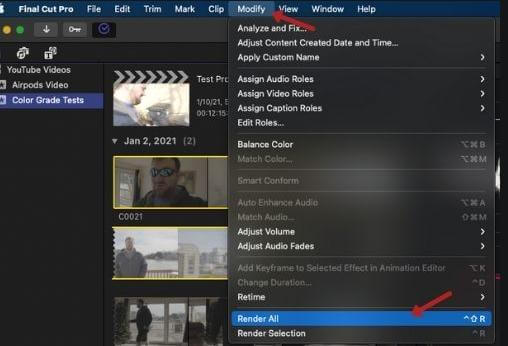
To do a permanent solution, you can go to Final Cut Pro Menu > Preferences > Playback and untick the box of Background Render. This won't let it create a render file. But whenever you want to see the effect on your video, you can manually render files by going to Modify > Render All.
How to Free up Space on Final Cut Pro
Whenever you use Final Cut Pro, make sure that there is 10% of your disk space free. It allows the Mac to smoothly run the software. Otherwise, you will experience lag and slow processing. If you don't have free space in your hard disk, then remove things that are occupying extra space so that it gives you the freedom to edit your videos without any issue.
In this article, we will talk about how you can free up space on Final Cut Pro as it requires an amount of free disk space. There are many ways in which you can free up the space and not allow Final Cut Pro to take up a lot of memory. Let us see how we can do this.
1- Delete Unused Clips and Media
One of the things that takes a lot of space in your memory is the render files. To make a good room for memory and disk space, make sure that you delete the generated library files and render files. Make sure that you are deleting files that are not being used.
2- Permanent Solution to Render Files
The above method is only suitable for a temporary period. As soon as you delete the render files, it will again make render files and take up a lot of your memory space. You can permanently stop the formation of render files automatically by going to Final Cut Pro Menu > Preferences > Playback. Untick the box of Background Render and Final Cut Pro will never create a render file again automatically.
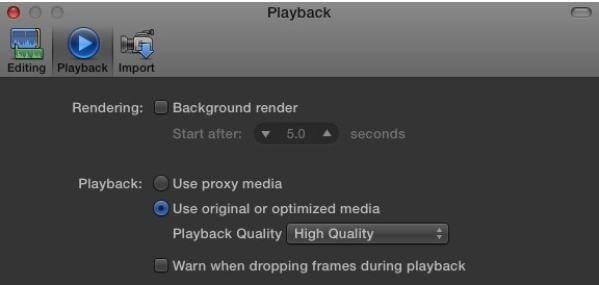
However, if you want to create a render file of a part of the video, then you can select the clip and render it manually by going into the modify option and clicking on render all.
3- Not Enough Disk Space Error
Sometimes when you have enough storage in your PC, an error will generate "Not enough disk space". It makes the user wonder that despite having a lot of space, this error persists. Don't worry; we can help you to get rid of this error.
Open Final Cut Pro and select the library option.
Then go to Files > Delete Generated Library Files.
Now, select all the render files and proxy files, and optimized files.
Exit Final Cut Pro.
To reboot the system, hold option and command keys together.
Also, delete the preference files.
Now the error should not pop up. But if it still exists, run the utility folder. You will find the utility folder in the application folder.
Now you need to execute First aid in all of the folders.
If still this issue exists, make a copy of your disk, and repair all of your drive's directories.
4- Free Up Space in Mac
Out of many ways in which you can free up space in your mac, one is to clear the cache files. Some garbage files not only occupy space in your mac but also make your mac slow. So, it is better to get rid of them.
You will see cache files on every PC because these files are kept to speed up the Apple software. But you don't need certain unwanted cache files. You clear and delete cache files from your PC. You can open the Finder window and go to the field box of Library/Caches, and enter this, Command + Shift + G. It will display all the visible files in the window. You can either delete the files one by one or, by selecting all, delete them at once.
However, you can also delete the files from the system log. You just need to go to the folder and enter /var/log, and select Go. All of the system files will appear in front of you. You can choose and delete the files that are not important.
Lastly, you can also download cleaning software for your mac. MyMacX is a cleaning tool that can help you to get rid of trash and make free space in your mac. This tool is for free, and you can download it easily. Just open the app and check the box of cache files. Delete the items that you want, and your mac will be as good as new. This tool allows the user to clean the trash.
People Who Liked this Content Also Liked
How to Add Sound Effect in Final Cut Pro >>
10 Best Free Final Cut Pro Transitions for You to Choose From >>
10 Best Final Cut Pro Text Effects for You to Use in Video >>
Or You Can Use Another Comprehensive Video Editor That Takes Up Less Space
iMyFone Filme is not like any other video editing tool. It has very simple system requirements and takes very little disk space on your PC. Unlike Final Cut Pro, iMyFone Filme is compatible with both Windows and Mac. So, you don't need to worry that it won't work in your operating system
iMyFone Filme only requires 4 GB of RAM and a little disk space. There is no certain requirement for specific disk space. Compared to other video editing tools like Final Cut Pro, it does not generate render files that take the most of your disk space.
iMyFone Filme is a professional video tool that has plenty of features. Let us take a look at a list of its features.
Features:
-
It has a timeline-based video editing feature.
-
iMyFone Filme is very simple, and even a beginner can use this tool without any trouble, which is unlike most video editing tools.
-
It has multiple transitions, effects, filters, and text styles from which you can add to your video with just a simple drag and drop phenomenon.
-
iMyFone Filme allows the user to choose the format and resolution of the video in which he wants to export the video.
Pros:
 It takes less disk space and works wonderfully.
 You can import unlimited media files with iMyFone Filme (video and audio).
 It allows the user to edit videos of resolution up to 4K.
 iMyFone Filme has an ample editing library that has 118 transitions, 36 different effects, 88 filters, 175 elements, and 243 soundtracks. You can use these to edit your videos.
 Moreover, it has other editing options like adjusting the speed of the video, crop, record screen, record audio, freeze frame, mosaic, and mirror.
 It is quite simple and not complex like other editing tools, so even a beginner can edit videos with iMyFone Filme.
Steps to Edit Videos Using Filme
iMyFone Filme is a very easy to use software. You can edit videos with it in just a few minutes. Let us see the steps in which you can edit videos with iMyFone Filme.
Step 1: Download iMyFone Filme from the website. Although it's a paid tool, you can download its trial version. Install it and open it. It will show you many options as it is a professional tool. Go to "Editing mode" so that you can edit videos.
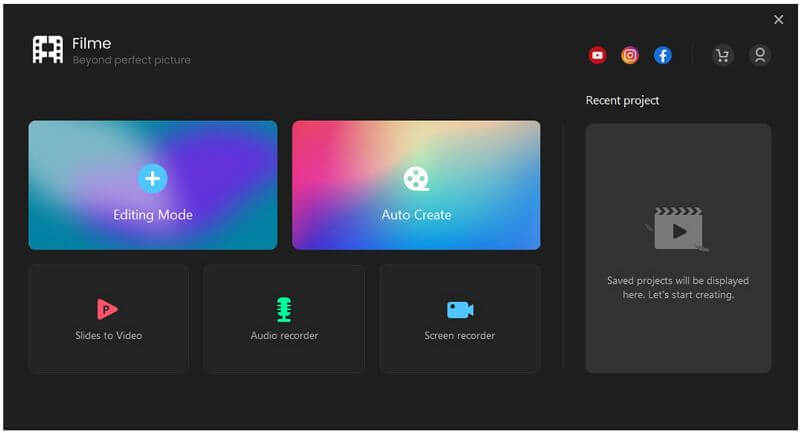
Step 2: When you enter editing mode, you will see that it is an editing window where there are different editing options. To be able to edit a video, create a new project. It will display an option of aspect ratio. Make sure to select the appropriate aspect ratio.
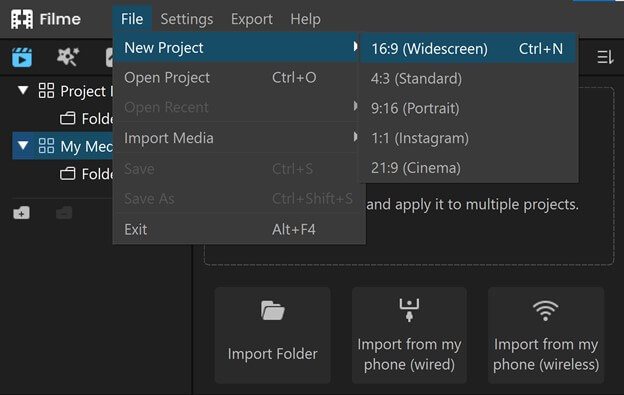
Step 3: Go to the window of import and import videos and audio clips that you want to edit with. You can import as many videos and audio as you want. iMyFone Filme gives you the freedom to select the media files.
Now that the files are imported, you need to drag them down to the editing timeline. There are two timeline sequences, one is for video, and the other is for audio. It makes editing easy for the user. If you want to edit something related to the video, then you can adjust the video timeline, and the same goes for the audio timeline.
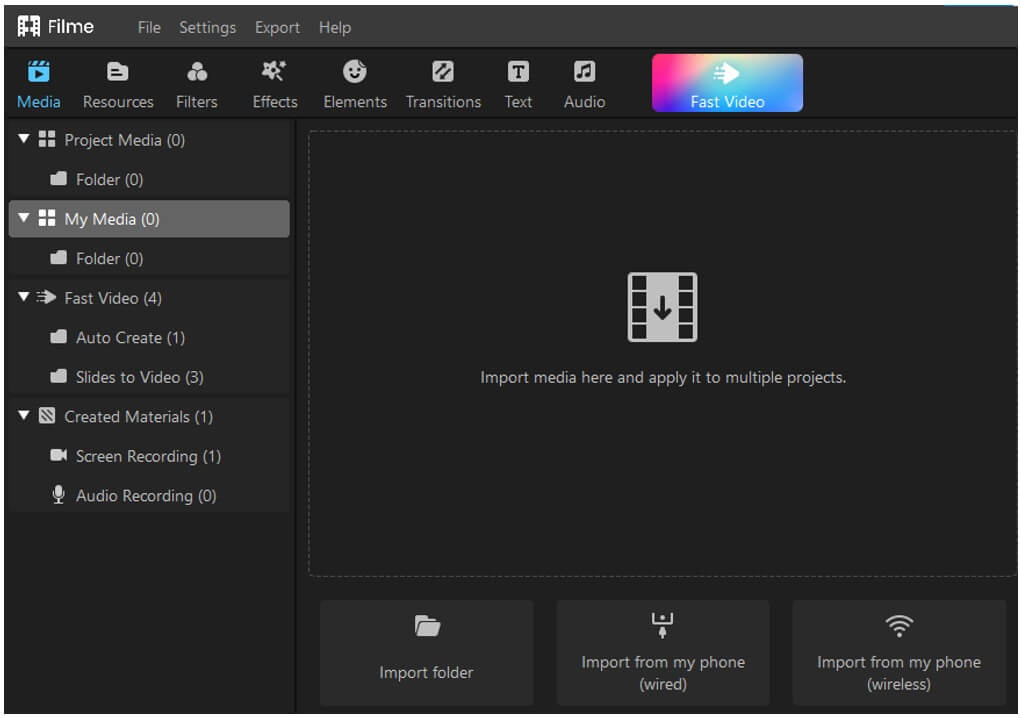
Step 4: There are many editing options in iMyFone Filme. You can add different transitions, effects, filters, elements, text styles, and default audio tracks. It is just an easy drag-and-drop tool. Just select any editing feature, drag it to the timeline and place it where you want to. A certain effect will be added to your video or audio. Even a beginner can edit with iMyFone Filme.
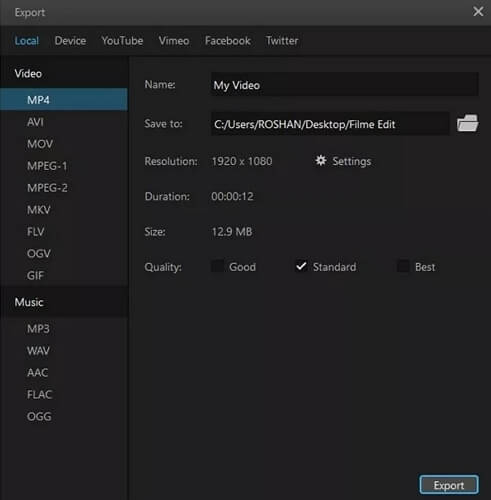
Step 5: Once you are done editing your video, iMyFone Filme gives you the option of export. Now, as you are using a trial version, you can only export video up to 720p resolution, and your video will have a watermark too. But if you buy iMyFone Filme, you can export video up to 4K resolution without any watermark.
One thing that both versions have in common is that you can select the format of the video and audio. There are different formats available which you can select individually for video as well as for audio. Because certain platforms have a strict rule of format, iMyFone Filme allows you to export the video in whichever format you want.
Conclusion
It is a known issue for the user who uses a video editing tool that requires and occupies a lot of disk space. This is solely for the reason when you edit videos; it creates certain files that are big. For example, Final Cut Pro creates render files. Although you can delete them and turn them off from the menu, by default, it will create its files.
A better alternative video editing tool is iMyFone Filme that requires a very small amount of disk space and RAM. So, if you don't have a high specs PC, then you can rely on this tool to edit your videos. It has different editing options like a professional tool and also allows you to edit and export videos up to 4K resolution.


