A completely free and open-source software, Audacity is a digital audio editor that is compatible with Windows, Linux, macOS, and other operating systems. Here you can learn how to separate audio in Audacity through a simple interface. Now, you can level up your video editing game with the tips mentioned below.
Separate Audio from Video Using Audacity [Windows 10]
Are you on the lookout for ways in which you can extract the audio from a video clip for Windows 10 devices? Read on to get a step-by-step guide on how to separate audio from video audacity way. Follow the steps and you'll be good to go.
1. Download Software
Start the process by downloading the software. Head over to Microsoft Store and type in Audacity. You want to download the one with blue headphones. Install the app.
2. Launch App
Once the application is installed, you can then move on to the next step, which is launching it. Simply press on the blue "Launch" button, and the application will open up.
3. Upload Video to Audacity
This is where the fun begins—Head over to where your video is saved on your computer and drag it onto the Audacity app. The app will automatically start Audacity's separate audio from video process.
4. Save As a Separate File
However, remember that the video won't be automatically saved. Here is what you need to do to save it. Go to File, click Export, and pick your required format. If you want to save it in a specific format, chose "Export Audio" and selected your desired format. You can get a wide variety of forms. Save the file in your desired location on your computer.
5. Audio Extracted!
And there you have it! If you wanted to learn how to separate audio in Audacity, these steps should've cleared it up. The interface is pretty simple to use. You can head over to the stored space and check out how the audio sounds if you want.

Pros:
 Simple interface for beginners
 Smooth workflow
 Simple stereo recording
Cons:
![]() Need for improved VST integration
Need for improved VST integration
![]() Lag at times
Lag at times
![]() Need advanced editing options
Need advanced editing options
Easier Way to Separate Audio from Video – Filme
If you tried your way around Audacity and couldn't do it, we suggest you head over to Filme to get the job done. With iMyFone Filme, you can edit the audio even after you have separated. There is also an option to change the voice in audio via voice changer when using Filme.
Watch this video to see how to separate audio from video easily:
Without Audacity, separate audio from video with thes easy steps.
1. Download iMyFone Filme
Head over to the official website of iMyFone Filme and download the application from there. You can download it free for Windows 7,8,8.1, and 10. Or you can even purchase the app for advanced features.
2. Launch the App
Once the application is downloaded to your PC/laptop or mobile phone, you should now launch it. This is a pretty simple step as all you have to do is open the application.
3. Upload Video
Now, for you to be able to extract audio from a video, there is an obvious need for a video. Head over to your saved files and upload the video that you wish to extract audio from.

4. Detach Audio
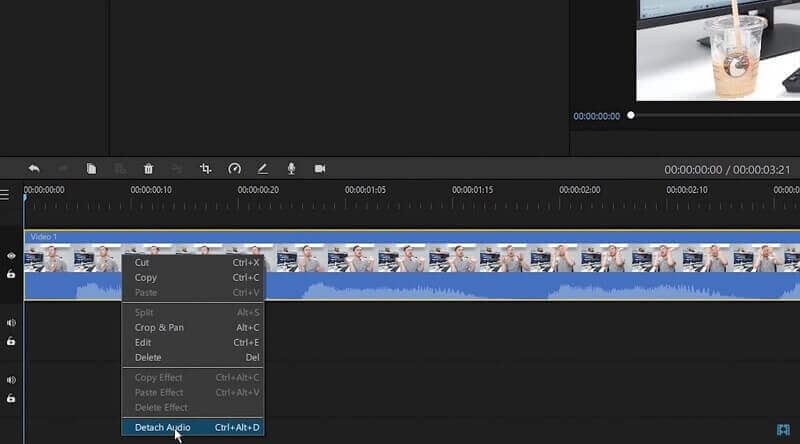
Here is where you learn how to extract audio from video by using iMyFone Filme. Once the video is successfully added to your timeline, now right-click on it and select "Detach Audio." You can use this for voice changing, soundtrack editing, or more. The voice changer editing feature can be used to edit the audio, and there are other editing features available as well, from basic cropping to much more fancy ones.

5. Save Audio File
Once the audio has been successfully detached, all you have to do is save it in your desired location on your device. If you wish to go back, you can also press the "Undo" button.
Audacity or Filme
So, you wanted to learn how to separate audio in Audacity, that's done. How do you pick from the two options given above? Here is a brief comparison between Filme and Audacity. While Audacity is a great digital audio editor, there is still room for robust mixing abilities in Filme editing. This is a must for all those people who need the voice detaching feature for a big project.
Moreover, if the video size is too large, users can expect a bit of a lag, something which is not found in Filme. It runs smoothly without any hindrances.
1. Interface
The Audacity digital audio editing tool comes with a user-friendly interface. With this, you can easily navigate from one place to the next. However, this interface comes with a price of lesser features. Since Audacity has a pretty simple user interface, users can't edit the audio a lot. On the other hand, Filme comes with tons of editing features such as voice changers and more. It is simple to use and equipped with all the features you could ask for.
2. Listen to the live audio
Audacity also offers no features of listening to the live audio, including effects during the recording process. This can you easily do when using iMyFone Filme's application.
If you are using the Audacity free version, you might feel that there are limited options available for you until and unless you purchase. Meanwhile, Filme, too has features you can purchase, but besides them, it also offers a massive variety of free features to its users.
Also Read:
Final Words
And there you have it, folks! This brief and detailed guide explains how to separate audio from video Audacity way and the non-audacity way. With iMyFone Filme, you get yourself a bunch of other editing features paired with a lovely interface. Download the application now to get the audio detaching started.


