Ever since Microsoft Office and its components have become available, recording, storing, and presenting information has completely changed for the good. Even though we have plenty of other tools that can perform the same function, a majority of the people still choose to work with the Microsoft Office tools.
Not talking about the entire suite, its major components are MS Word, MS Powerpoint, and MS Excel. These three software are heavily used by users all across the globe. For our task, we will look at the process of making a Microsoft slideshow. Creating a slideshow with Microsoft components can be done with Powerpoint.
Part 1: How to Make a Slideshow in Microsoft?
Microsoft Powerpoint is a basic yet amazing program that you can use to create a slideshow and add music to the same. Before you can create a Microsoft slideshow software, take care of a few things;
-
Select the images you want to add to the slideshow and gather them all in one place.
-
If you want to add background music, ensure that you have saved the file on your drive.
Once these things are ready, move on to create a Microsoft slideshow.
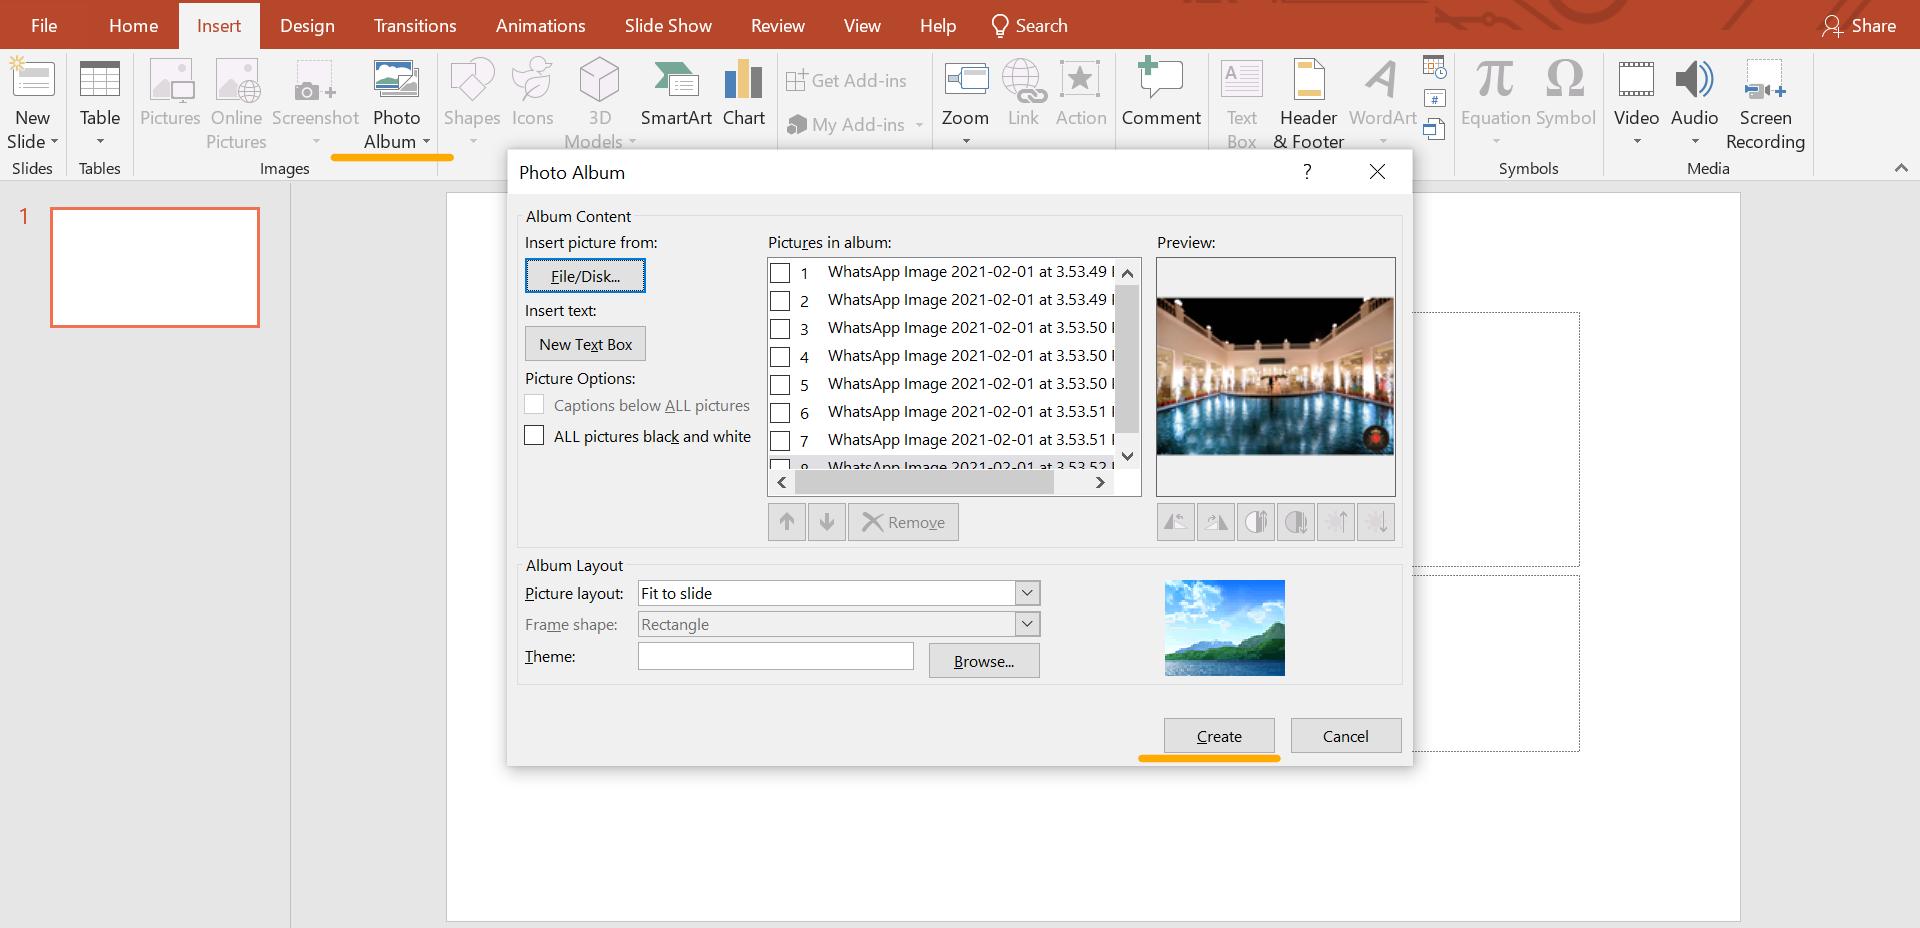
Step 1. Open Microsoft Powerpoint and choose Blank Presentation to create a Microsoft slideshow. From here, go to Insert followed by Photo Album and New Photo Album. Select the photos you want to add and click on Create.
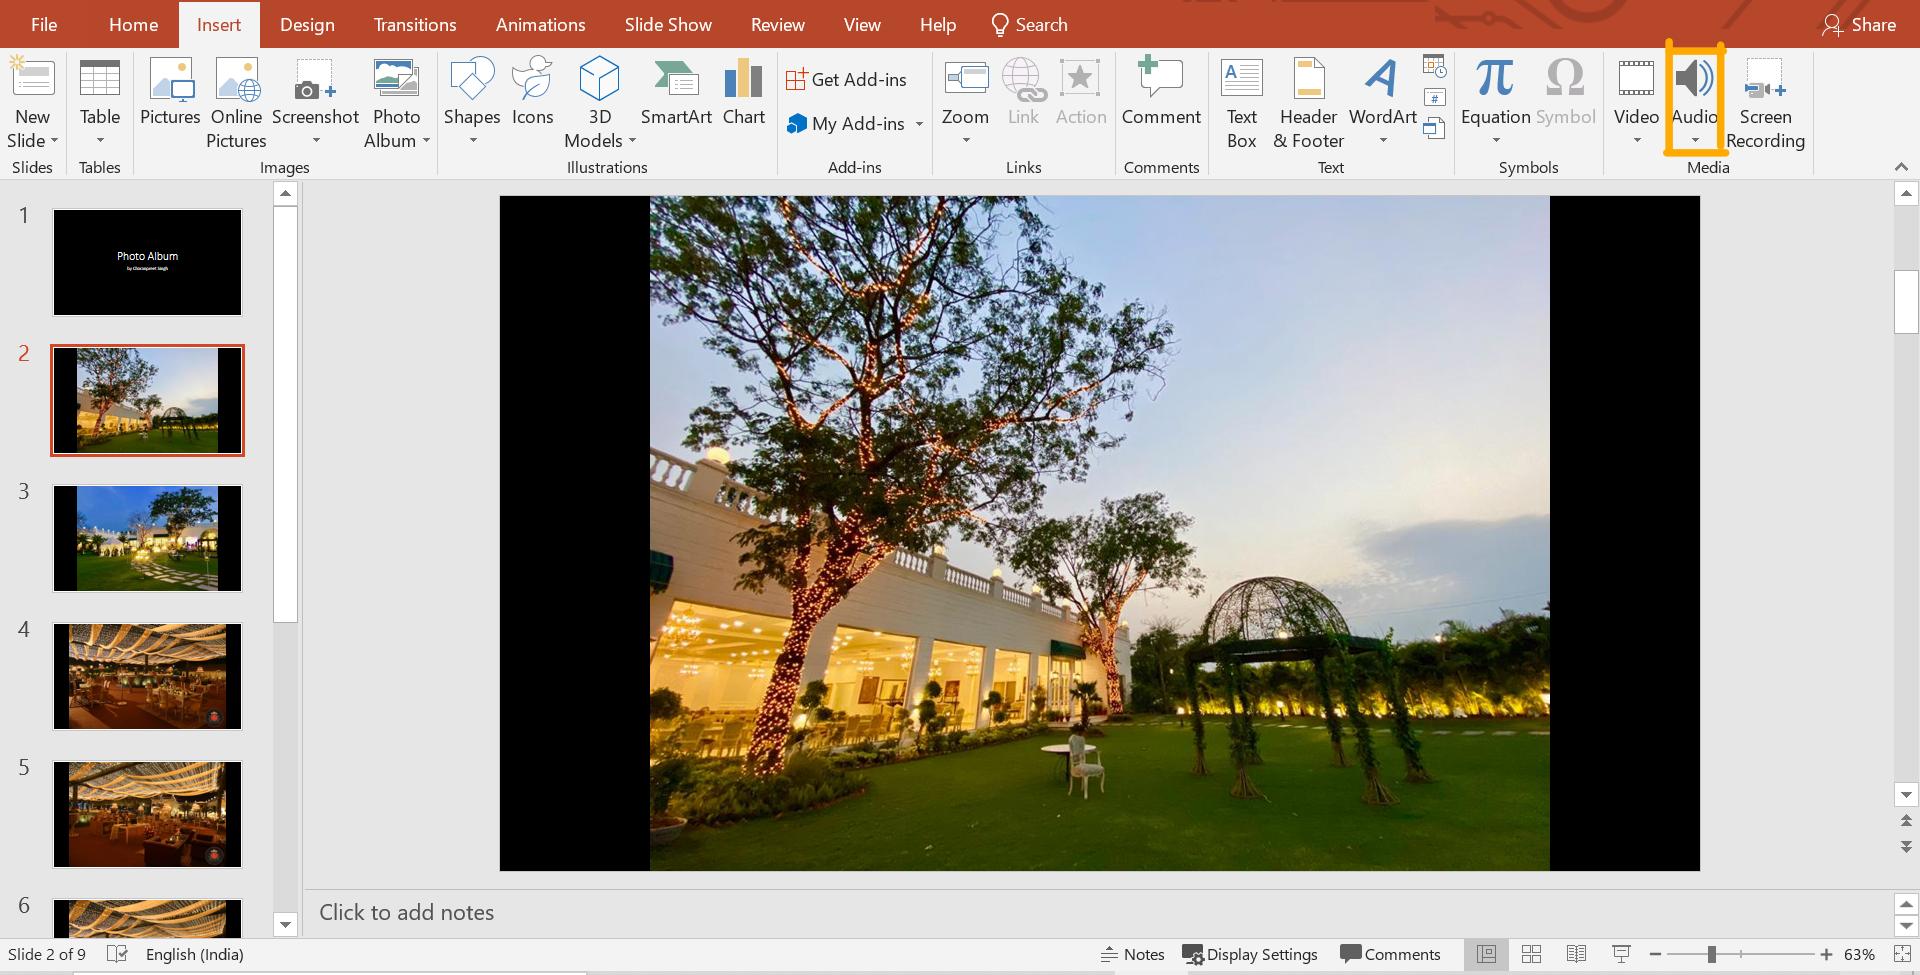
Step 2. Once you have all the images arranged in the right format, move on to adding music and give it an authentic slideshow expression. For adding music to the photo slideshow Microsoft navigate to Insert >> Audio >> Audio on My PC. When the dialog box opens, select the folder and audio file followed by clicking on Insert.
Step 3. Adjusting the audio file and distributing the background music in every slide is complicated in Powerpoint. For one, you have to insert the same file in every slide and then make adjustments to the audio playback and ensure that it aligns perfectly between the slides.
So here is the difficult part.
-
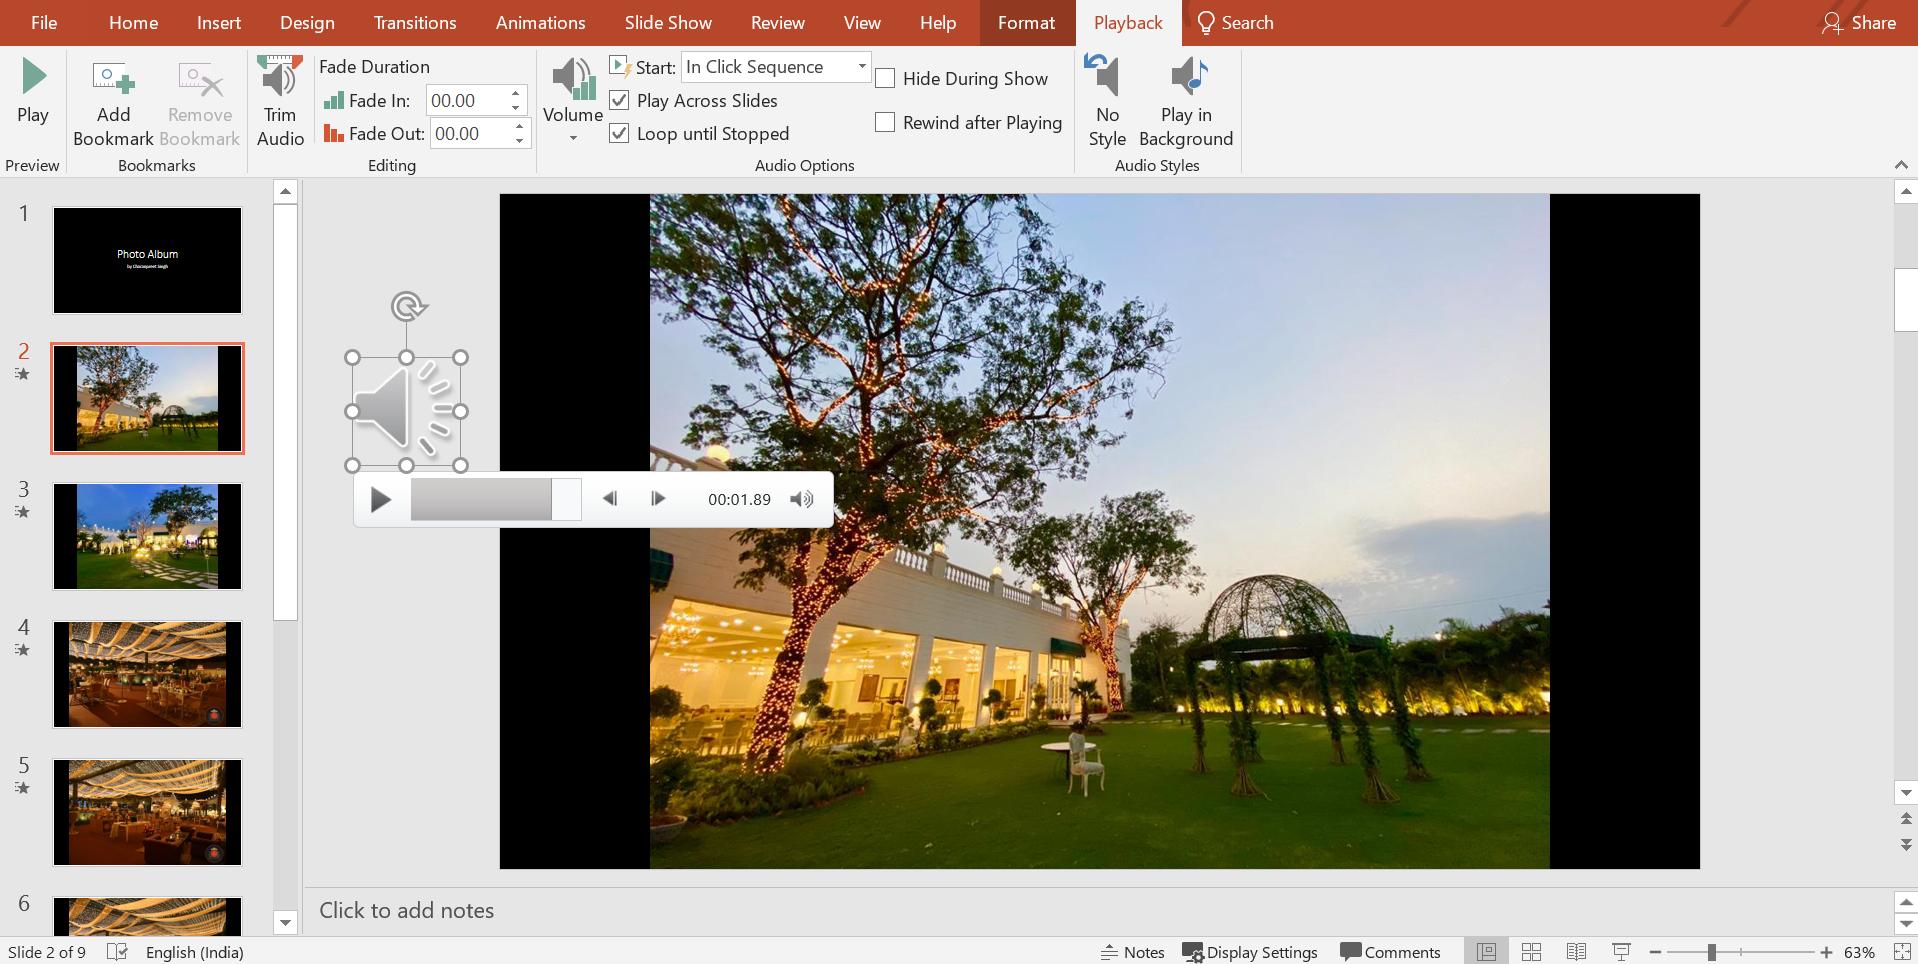
When you select the audio, click on the Playback (on the top menu bar towards the right end).
-
First, click on Play in Background so that the audio plays in the background when you run the slideshow.
-
From the options that are open above, choose Trim Audio to set the length of audio you want to play behind each slide.
-
To give it a better and more realistic effect, choose the Fade in and Fade Out time to make the audio rhythm at the end and beginning of each slide.
-
Lastly, select Loop until Stopped to play the same audio on every slide until it is stopped manually.
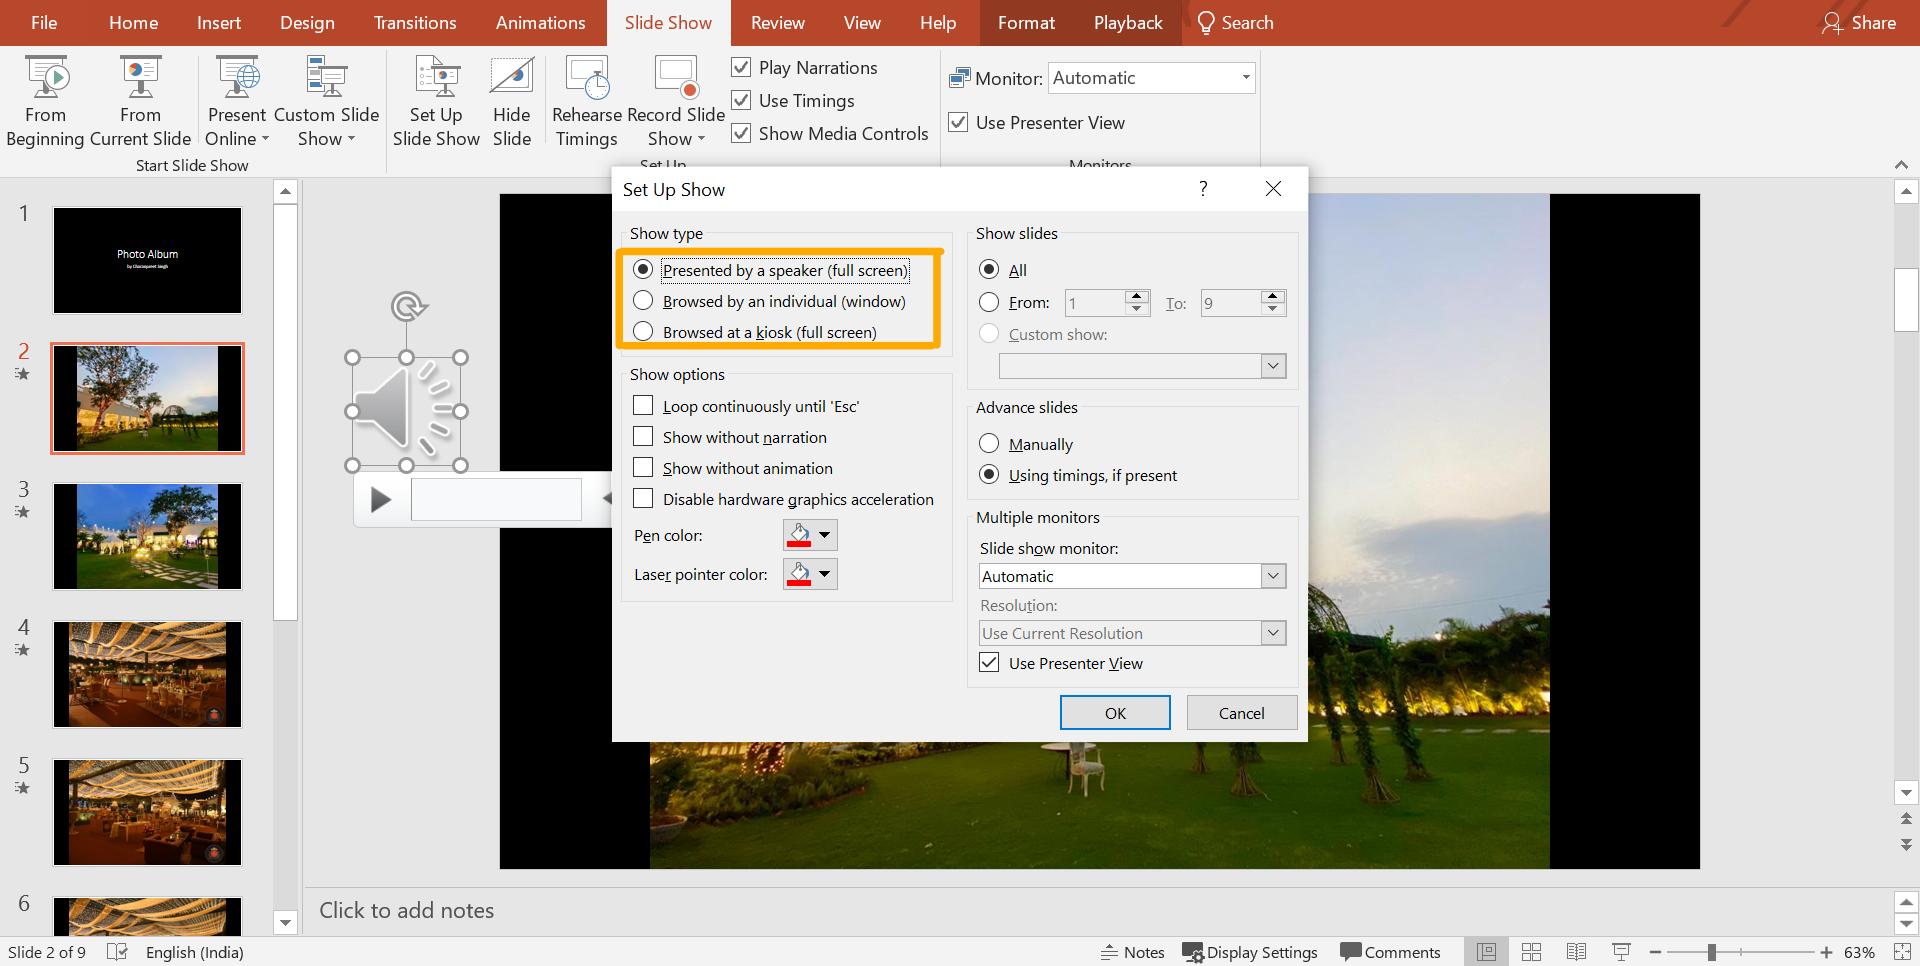
Step 4. Once everything is final in terms of image, audio, and background, click on Slide Show on the top bar, followed by Set Up Slide Show. Here you have three options;
-
Presented by a Speaker (Full Screen)
-
Browsed by an Individual (window)
-
Browsed at a Kiosk (full screen)
Based on your requirements pertaining to where the slideshow will run, choose the option. However, for a slideshow that needs to run like a loop, select “Browsed at a Kiosk.”
Step 5. Ok. This is the important part. To select the time frame for each slide, you first need to select Rehearse Timings. Clicking on this option, the slideshow will start running. Keep a check on the timer. After the desired time for each image reaches, click on the blue arrow (Next). The next image in the Microsoft slideshow software will open and follow the same process.
Besides the image timer, there is the total timer that will let you know the total time of the slideshow.
Step 6. The last step is about creating a video of the slideshow for presentation. With the photo slideshow Microsoft completed, click on File >> Export >> Create Video. From here, select the destination for saving the video and click on Save.
As you can see the Microsoft slideshow maker is a bit complicated to operate. Fortunately, you have a better alternative to a much better and incredible slideshow than the Microsoft slideshow software.
You might also interested: Slideshow Loop in PowerPoint
Part 2: The Best Alternative for Microsoft Slideshow
Filme is one of the best alternatives to the Microsoft slideshow maker as it gives you access to ready-to-use features with the click of a button. And using the Filme Fast Mode, you can build a slideshow in minutes that too added with music, transitions, effects, and even texts.
Some of the fantastic features of Filme include;
Key Features
-
Templates: With access to a plethora of templates added with transition, effects, and music, you can be in and out of the software in minutes.
-
Bespoke Graphics: To make the slideshow better and more effective, you can add it with the required graphics. For instance, the effects are added to the software to make your slideshows more attractive and impressive. Similarly, transitions add a cool effect to the images, and the text options deliver the best experience.
-
Basic Editing: Along with a faster option to create slideshow with Fast Mode, Filme also provides access to a host of editing features and functions to help you explore the editing potential. These include trim, crop, rotate, adjust speed, and pan and zoom.
-
Direct Uploading: Filme lets you upload the completed videos and slideshows directly on Facebook, Vimeo, YouTube, and Twitter.
Filme’s features and functions deliver the best user experience and an interface that is easy to use. Filme is, by all counts, a better option than Microsoft slideshow software to create presentations.
Part 3: How to Make a Slideshow in the Microsoft Slideshow Alternative
To make a slideshow with Filme, you can use two different routes;
-
Fast Mode
-
Editing Mode
To give you an overview, the Fast Mode is faster and built to help you create bespoke presentations in a jiggy. The editing mode, on the other hand, will inspire you to awaken your inner creativity and work on the slideshow in complete detail.
Whatever method you wish to work with, given below are the steps to make a presentation better than a Microsoft slideshow.
Fast Mode
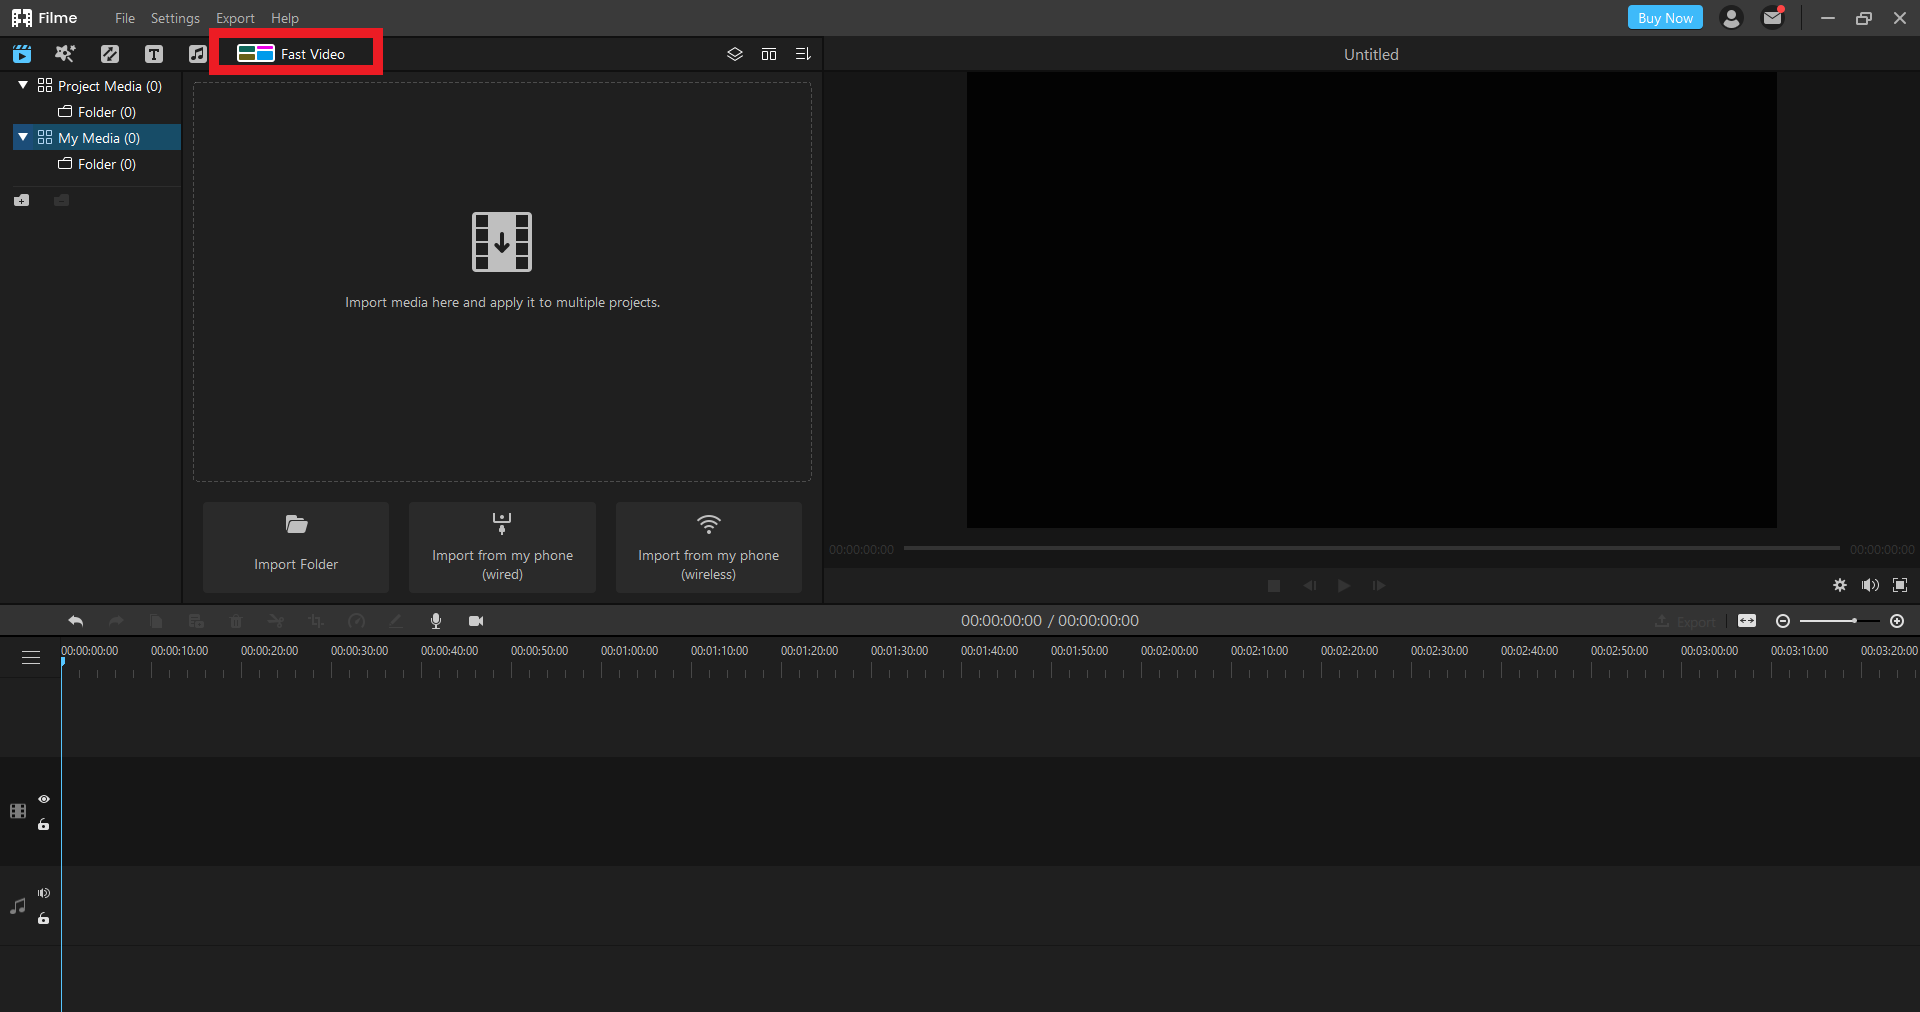
Step 1. After downloading the software, open it and Click on Fast Mode.
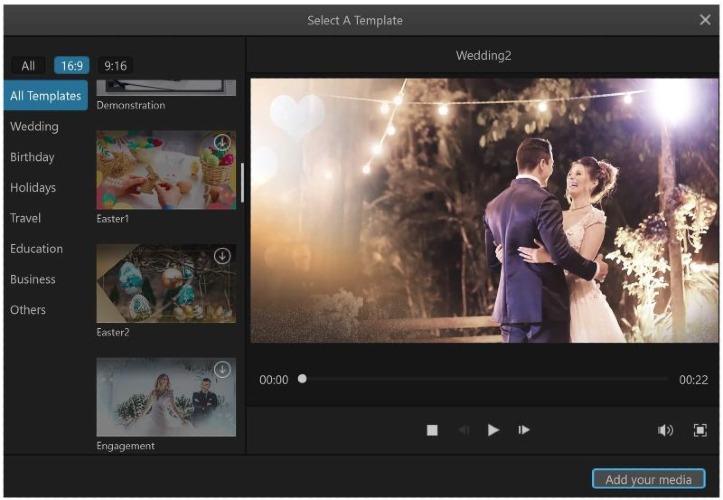
Step 2. You will come across a dialog box with listed options of Templates. Depending on the purpose and occasion of the slideshow, select one option.
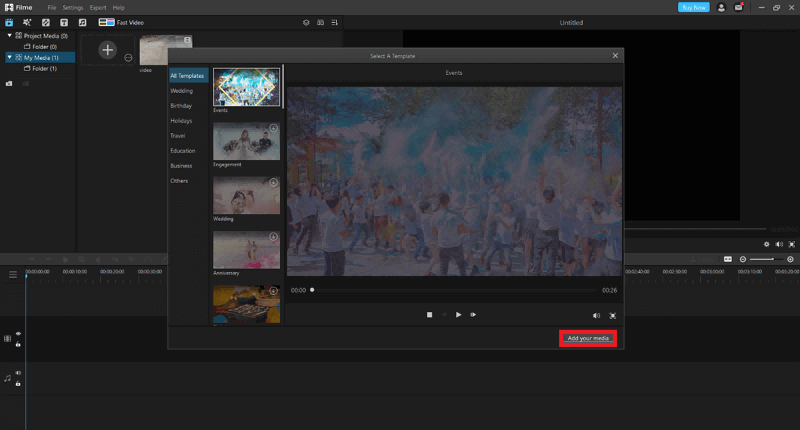
Step 3. Once the template is ready, click on Add Your Media at the bottom of the box. Select one option to add the images. The fastest way is to drag and drop the images from the folder into the software. If the images you want to add are in your phone, connect it to your PC with a USB or wireless medium.
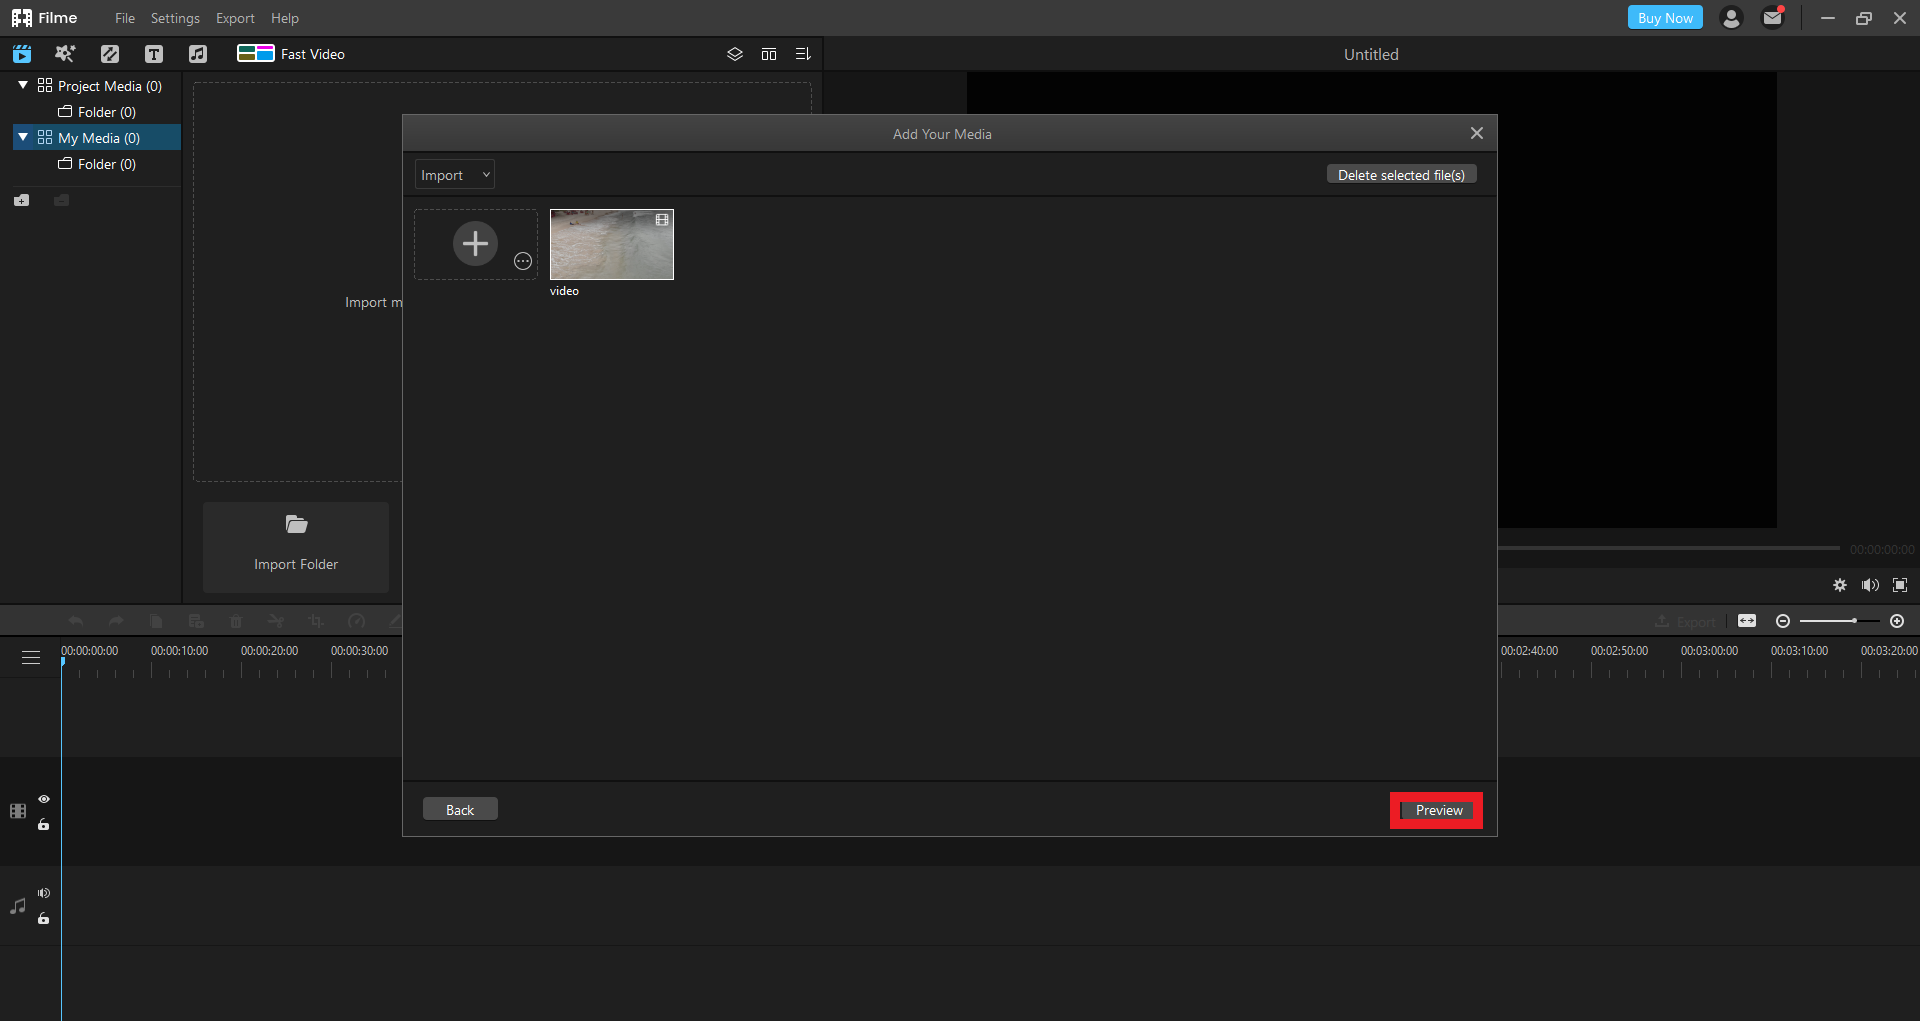
Step 4. After adding the images, click on Preview to check the slideshow, followed by clicking on Export.
Step 5. Select the format and the location to save the video on your disk drive. You can also upload the same directly on YouTube, Vimeo, Twitter, and Facebook.
Editing Mode
Step 1. Open the Filme software and click on Project Media at the top of the left-side toolbar.
Step 2. Add the images you want to see in the slideshow. Here adding images is pretty simple than what you have seen in the Microsoft slideshow maker Windows 10. All you have to do is click on the Insert icon on the main dialog box. Other options include dragging the images to the dialog box or adding them from your phone.
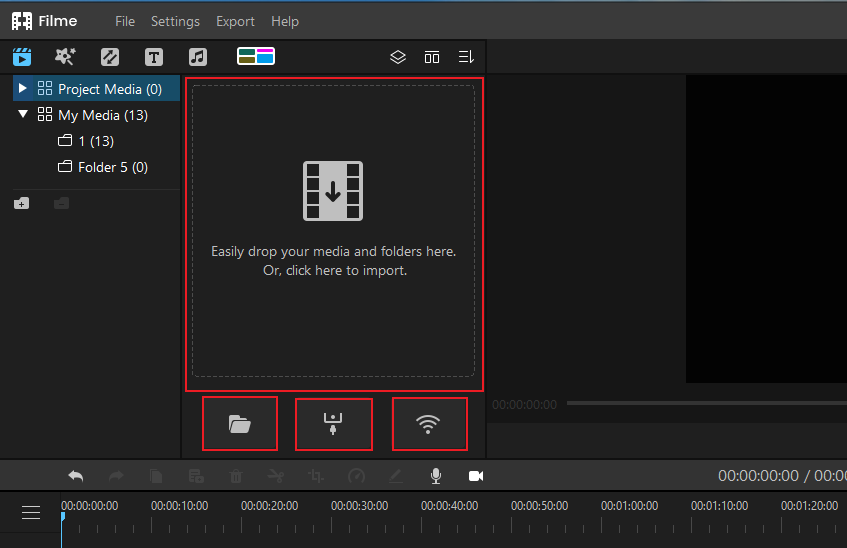
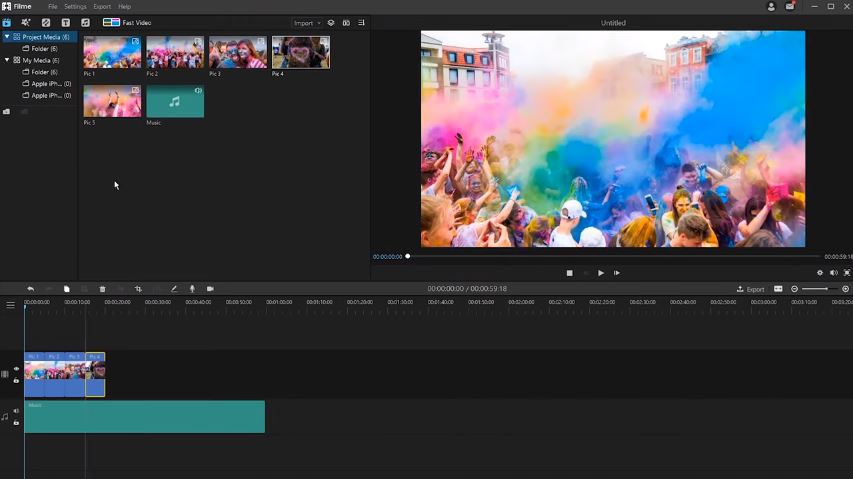
Step 3. A better way to move forward is adding the audio first. With the audio file preload into the timeline, it is easier to adjust the images and change their intervals to fit according to the audio’s length.
Step 4. With audio added, start selecting the images in the sequence you want to see in the final slideshow. Here too, you are better off than using the Microsoft slideshow maker as you can add the images in any order you want without having to make changes later.
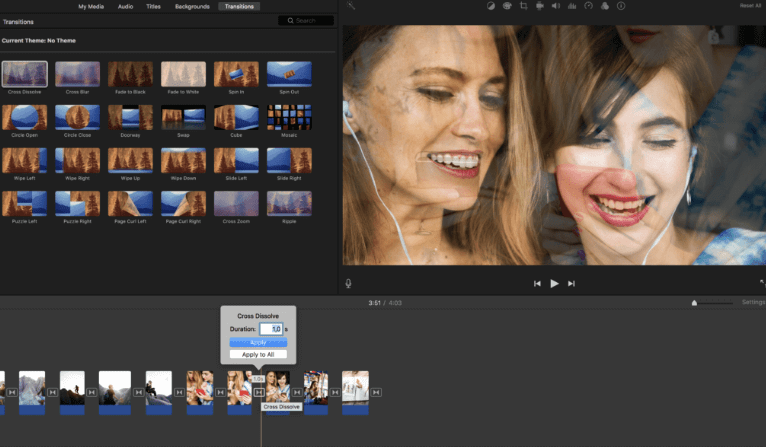
Step 5. For editing, start by adding transitions to the images. Transitions give a unique look to the images making them more interactive and eye-catchy. Filme has over 112 different transitions that you can explore. The best part is that you can add a unique transition to every image.
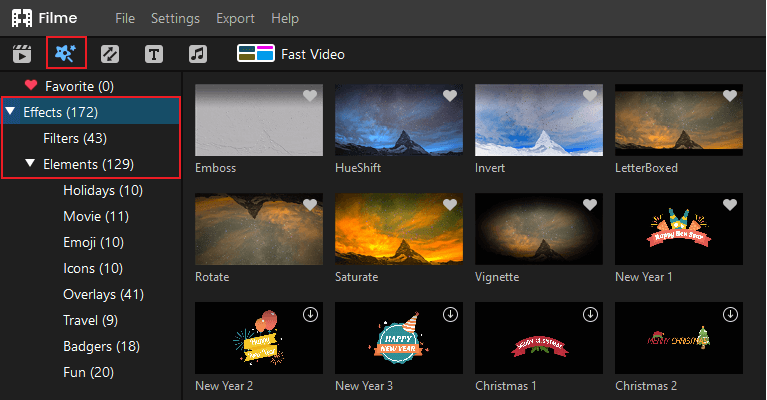
Step 6. For adding effects to the images, click on the Effects tab to choose from a library of 172 options. Add them to all the images commonly or choose a different one for each image, it’s up to you.
Step 7. With over 45 options to choose from different forms of Text options, you can create a highly customized slideshow with music, much better than what you can make with Microsoft.
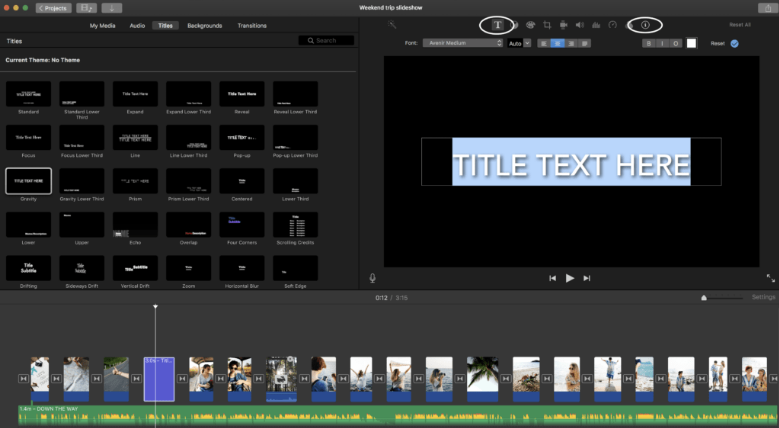
The text, image, and audio segment shall fall in the same line to ensure coherence.
Step 8. Finally, you can also use the basic editing tools in the timeline to crop, edit, rotate, and zoom in or out the image.
Step 9. Once everything is done, click on Export >> Export Video and select the format plus the location where you want to save. For publishing it online, choose from YouTube, Twitter, and Facebook. However, you will need to connect the Filme software with your account first.
Learn more about Slideshow:
1.Best Ways to Create Photo Slideshow Video for Anniversary Party
2.How to Make a Amazing Slideshow Video
Conclusion
How did you find creating a Microsoft slideshow and making one with Filme? Filme gives you more options in every respect, be it adding images, audio, transition, effects, texts, and it even offers easy-to-use editing tools.
All in all, if you wish to make a photo slideshow with Microsoft, be prepared to learn a lot of things and facing hurdles, not to mention the time you might have to spend. On the other hand, working with Filme is super easy, intuitive, and you will find yourself immersed in the entire slideshow making experience.


