


As a video editor, you must be aware of the importance of video trimming as an essential factor for making your video presentable. Here, the question arises – How to trim a video in Adobe Premiere pro? Unf ortunately, Adobe Premiere's video trimming feature isn't much user-friendly for beginners. However, you don't have to worry because this is just what I'm here to help you with! Or you can try iMyFone Filme which can trim video easily within a few clicks.

Part 1. How to Trim a Video in Adobe Premiere Pro
Using Premier's Tools
As stated earlier, Adobe Premiere Pro is a tool specially designed for professional video editors. Most professionals don't really find it difficult to work their way through the software to obtain the desired results. However, this process may not at all be that easy for beginners that just want to trip their video to make it more presentable.
The workplace that Adobe Premiere has to offer is rather complex and it may take you several hours to even figure out how to perform a basic trim. Lucky for you, I've come to your aid with the simple step-by-step guide on how to trim a video clip in Adobe Premiere Pro. With that said, let's not waste another second and get straight into the guide.
-
Download and install Premiere Pro on your computer. Then launch the software and set up a new project. Tap on the 'Import Media to Start' option and browse the video file that you need to trim. Double tap on the file to import it in Adobe Premier.
-
Drag and drop the video clip in the timeline to get started with the editing.
-
Tap on the Razor tool shown immediately to the left of your timeline. Afterward, from the timeline, click on the exact point of the video where you need to trim from. At this point, the video will be divided into two separate clips. You may place more cuts with the Razor tool to filter out the complete portion of the video that you want to trim.
-
Tap on the Selection tool and right-click on the partitioned video clip that you need to remove. From the list of actions, select 'Ripple Delete' to remove this section. A ripple delete will automatically join the surrounding portions of the video to remove any empty space.
-
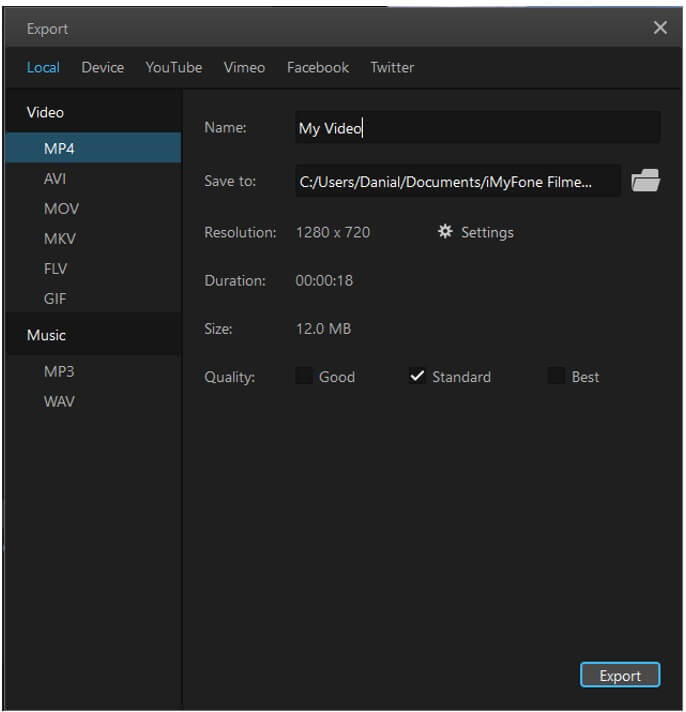
Lastly, you must export this finalized version of the video to make the trim permanent. Go to the 'File' menu and tap 'Export'. Next, select 'Media', enter the appropriate information including the file name and press 'Export' once again.


Quick Steps with Shortcut Keys
There are a couple of indispensable shortcut keys you should learn.
Tip 1: Ctrl+K
The first is the Ctrl+K or Cmd+K shortcut. It works faster than the Razor Tool but achieves pretty much the same effect. If you have an active track, hitting this key combination will split the track into two parts at the point where the playhead is positioned. This is useful when you want to add a transition in the middle of your video or you need to insert another clip there. If you want to do this for all the tracks in your timeline, just hold Shift while using the shortcut keys. To summarize:
- Bring the playhead to the trim point.
- Hold down the Control key and hit K. This will trim the video clip on the chosen track that that point.
- To do this for multiple tracks, select the tracks before executing Step 2 above.
Tip 2: Q & W
The second set of shortcut keys you should definitely get used to are Q and W. It gives you what's known as a Ripple Trim, which is basically a quick way to trim and realign your clips. If it's the beginning of a clip and you want to trim out the left side without creating a gap, hit Q. If it's the end of the clip and you want to trim the right side the same way, hit W. To summarize:

- Bring the playhead to the beginning of the first clip, which is your trim point.
- To trim left and remove any gap, hit the Q key. This is called a Top Clip.
- Next, bring the playhead to the end of the last clip. To trim right without a gap, hit the W key. This is known as a Tail Clip.
That's it!
Tips for Trimming Video in Adobe Premiere
If you're trying to learn how to trim a video on premiere pro, there are a few things that you must keep in mind to avoid any inconvenience. When you add a video clip to Adobe Premiere, it often gets automatically rendered by the software to ensure high-quality playback and convincing speed for the time being. Rendering takes time and may result in loss of quality afterward, however, it ensures that you get the best possible video quality by removing any lag or skipped frames from the video playback.
How to Trim a Video on Adobe Premiere Pro without Re-Rendering?
Adobe Premiere is known to re-render videos every time you make even the most minor alterations. If you're wondering how to trim a video clip in adobe premiere pro without having to re-render it, then follow the alternative method below:
-
Firstly, you need to import your video clip to Premiere Pro. To do this, launch Premiere and select the 'Import Media to Start' option in the bottom-right corner of the screen and browse and select the video clip that you need to edit.
-
This video clip will now show up in the media library section in the bottom-right of the screen. Drag and drop this video clip from the media library section to the timeline. The complete video clip duration will now show up in the timeline.
-
To crop the video clip, drag the blue time marker at the top of the timeline section to the duration where you want to begin the video.
-
Press 'Ctrl' on your keyboard and drag the starting end of your clip to the position of the time marker. Doing this will remove all unnecessary video portion from the beginning of the clip.
-
To trim from the other end of the video clip. Follow the same steps, however, this time from the opposite direction. This method will only trim from either end of the video clip.
-
To trim from the middle of the clip, select the 'Laser Tool' from the side menu of your timeline. Then, click on the video clip at the position where you need to trim. The video will cut from this position.
-
You can follow steps 2-4 to trim from any cuts that you just made.
-
To save the finalized version of the video, go to 'File' and select 'Export'. From the list of available options, tap 'Media'. You'll now be directed to export setting where you can adjust specific settings including video format, name, quality, and more. Tap 'Export' once you've entered all appropriate information and instructions.


How to Trim and Re-Encode Video without Re-Rendering
Usually, video trimming with Adobe Premier has the greatest setback of re-rendering every video for even the slightest action. You might be wondering how to trim a video on adobe premiere pro and encoding it without re-rendering the video. We've got the appropriate method that you can use to trim and encode any video without having to re-render it again and again.
-
Launch Adobe Premiere on your computer. Go to 'File' and select 'Import'. Locate the video clip that needs trimming and double tap on it to import it in Premiere.
-
Drag and drop this video clip into the timeline.
-
Select the 'Ripple Edit Tool'. Press 'Sequence' and go to 'Sequence Settings' where you'll be able to set or make modifications to the file format, name, bit rate, codec, and other requirements.
-
Adjust the Ripple to define the desired start time and end time for the video.
-
Finalize the trim by selecting 'File' and tap 'Export'. Select 'Media' and go to 'Export Settings'. Set the appropriate settings and hit 'Export'.
Unlink Video and Audio for Trimming
When you upload a video to Premiere Pro and bring it into the timeline, you'll see that the video and audio tracks are synced and locked. This is to ensure that there's no misalignment when the video is converted to another format or manipulated in other ways. For instance, importing it into a different video editor might cause a mis-sync between video and audio if the two tracks aren't linked and locked. To avoid this problem, video editing professionals invariably lock these two tracks together. That's why you need to unlock or unlink the two before you do anything else, such as delete the audio track alone.
- To do this, import the video into Premiere Pro and bring the video from the project panel to the timeline along with all associated tracks.
- Next, select just the video track.

- Right-click the video track and choose "Unlink" from the contextual menu.
- The audio track is now separate from the video track, and you can trim either one using the trimming methods shown in this article.
Choose the Correct Tool for Trimming and Cutting Clips
If Premiere Pro is a little too advanced for you, why not try a simpler tool. iMyFone Filme is perfect for beginners and amateurs alike. Although it offers features like advanced timeline editing, it's also highly intuitive as a video editing platform. Here are some other reasons why Filme is a great choice:
- Filme lets you zoom into your clip so you can trim exactly where you want - down to the correct frame.
- The trim, split, and crop tools are easily accessible right above the timeline, which means you won't have to hunt around for them.
- Beautiful transitions can be applied after trimming, giving your video a professional look in just seconds.
- After removing the linked audio, you can add from a large selection of royalty-free music and edit it to fit your video clip.


Final Verdict
Premiere Pro provides a somewhat unfriendly user-interface quite difficult for beginner video editors to understand. It might even take you days to properly understand how to trim a video clip in Adobe Premiere Pro. I've got the perfect tool that you may utilize to trim your videos with ease!Learn how to do all this and more in the next section below.
Also Read: Add Text in Adobe Premiere Pro >>
Part 2. Best Alternative for Adobe Premiere Pro – iMyFone Filme
iMyFone Filme is an simple video editing software that greatly exceeds Adobe Premiere Pro in terms of user-friendliness. When compared to Premiere, Filme allows anyone to understand and perform the art of video editing in a matter of minutes. Filme is greatly known for its highly intuitive user-interface that you'll definitely enjoy working around. From basic editing tasks to much higher end video editing, Filme supports it all and makes the complete process seem much easier to you!
How to Trim a Video using iMyFone Filme?
The procedure of trimming any video with Filme is rather straightforward and takes little time to understand. The steps below illustrate how you can utilize Filme for the purpose of video editing:
-
First and foremost, download and install iMyFone Filme on your computer. Launch the software after the installation completes.
-
Press the 'Import media here and apply it to multiple projects' option and browse the video file that you need to trim. Double click it to add it. Hover your mouse over the video clip and tap on the '+' button to add it to your timeline.
-
To trim the video clip, click, hold, and drag the begining or end of the video clip to where you want to trim it to. Please note that you can make the duration of photos longer but not videos.
-
Release the mouse once you're at the correct duration and the excess part will be trimmed out.
-
Save the changes by clicking on 'Save' in the 'File' menu or above the timeline.
Other Key Features
-
Filme is the most accessible video editing software that gives you options to add text or record your voice, add video transitions, or change the video speed.
-
It consists of multiple templates and transitions that you can easily use according to your theme and desire.
-
Built-in background music, special effect and trasitions to add spice to your video, and you can add music according to the relevant theme. This feature will enhance creativity and grab the attention of the audience.
-
Filme is a software which is not tricky even for beginners. It is simple yet innovative video making software.
Filme provides a list of actions that you can do with your videos. In simple words, Filme allows you to get creative with your videos by allowing various fancy video editing features that catch the interest of most video editors. Following is a list of some of the most prominent key features of Filme.
-


Watch this video to see how to use Filme to trim videos:
Conclusion
This article covers everything that you need to know about how to trim a video clip in Adobe Premiere Pro. Honestly, Adobe Premiere Pro is a software designed for professional video editors that know how to work around complex video editing software.
When it comes to simple video trimming, Premiere may not be the most appropriate option. My personal preference is iMyFone Filme which is much more user-friendly and preferred for people that want to perform simple or complex editing tasks in the least time.


