Screen recording has come as a blessing in disguise for all the streamers and tutorial makers who want people to either enjoy their content or show the world how to get things done. In this, we have fantastic software to help the streamers with it, called Bandicam Screen Recorder.
The software is easy to use and has helped thousands of streamers make money out of game streaming and share content. It is crucial to understand how to use the software, how to tweak it to get best performance. In addition to this, it is also essential to work with a platform that records and renders your audio perfectly. With these things in mind, let’s explore the possibilities and potential of Bandicam, and we will also know about an alternate solution to bandicam screen recorder.
Part 1: What is Bandicam?
Bandicam is a three-in-one software that can successfully help you with screen recording, game recording, and video capturing. It is light software, which means that you can use it with any type of system. Not to mention you can only expect a flawless performance along with getting a high-quality video in response. Capturing the screen is tougher than it looks.
The Bandicam, a free screen recorder, is mostly used by streamers who want to show their games like PUBG, Minecraft, Fortnite, etc., and that too with a high compression rate. There are a lot of intricate aspects of Bandicam which may not seem very useful from the outset. But, once you start using the platform, you will realize how great these small features are. To give you an example, the Bandicam screen recorder allows you to cut a part of the screen or a video you are watching and record only the selected part. Isn’t that great?
There are many more similar features provided by the software that will change the bottom line of your screen recording experience.
Part 2: How To Use Bandicam To Record Screen
Using Bandicam is simple and intuitive. Plus, you can set the settings to record different screen dimensions according to the purpose. Bandicam gives you the option to record a specific part of the screen, record the entire screen, or record the screen without the Windows logo. Apart from all these aspects, you can also edit the recorded videos and add annotations for explaining the elements of the video. Let’s learn how to do all these things with Bandicam screen recorder free download for PC.
How to Record the Entire Computer Screen with Bandicam?
Step 1. Open Bandicam Screen Recorder, and it will open up a small window. Side by side, you can start working on your stuff, be it a game or a video you want to explain.
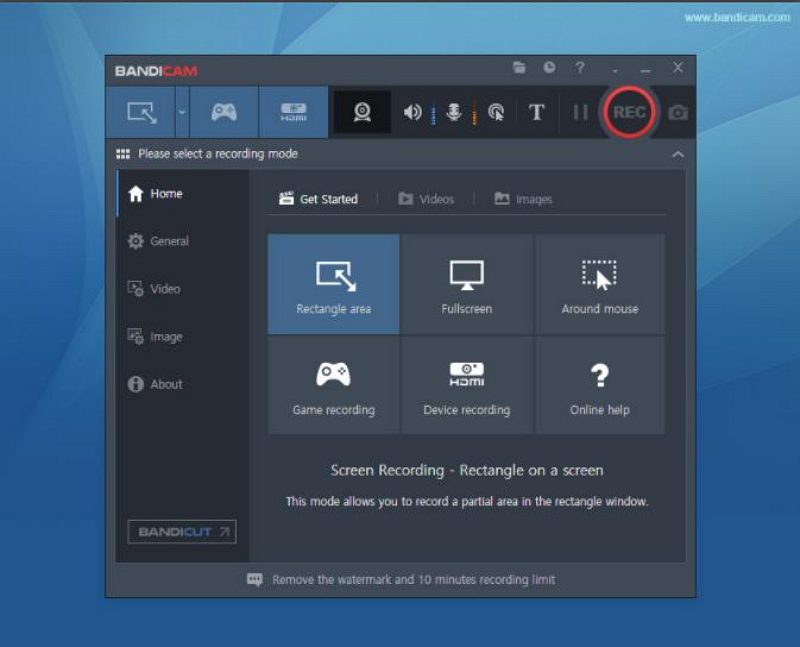
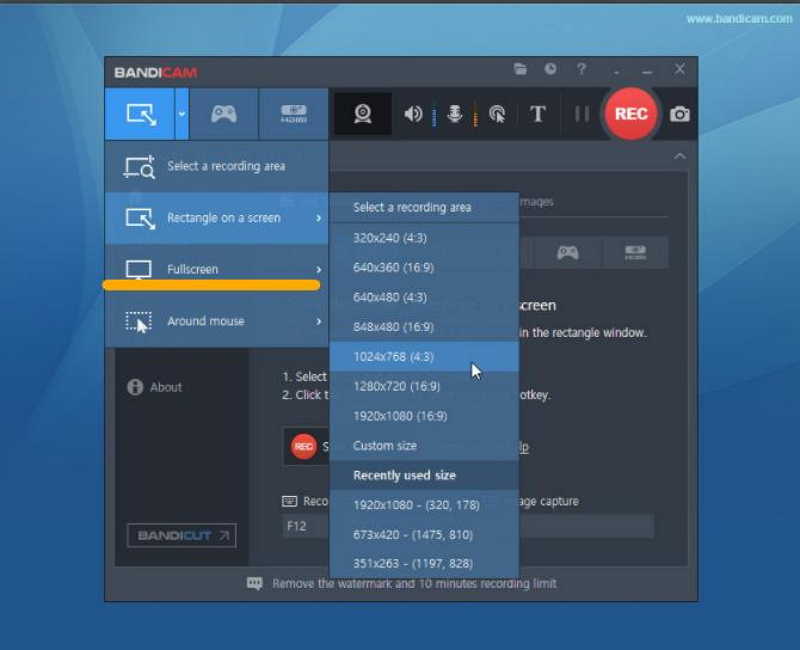
Step 2. Once it is open, click on the small rectangle box and arrow on the left corner. This will let you choose the Screen Record Mode from the drop-down menu. From here, select the Full-Screen mode from the drop-down menu, and click on REC to start recording.
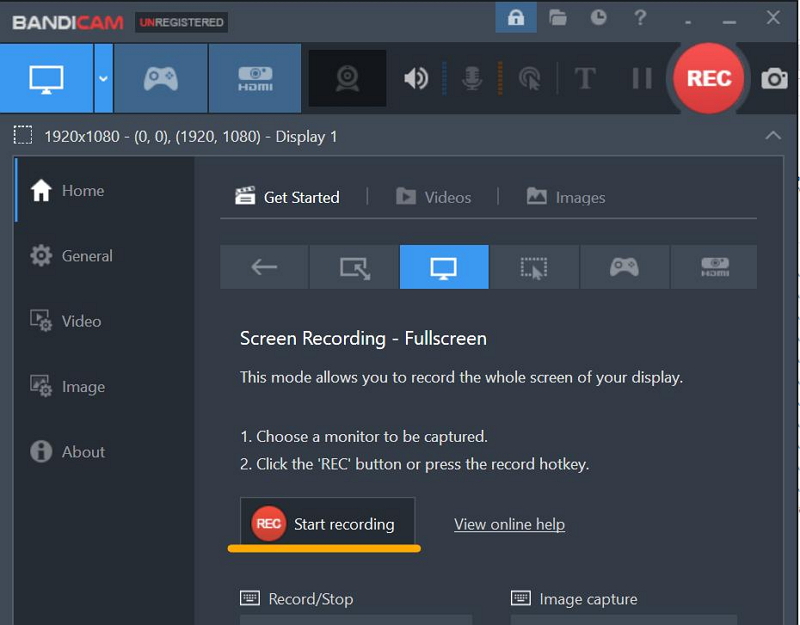
Step 3. Once the area is selected, Click on REC at the top right corner to start recording the screen.
How to Record a Specific Part of the Screen?
Bandicam also gives you the option to record a pre-selected screen area. However, choosing one of these dimensions first required knowing the exact size they will cover. So a better option is to either choose the full-screen mode or select a custom size.
Step 1. Open Bandicam Free Screen recorder and navigate to the Screen Record Mode in the top left corner.
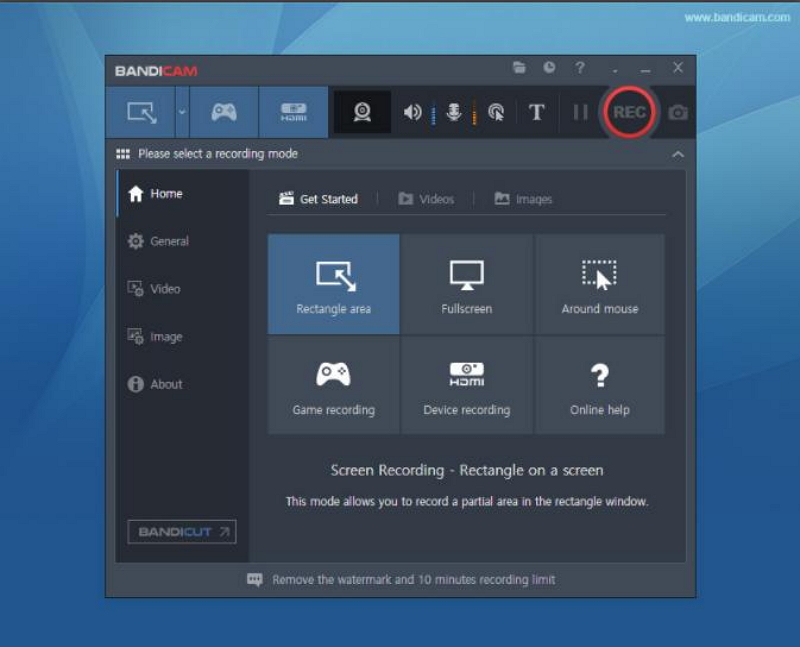
Step 2. From the drop-down menu, choose “Select a Recording Area.” Or you can also choose the “Rectangle Area” option on the main screen to custom select the area.
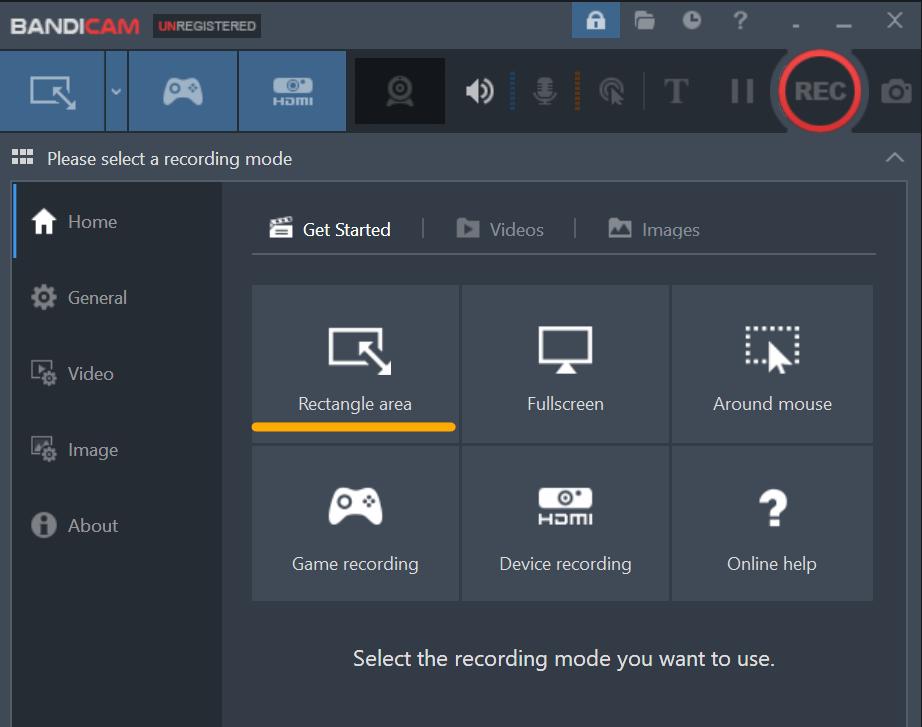
Step 3. You can select the area you want to record by dragging the cursor and making the desired rectangle size.
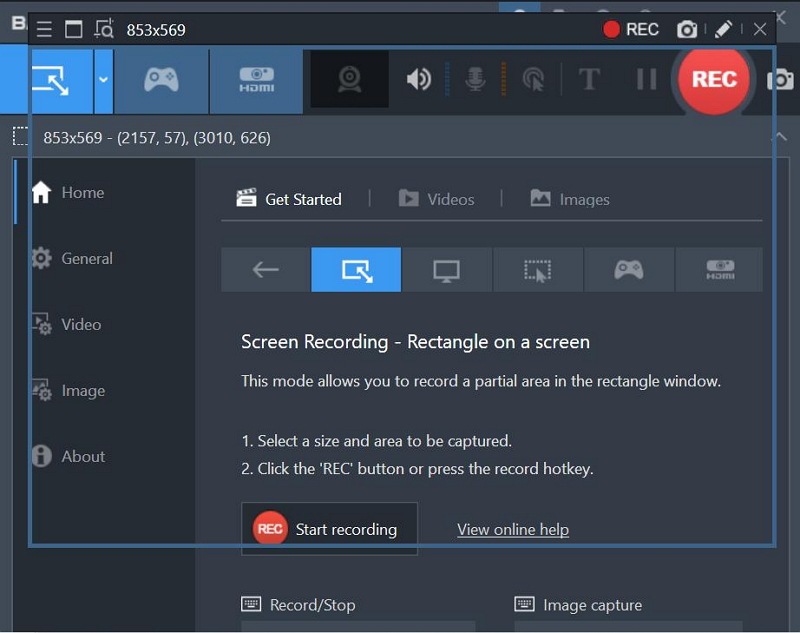
Step 4. Click on Start Recording, and the timer will start.

How to Get Recorded Videos?
Once the videos are recorded, you Bandicam saves them all in the library with the entire list present on the interface. Here’s how you can fetch them.
Step 1. Open Bandicam and go to “Home.”
Step 2. Click on Videos, and a list of all the recorded videos will appear.
Step 3. From here, you can Play, Edit, Upload, or Delete a video as per your choice.
Part 3: Pros and Cons of Bandicam
As one of the leading screen recording software, Bandicam’s popularity went off the charts ever since the momentum of streaming games and content has picked up speed. The software gives you several possibilities in terms of recording and sharing videos. However, there are a few things that we would like to change about the software too. Here are some pros and cons of the Bandicam screen recorder.
Pros of Bandicam
 A great software for those who want to record different parts of the screen.
 Bandicam is compatible with the games that use DirectX or OpenGL, or Vulkan Graphics technologies to enhance the gameplay. So, you can seamlessly play and record videos without lagging.
 Its video editing mode is highly proficient as it not only helps you add annotations but also add them while recording the video. So, you get a real-time editor.
 Unlimited screen recording with the paid version.
 A great software to set up employee screen recording and screen activity monitoring systems.
Cons of Bandicam
![]() The free version only allows 10 minutes of screen recording.
The free version only allows 10 minutes of screen recording.
![]() The better editing and recording tools are only available with the paid version.
The better editing and recording tools are only available with the paid version.
![]() Some users have reported issues with Bandicam affecting their system’s performance.
Some users have reported issues with Bandicam affecting their system’s performance.
![]() The Bandicam Text Editor places the text on the top center of the screen, which can interfere with the recorded video.
The Bandicam Text Editor places the text on the top center of the screen, which can interfere with the recorded video.
How to Screen Record an Instagram Story
Part 4: What’s the Best Alternative to Bandicam Screen Recorder?
Well due to its limited recording ability in the free version, Bandicam loses a lot of its customers, sending them away to look for options. So, to help you with it, Filme is a better alternative to Bandicam. Let’s explore the features and functions of Filme, followed by a guide on using it for screen recording.
What is Filme?
Filme is an advanced and innovative video editing tool boasting several amazing features to help you create stunning videos in a few clicks. The best part about this software is its intuitiveness, making it a perfect tool for beginners and pro editors.
The software brings the best of video editing to your desktop, and that with all the necessary features, you may want to create stunning and viral content. It gives the options to edit the videos and set different backgrounds according to the requirements.
If that's not all, Filme has a basic editing toolkit that is powerful enough to transform your videos and bring your imagination to life. The world today has shifted from watching stories to embracing the trend of digital stories that are made with love and proficiency.
With Filme and its inbuilt toolkit, you can capture the moments you love and bring them together to create something extraordinary. As a bonus, you can also use Filme to record your screen and edit it with advanced tools for best results.
Let’s check out how you use Filme’s Screen recording feature and then compare it with the Bandicam free screen recorder.
Part 5: How To Record Screen In Filme?
Step 1. Open Filme, and you will come across an interface similar to the one given below.
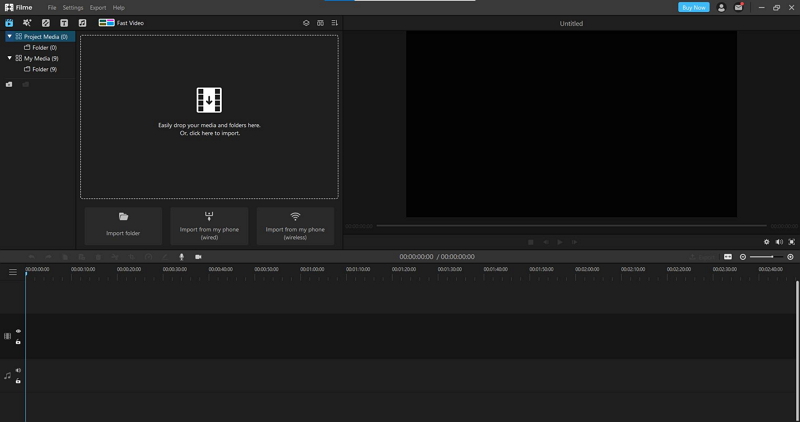
Step 2. Go to the Timeline Section below and click on the icon with Camera.
Step 3. Clicking on it will open a selection area with adjustable markers on all sides. Select the desired marker and drag it to adjust the screen size you want to record. PS: Make sure that you open the target window that you want to record beforehand.
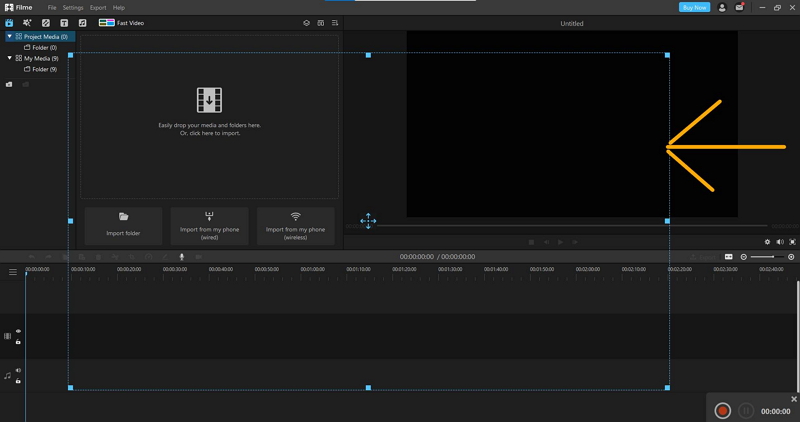
Step 4. On the bottom right corner, you will see a small toolbar with a Red button (Record) and a Pause option. Click on Record to start recording and if you want to pause in between, hit Pause.
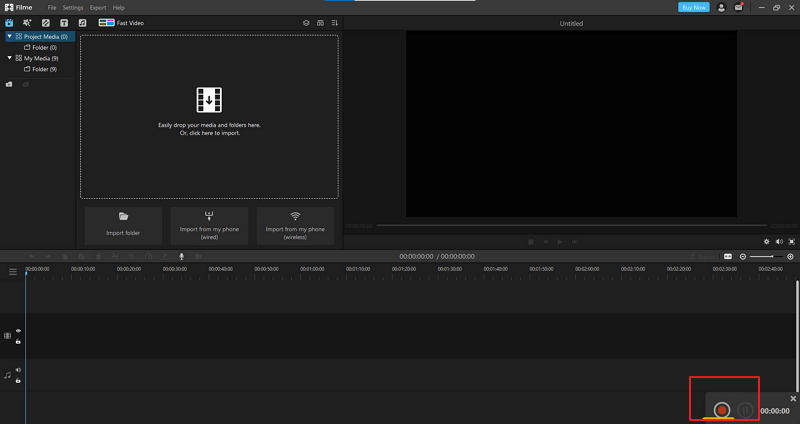
Step 5. To stop recording hit the Record button again, and the video will be saved and come up on the media window on the main screen.
Conclusion
So, didn’t you find Filme easier to use than Bandicam? Sure, Bandicam has a ton of features, but the central part is setting the dimensions for recording the screen when it comes to screen recording.
Filme offers the perfect and one-click solution to that, along with helping you record for an unlimited amount of time. On the other hand, the Bandicam free screen recorder only has 10 minutes of recording with the free version.
As for the editing is concerned, you will find several options in both the platforms and create incredible final videos, not to mention enjoy a high-resolution output absent in the majority of the platforms. So, Filme is a better option than the Bandicam screen recorder for its ease of use and editing abilities alone.


