Screen recording is quite convenient. Some phones have an in-built Screen recording feature, others don’t. If you want to screen record and share content instantly with your friends and family, you need to check out the iMovie screen recording. This amazing tool offers supreme screen recording services along with video editing tools for not only iOS users but also iPadOS and macOS users. If you haven’t used the tool before, it is best to watch the tutorial and get the hang of the procedure first. Other than iMovie, there are other great screen-recording tools that the users can utilize free of cost.
Part 1: How to Record Screen on iMovie ( Mac)
There are a few steps that need to be followed if you want to screen record on Mac, whether it is a video, an audio file, or an important video conference. One of the greatest advantages of using Mac is that it allows you to hone your creative instincts. You can record a short clip or edit videos or films with extremely high quality. Visuals are never compromised when using Mac. Take a look at the detailed tutorial given below to figure out the process.
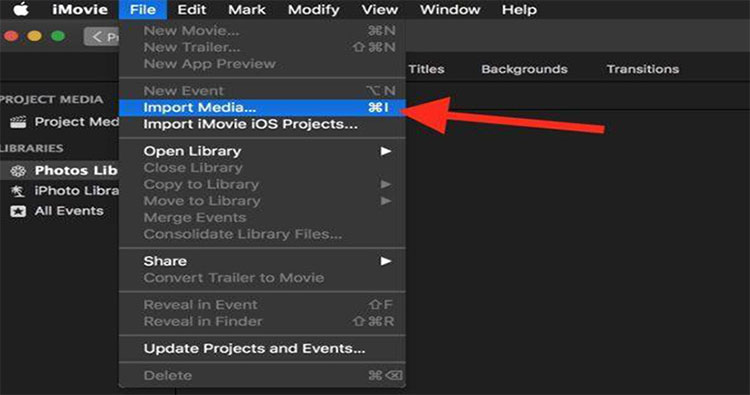
#Step 1: Locate the toolbar and click ‘Import Media’
Firstly, you need to run the iMovie application on your Mac. Locate the toolbar to find the import button. On the toolbar, you will need to click on the file option. A drop-down list will appear. From the list, choose the option ‘Import Media’. This option allows the user to upload the required video.
#Step 2: Click the Cameras section
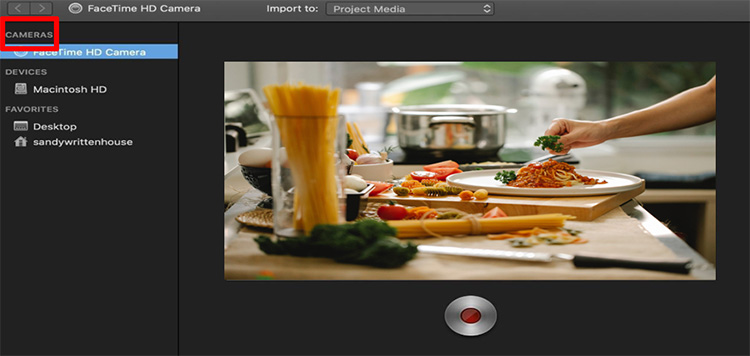
Users who wish to record themselves, for a Youtube video perhaps, can use the in-built camera feature of iMovie and record a video successfully. To use the in-built camera, you need to go to the Cameras section. In the Import video, you will be able to see a live video window. Click on that window and begin recording yourself right away!
#Step 3: Click the ‘import to’ option
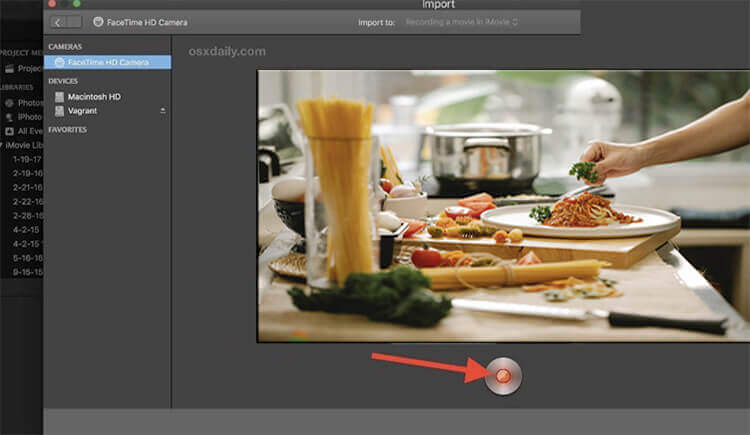
In the image displayed above, you can see the in-built camera record button that allows you to record yourself. If you notice the toolbar, you can see the ‘import to’ option. Upon clicking this option, a drop-down of three options will appear for the user to choose. You can click on Project Media, existing event, or create a new event.
#Step 4: Start recording a video
Click on the red button. A live video of yourself will start recording.
#Step 5: Click the stop button to stop recording
Once you are done recording, click on the stop button.
#Step 6: Edit the recorded video
If you want to edit the video, you need to return to the main page of the iMovie application and begin the process. You can also learn how to edit a screen recording in iMovie.
Also Read:
How to Record Mac Screen with Internal Audio >>
Part 2: How to Screen Record on iMovie(iPhone)
Just as easy it is to record videos on macOS, it is just as simple to record videos using iMovie on your iPhone or iPad. If you want to record a quick Youtube video and then edit it simultaneously using professional editing tools, it is best to record yourself directly through iMovie. This allows you to save the time spent recording somewhere else, then uploading that video on the iMovie application to start the editing process. Below are the detailed steps:
#Step 1: Click the required timeline
If you are already going through the process of video or film editing and wish to add a video or photo right at that moment, you can click on the required timestamp of the movie timeline.
#Step 2: Add media files
Locate the ‘+’ sign, which you will find on the left corner of the screen. This button will allow you to add media files, whether video or audio.
#Step 3: Click on the ‘Camera’ option.
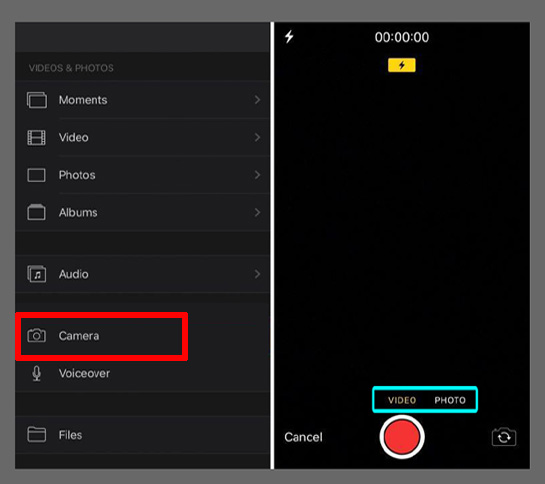
From the list of several different options, you need to click on ‘Camera’.
#Step 4: Press the record button and start recording
Once the camera showing a live video of yourself opens up, you will notice two options above the red record button. The two options are Video and Photo. It depends on whether you want to record a video of yourself or take a photo. Once you click on the desired option, you simply need to press the record button, which is the same thing as using a regular iPhone camera.
#Step 5: Preview the recorded video and do further editing
If you choose the option of recording a video, you will notice the ‘preview’ option that allows the user to view their recorded video once. Suppose there is a problem. Then, they can press on the ‘Retake’ option that lets the user start from scratch. In case the video is perfectly filmed, the user is required to click the “Use Video’ or “Use Photo” option and get on with the editing process.
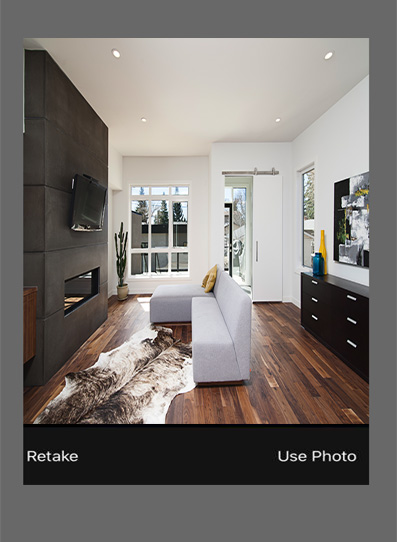
If you choose to add the video or photo on a specific movie timeline, once you click the ‘Use video’ option, you will notice the video inserted at the exact spot.
Also Read:
How to Screen Record on Snapchat on iPhone >>
Part 3: Hot FAQs on Screen Recording on iMovie
A lot of people are curious about questions like can iMovie screen record? Other questions are concerned about the details of screen recording using iMovie. Addressed below are such questions that the new users are often curious about.
Question 1: Why does my screen recording have no sound in iMovie?
Users often commit the mistake of muting the video in the timeline accidentally. This may be the reason why you can’t hear the audio. Another reason can be that the volume of the video may have been set to the lowest level by default. You can increase it to the maximum and continue editing your video. If your video is muted and it is not due to the two reasons mentioned above, you need to quit the iMovie application and open it again. This may fix the bug. If it is still not working, you need to quit the iMovie application and import the required file again. This should be able to fix the user’s audio issues.
Question 2: How long can you screen record on iMovie?
This is one of the greatest perks of using the iMovie record screen and audio feature. It allows you to screen record (video or audio) for as long as you please! To give the user a general idea, iMovie is capable of screen recording for 60 minutes straight!
Question 3: How do you record your screen on iMovie with music?
If you want to record music, you can press the screen recording button and make sure you turn up the volume. This will easily record the music. You can edit the beginning or the ending of the music video according to your needs. If there was any buffering in the middle, you could easily edit that out as well. Afterward, you can use or view the video as it is or, you can add the music of the video to some other video you filmed. A lot of Youtubers use this convenient process to add music to their gameplay videos and so on. Thus, if you had any queries regarding how to add screen recording audio to iMovie, this answer solves your problem!
Question 4: Can you record just audio on iMovie?
Yes! It is absolutely possible to record only audio files using the iMovie application. All you need to do is to click on the audio file you want to record, play the audio and turn up the volume, preferably to maximum level. Press on the screen recording button. The internal audio being played on your screen will easily get recorded by the iMovie app. This is the easiest method for such people who wish to record audio quickly and then share it with a friend or a colleague immediately. You can share such clips of recorded audio on your social media platforms. It is a quick and easy method that requires minimum effort. Recording audio using iMovie may be the quickest method to perform this task.
Part 4: iMovie not Working on Windows? Use Filme Screen Recorder
The only downside to the iMovie application is that it is not available for Windows users. Other than this, to run the iMovie app, users need to be equipped with the latest version of the Mac Operating System. For users who prefer Windows over iOS or can’t upgrade their macOS, they need to find an alternative for screen recording. iMyFone Filme is just as good as iMovie! It can serve as the perfect alternative for iMovie. Mentioned below are the steps you need to follow to screen-record using the Filme application.
Step 1. To begin the process, you need to open the Filme application.
Step 2. Locate the ‘Record’ button at the top, across the toolbar. Click on the button.
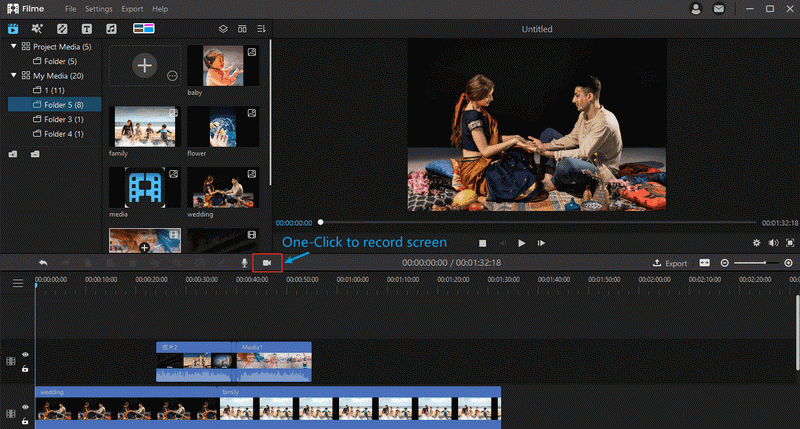
Step 3. Hold and drag the cropping box to adjust the marked area according to your requirement. It lets you view a rectangle icon. The rectangle icon allows you to pinpoint the specific area on the screen that you want to record. All you need to do is to hold and drag the rectangle icon to that part of the screen.
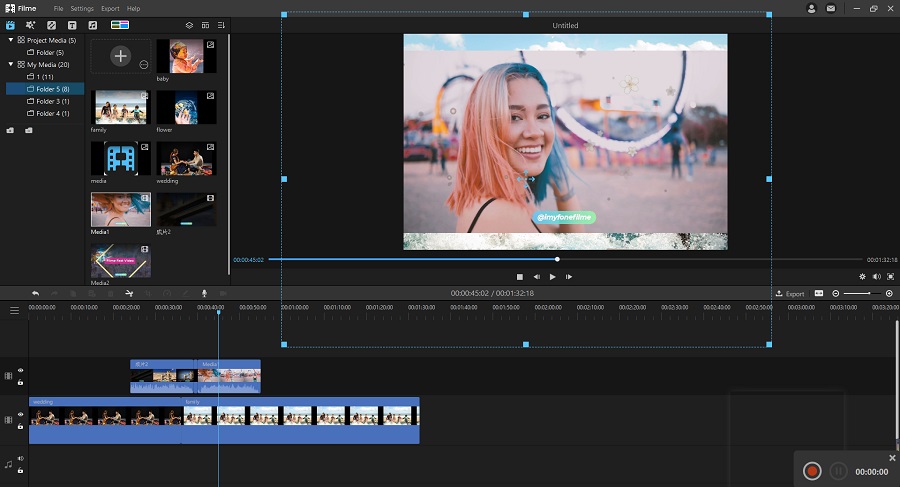
Step 4. Locate the ‘Record’ button. You will find it at the top right corner of the screen on the toolbar. Press the button to begin the screen recording. As soon as you press record, a 3-second countdown will be displayed, after which the recording will begin. After it is done, press the save button, and the video will be opened up in Filme for editing.
Advantages of using Filme
1) You can customize the part of the screen you want to record while leaving out the rest.
2) You can screen record even the computer audio!
3) There is no limit to screen recording. You can record video and audio without any time restriction.
4) Filme can be used not only on Windows but macOS as well.
5) Filme is easy to use with simple interface, even for beginners!
6) You can also share the recorded video to popular social media platforms like Facebook, Twitter, YouTube and Vimeo.
7) Filme comes with other basic editing tools like trimming, changing video speed, spliting, etc.
Wrapping it up
Using the iMovie app has made the screen-recording process very convenient for iOS and macOS users. They can record audio and video files and edit conveniently. Similarly, iMyFone Filme is a great tool that fulfills the screen recording and editing requirement for Windows users. Discussed above are all relative queries such as how to put screen recordings in iMovie and so on!


