Computers screen are a big part of our daily live. We use then and share with other persons what we do. It can be a game recording, a product software presentation or just a technical support instruction. But all these have something in common, they need a record screen and microphone to be made and shared with other persons.
On this article, you will learn more than 3 ways to smoothly record screen with audio on Windows 10 and macOS. Learn the details of what you need to do to record screen and microphone media.
How to Screen Record with audio on Windows 10
On this version of Windows, you can use several tools to keep your screen recording and microphone narration well documented. There is not a definitive solution for all the task that could need a microphone screen recording, since it depends on your necessities as a user and what you want the recordings for.
That is why we prepared a detailed guide with three different ways to record screen with audio on Windows 10. Take a look at the pros and cons of each way to learn which one is the most appropriated for you.
Way 1: Use Windows 10's Build-in Tool - Game Bar
The Game Bar is a modality that Windows developed for Windows 10 and onward operating system versions. It has multiple functions that are focused on optimizing the gaming experience of the user. For example, it can optimize the computer resources and displaying them when required.
Features of Windows Game Bar:
- Good quality recording.
- You get to adjust volume of the microphone input.
- Adjustment of the system sounds and the speakers output.
- You can add noise filters to your audio as well.
- Optimization of the computer resources.
- Safe and efficient.
Therefore, it is an alternative you can use for your recordings even if you won't use it for games. Here is a detailed guide on how to screen record with microphone using the Game Bar feature of Windows 10.
How to Screen Record with Microphone Using Windows Game Bar:
Step 1: First, you need to ensure that your Game Bar feature is activated. It is as simple as opening the Start Menu and clicking on the "Settings" icon (The small gear).
Step 2: Among all the options available, search for the "Gaming" section.
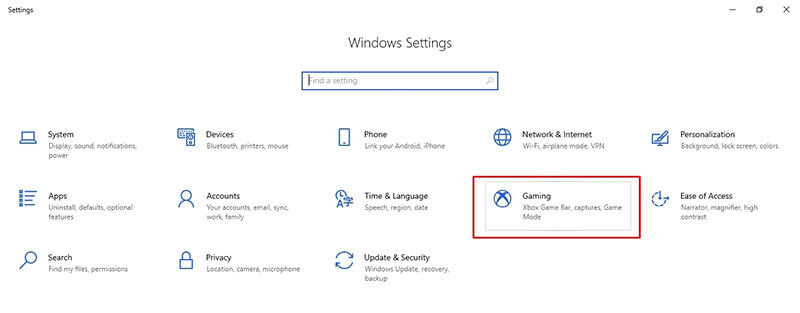
Step 3: Once here, the Game Bar settings will be the first tab displayed. There you can toggle on the Game Bar feature and now you can activate it at any moment.
Step 4: Now, to open your Game Bar just press the combination (Windows button + G)
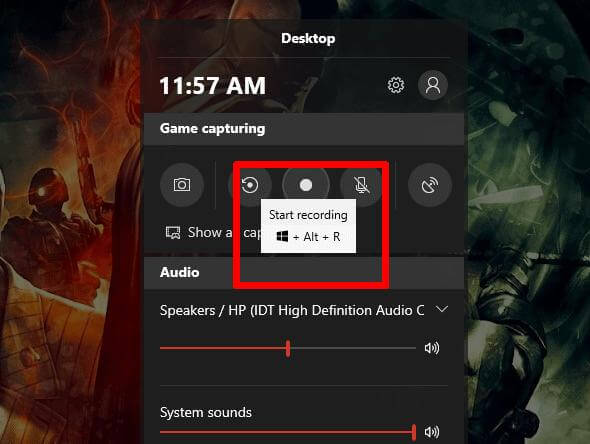
Step 5: If you want to enable the microphone screen recording, just open the Game Bar and click on the recording option. You might as well press the combination (Windows + Alt + R). Turn on your microphone to start recording your voice as well.
Step 6: Remember to adapt on the settings the input device you will use for your microphone.
Step 7: Once your recording is ready, click on the "Stop" button or press (Windows + Alt + R) again the recording will be saved on your designed designation. You will see a notification confirming that your recording is done. If you click the notification, the destination of your recording will be opened.
Here is a detailed guide on how to record screen on Windows 10 using Game Bar. Check it out for more info!
Way 2: Use PowerPoint Screen Recording
PowerPoint is well-known for the professional presentations. But in addition, from the Power Point 2016 onwards, it was implemented the screen recording feature. This is a simple way to record your computer screen and microphone on Windows 10, considering that the Office package is one of the most common tools you might have on Windows.
Features of PowerPoint Screen Recording:
- Adjustment of the area of recording.
- Option to record or hide the pointer.
- You can turn on your microphone and select the input or mute it.
- You can use hotkeys shortcuts to keep control of the recording.
- You can include the recorded media on your PowerPoint presentation.
- You can save the recording video on a selected location.
- You can change the video style with filters.
- You can add comments to the recording.
How to Screen Record Using PowerPoint:
Therefore, here is a detailed guide to help you enable microphone screen recording using PowerPoint:
Step 1: Open PowerPoint and go to the "Insert" tab on the upper menu.
Step 2: A small menu of options should appear with the recording options. You can click and hold the click to drag it around your screen. Place it where it won't bother your recording.
Step 3: Now, you can adjust the recording area or turn on the feature by pressing (Windows + Shift)
Step 4: Click with the crosshair tool and drag the area that you need to record. Display the windows that you want to record.
Step 5: You might use the default options. Where both the mouse pointer and the microphone audio are recorded. If you do not want that, turn the switches off.
Step 6: Click on the "Record" option to record your screen and microphone. You can also press (Windows + Shift +R). You can change the displayed windows and all will be recorded.
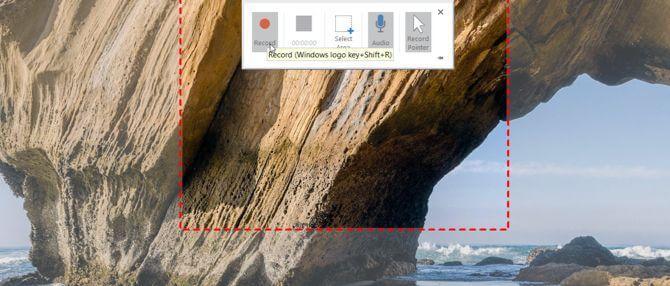
Step 7: Once your recording is done, click on the "Stop" button. You might as well press (Windows + Shift + Q)
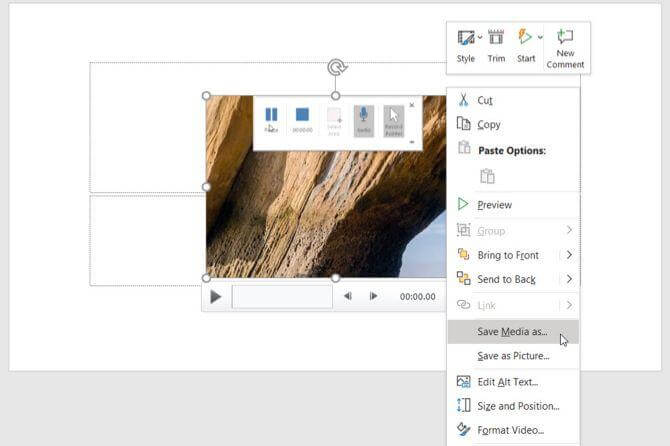
Step 8: Now you might do some small editing to your video. Like adding a color filter or trim the whole duration.
Step 9: To save your video, left-click over it and select "Save as" on the menu of options that will unfold. Select the location for your video and now your recording will be saved.
Way 3: Use Screen Recorder for Windows - iMyFone Filme
iMyFone Filme is a video editing tool that has multiple and helpful functionalities other than the editing tools. You can use it to prepare microphone screen recordings and edit them as well. Here is the breakdown of part of the features Filme can offer:
Features of Filme:
- Support to import various file formats.
- Record computer audio, microphone audio, or both simultaneously.
- Do the screen recording with high quality.
- You can adjust the size and shape of the cursor.
- Export the recorded video to multiple formats.
- No limited recording time.
- You can share the recorded video on YouTube, Twitter, Facebook and Vimeo.
How to Use Filme to Screen Record with Microphone?
Using Filme is a smooth process. Here is a brief tutorial on how to screen record with microphone using Filme:
Step 1: Download and install iMyFone Filme editor from the official website.
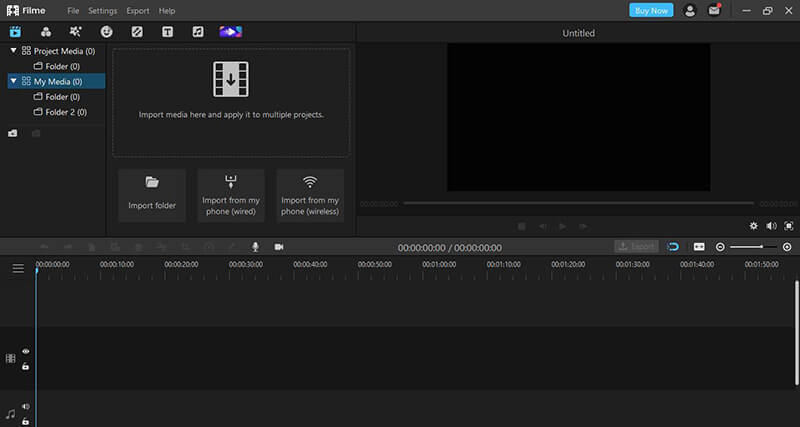
Step 2: Open your video editor. You will only need three clicks to complete your recording. The first click will be in the "Recording" icon to start recording.
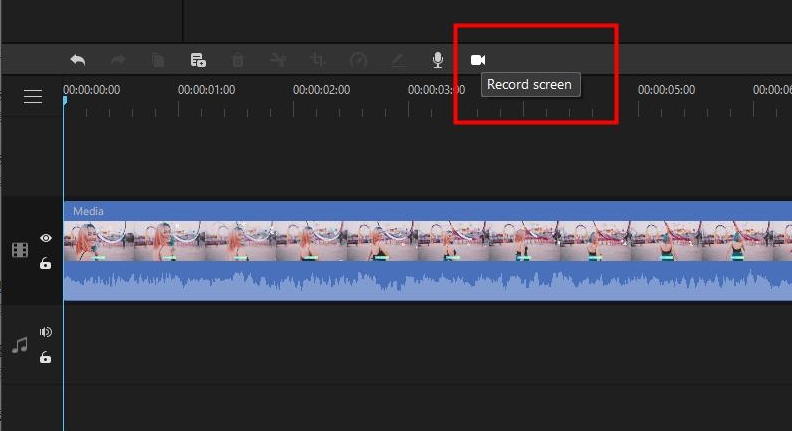
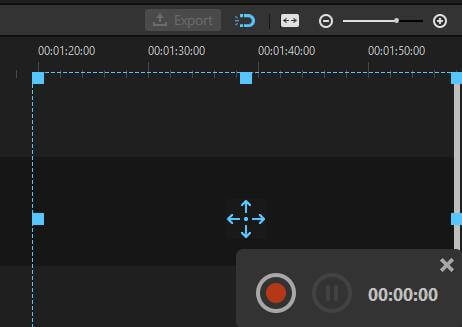
Step 3: The recording will include your microphone and device audio. A small menu will appear on your screen. You can control the recording process on this menu or press the shortcut keys. You can delimitate the screen area that will show up during the recording.
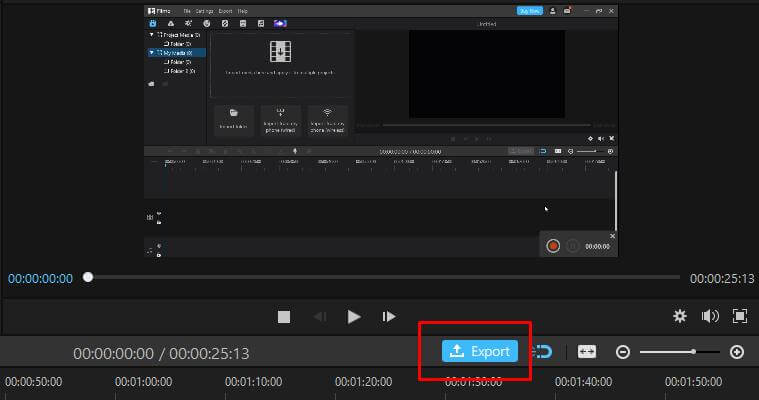
Step 4: Click again on the record button to stop the recording. Now, you will see all the recording displayed on the video editor. You can preview the recording and you might as well edit it if you want to. You can use features like drag and drop your video clips to change the order of reproduction, crop the video clips, scale them, trim it, and rotate it.
Step 5: The third simple step is to export your recording one it is done.
And here is a video tutorial about how to use Filme if you are confused about the steps above.
How to Screen Record with audio on Mac
If the three previous ways are still of no use for you, we prepared the way that you can use to record screen on Mac with microphone.
Use Free Extension (Loopback audio) Together with QuickTime Player
Loopback audio is a free extension that works as a cable-free audio routing for Mac. You might as well make microphone screen recordings using this tool. It is easy to use understand how to use it and includes different audio features.
Quicktime Player is a usefull screen recording. However, it does not include microphone audio. That is why you need to combine it with a free extension to include this functionality as well.
Here is how to use it to enable microphone screen recording:
Step 1: Install and open de Loopback audio extension from the official website.
Step 2: Open the media you need to record or capture in any application. That includes internet browsers, video player and so on. Start recording after 5 seconds to make sure it hides the control panel on your screen recording.
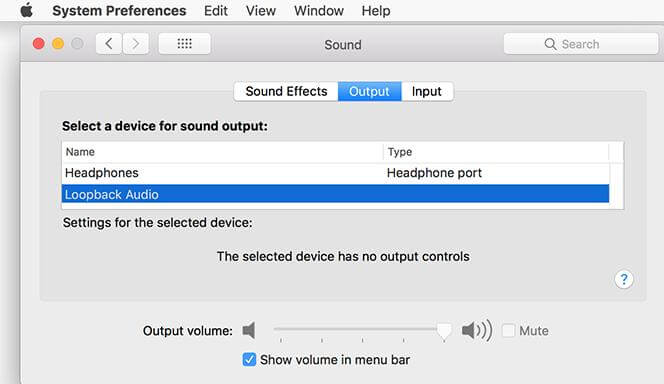
Step 3: Open the System preferences for Sound settings. Make sure the output that is placed is the Loopback Audio application.
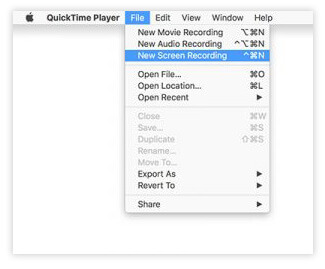
Step 4: Now you need to open QuickTime Player. There, on the file tab you will see the option "New Screen Recording".
Step 5: You can delimitate the area of the screen you want to record. It can be a customized portion or the whole screen.
Step 6: On the options menu of the recording, you need to choose the Loopback audio for the audio source. That way you will include the microphone audio.
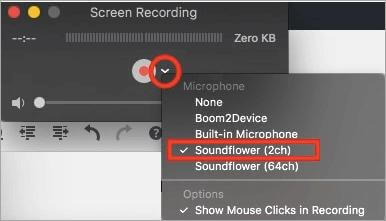
Step 7: Start your recording and narrate all the audio you want to include.
Step 8: Click on the "Stop" button to end the recording. Your recording video file will be saved on a location you can configure on the QuickTime Player options.
Step 9: You can use QuickTime Player to edit your video content if you need to. For example, trim the video or adjust the video audio volume. You might edit it with iMovie as well.
Step 10: Now go back to the System Preferences Sound settings, and adjust the Audio output back to the "Internal Speakers" mode.
Conclusion
Learning how to screen record with microphone is a valuable tool to show the content that is shown on your computer. It can facilitate the long-distance communication which is a helpful alternative nowadays for business meetings and technical support.
It also allows creating content and showing for example the playthrough of your favorite games. You might use a simple screen recording tool, but the best screen recorder with microphone will enable you to edit the recorded video. iMyFone Filme, for example, is a great alternative that will help you edit the video, add effects and filters that will improve the quality of it.


