Looking for a tool to separate the audio from your video? No worries then! We have just the solution for you. The FCP is the best choice for you to use and get your audio separated from the video in just a few minutes by following the guide below!
Part 1. How to Separate Audio from Video in Final Cut Pro
Final Cut Pro is editing software that you can use for any type of editing. It is quite a tough tool to understand but the best one out there for editing. So, it is all worth it!
Final Cut Pro
Let's start with the basics and get the professional video editing by these steps:
Step 1: Import Video Clip
The first thing is to import the video that you want to detach audio from. So, to import the file, you can click on the 'Import Media' and get the file you want to edit with the FCP. Or, there is a shortcut key for importing files. You can use that too. The shortcut key is to press 'Command+I.'
Step 2: Detach the Audio
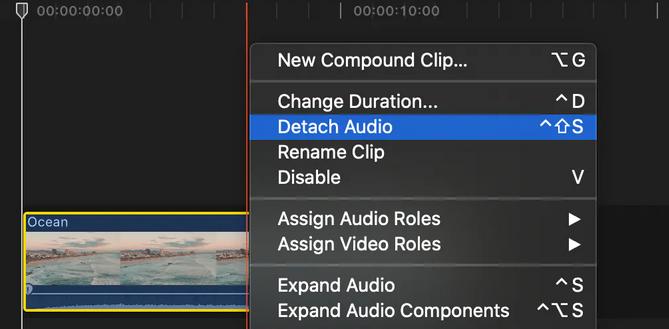
To detach the audio from your media file, you can use a shortcut key of 'CTRL+Shift+S,' or you can do it manually. To do it manually, you have to right-click on the video that you want to detach the audio from and select the option of 'Detach Audio.' This will detach the unwanted audio from your media.

Now, you can add new audio in the clip if you want to, but if you don't want any audio, then it is time to save your file.
Step 3: Saving to the Original Format
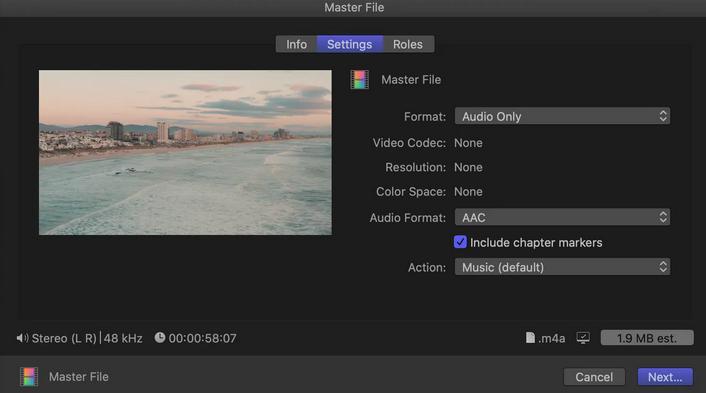
Let's now save the video in the original format so that the quality of the video does not drop. To save the video clip, go to the 'Share' and select the 'Save Media' option to save the file manually. There is a shortcut too. You just have to press the 'Command+S,' and now, you can save it anywhere on your device.

Key Features
Not all the features can be described here, but some of the best ones are:
-
FCP is the best if you want to move or trim a clip.
-
You can do Multicam editing in FCP.
-
You can also add effects in your clip using FCP.
-
There is an advanced color grading in FCP.
-
You can have HDR video support in FCP.
Part 2. How to Record the Voiceover with Final Cut Pro
Here are the steps that we can follow in recording the voiceover with the FCP.
Step 1: Import the Media
As explained above, you can use the shortcut key of 'Command+I,' or you can manually import the video clip by clicking on the 'Import Media' and get the file in your library of the FCP.
Step 2: Remove Background
After importing the file, you have to remove the background audio from it as it can be unnecessary.
Step 3: Record Voice Over
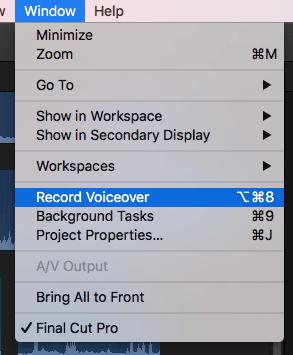
Now, the recording of your voice starts. To start recording, you have to first select the specific point on your timeline from where you want to start recording. Once you have selected the point, click on the 'Window' and select the option of 'Record Voiceover.'

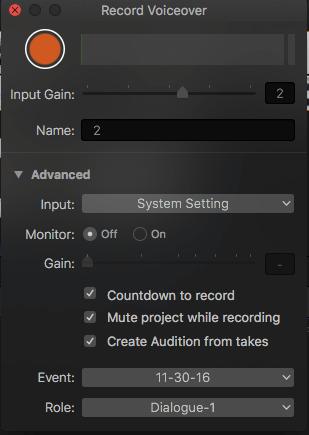
Now, you will see a record button. Press on it to start recording. Once you are done with recording your voice, again press the recording button, and it will now stop the process of further recording.

Step 4: Saving the Final Product
There is a shortcut for saving, and that is to press the 'Command+S,' or you can go to the 'File' and click on the Save option to save the final product of your editing on your device.
Key Features
The best features of the FCP are:
-
You can use the FCP for trimming or moving your clips.
-
Multicam is also available in FCP.
-
FCP allows you to add effects to your clips.
-
You can have advanced color grading in your clips if you want.
-
FCP supports HDR video.
Easier Editor than Final Cut Pro for Beginners to Detach Audio and Record Voice Over
An FCP is a professional tool for editors, and it is not easy to use for beginners. So, if you are an amateur in editing and want to use an easy tool for professional results, then we have amazing software for you. iMyFone Filme is the best tool to use for any type of editing. You can use this to detach the audio and record your voice for the background of your video.
iMyFone Filme
The steps you need to follow to get your recording behind a video clip are:
Step 1: Import
There is no shortcut key, so you just have to opt for the manual method of clicking on the 'Import' option given on the left side of the interface of Filme.
Step 2: Remove the Audio of the Clip
By clicking on the 'Edit' after right-clicking on the video clip, you can see the option of 'Video and Audio tool.' From there, go to the audio icon and move the dial of the 'Volume' option to zero. This will remove the audio from your video file.
Step 3: Record Your Voice
Now, hit the button 'Record' and start recording your voice. Once you are done recording, again hit the button 'Record' and stop recording further.
Step 4: Export
To export the final video results, you can either press 'CTRL+S,' or manually do it by clicking on the 'Export' option given on the left side of the interface of filme.
Key Features
The features of this best and easy alternative for the FCP are:
-
Filme allows users to make high-quality video editing within a few minutes, and it is easy to use.
-
Filme is used by professionals as well as millennials for the best video editing.
-
You can auto-create a lot of projects in filme.
-
You can also use the pre-prepared templates to edit quickly.
-
There are effects and filters present in the filme that users can use to beautify their edits.
-
You can add audio in your video edits to attract viewers.
-
There are many transitions available in filme that a user can put in their edits for fun
-
Users can also add a meaningful message in their edits by adding texts.
People Who Liked this Content Also Liked
iMovie vs. Final Cut Pro | The Ultimate Comparison (2021) >>
How to Remove Audio from Video – 8 Methods You Should Know >>
[2021 Newest] How to Detach Audio from a Clip In DaVinci Resolve 16/17 >>
Remove Audio from Video in Final Cut Pro FAQs
We have tried to answer as best as we can about the frequently asked questions that people have about removing the audio from a video clip in the FCP.
How to sync the voiceover in video with THE FCP?
If you want to sync voiceover with your video using FCP, this is what you have to do. First of all, you need to open the FCP and then add your video and voiceover clip. After that, you can either do the automatic sync or the timecode sync. For that, go to the option "choose clip" and then click "synchronize clip." That's all.
How to get my missing sound effect back in THE FCP?
Firstly, open the FCP and then add your video. After that, click on the sound effects category option present in the photos and audio sidebar. Then, look at the upper right corner of your browser, and there is a pop-up menu available there; click on this. Now, all your custom audio folders and other subfolders will appear in that menu. All you need to do now is choose your audio and be done!
How to Mute Audio in FCP?
If you want to mute your audio in the FCP, all you need to do is select the lips and then choose the option "modify." From there, you can select "adjust volume" and then "silence." Now your audio has been muted.
How to Loop Audio in FCP?
Looping your audio in the FCP is easy. All you need to do is follow the simple things. Firstly go to the option "choose view," and from there, go to "playback." After that, the option comes “loop playback” click on that to put your audio on loop. You can loop your entire video/clip by clicking on the timeline to activate them and then simply press the space bar.
How to Fade Audio in FCP?
To fade your audio in the FCP, all you need to do is select the clips from which you want the audio faded and then choose the option "modify." From there, you can select "adjust audio fades," and after that, select "fades." You can select the fade duration on your audio by dragging the handle from the point you want to start and then dropping it on the point you want to end the fade.
In this guide, you can find the best, and easiest editing tool, iMyFone Filme, as the FCP is a bit tricky to operate. So, for the amazing results for editing, you can use this alternative software and get amazing results.


