


There is so much software out there to do editing with! Everyone wants the best and the most secure one, as in this era of online, data can easily be hacked! So, to help you with this problem, we have AVS Video Editor for you and an alternative for it too that will be the best choice! Let's get to it then;

How to Remove Audio and Add New Audio in a Video in AVS Video Editor
AVS video editor is a flagship product of AVS. With this amazing software, you can remove the audio from any video clip and add a new one behind the clip.
AVS Video Editor

The given steps are to be followed to remove the audio from a video clip and to add new audio behind it:
Step 1: Import Files
The first step is to import your media to the AVS video editor. You have to import audio files as well as video files. To import the media, go and click on the 'Import' and choose the file from your PC that you want to edit. You can select the video as well as the audio files at the same time. Once the files are imported, they will appear in the library.
Step 2: Drag to Audio-Mix lines
So, the next step is to drag the audio file you want to add to your video clip in the audio-mix line. There are two audio lines, and you can place the audio in the first line. But, if you have another audio that you want to add, you can drag that file too from the Library to the second audio-mix line.

Step 3: Drag the Video to Video-Mix Line
The third step is to drag your video file from the library and drag it to the video line. Once you have dragged the file, you can now see two lines for the video file that you just dragged. The upper line is for the video, while the lower line is for the background audio of the video clip.
Step 4: Remove the Background Audio of the Video Clip
Next is to remove the audio from the video clip. To do that, you have to click on the red line of the video clip. Hold the left click after clicking on the red line, and now drag this line down. Once the line is dragged down, the audio behind the original video is muted. The audio files you have added previously will be the only audio to be playing behind your video clip.
Step 5: Arrange the Audio
Now, you have to adjust the new audio with the video so that they can blend and mix nicely. To do that, click on the 'Audio' and change the new audio settings according to your liking.
Step 6: Saving the file
Now lastly, let's save the final product of our editing. To save the file, you have to click on the 'File' on the top-left corner of the screen. From the panel below, press on the 'save' option and set the format of the file before saving it on your PC.
Features
-
The first thing is the package that comes with the AVS video editor's subscription. In this subscription package, you can access AVS Editor, Converter, ReMaker, Audio Converter, and Audio Editor.
-
The results after editing through this software are professional.
-
With Intel HD Graphics and NVIDIA GeForce, you can decode videos.
-
There are many frame sizes available for high-quality video displays. Like; Full HD, 4K Ultra HD, etc.
-
Not only video editing, but you can also even burn CDs and DVDs with the AVS video editing software.
-
There are built-in transitions and video effects available for fast editing purposes.
-
You can add subtitles, credits, menus, overlays, etc., with this software.
-
You can remove the noise from video clips with the AVS editing software.
People Who Liked this Content Also Liked
AVS4YOU Video Editor Full Review in 2021 >>
[2021]5 Methods to Remove Watermark from AVS Video Editor >>
[2021 Newest] How to Detach Audio from a Clip In DaVinci Resolve 16/17 >>
How to Remove Noise in a Video in AVS Video Editor
There are many times when we are shooting, and some unnecessary noise is captured in the video. It mostly happens in crowded areas. So, to treat this noise and remove it from the video, you have to do these small steps in the AVS editing software.
Step 1: Import Video File
To start with the noise removal, you will have to upload the video file from which we want to remove the noise. To do that, click on 'Import' to select the video clip from your PC.

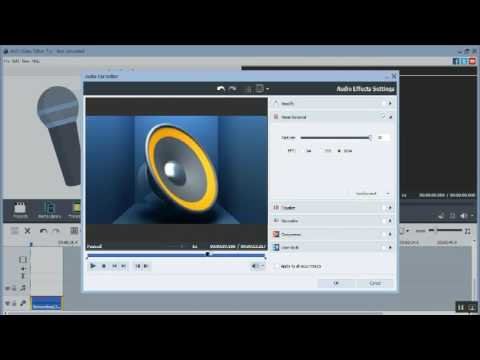
Step 2: Configure Noise Settings
Once the file is selected, it will appear in the library, and you have to drag it down to the video-mix lines. Now, you have to point out the 'noise' in your clip to the program so that the AVS video editor can delete those particular parts from your video clips. To do that, click on the 'Sittings' and then go to the 'Noise Setting' area. Next, click on the 'Get Noise Profile' to select the portion from the audio of the video clip that you want the program to treat as noise. Once you have selected the particular small portion of the audio, click on the 'OK.'

Step 3: Configure Removal Settings
Now, let's get to the eliminating part. To do that, click on the 'Remove Noise' option, and you will see that the noise is deleted from your clip.
Step 4: Save the Video
Once you are done with removing and satisfied with the results, let's proceed to save the file. Press the 'File' option and go to the 'Save.' After that, select a location and format for your video clip and hit 'Save.'
Features
Some of the best features of AVS video editor are:
-
You can cut, trim, merge, and mix different clips with the AVS video editor.
-
You can use AVS to burn CDs and DVDs for physical media.
-
There are more than 300 transitions and video effects that are unique and very easy to use.
-
If you have a shaky video, you can use this software to stabilize it.
-
There are almost all video formats that are supported by the AVS video editor.
-
Other than the built-in transitions and layouts, you can make your own too.
-
You can add any type of text, data, or menu with the AVS video editor software.
-
You can use it for decoding the videos and also make the quality of a video better with this AVS video editing software.
How to Remove Audio and Add New Audio in a Video Using iMyFone Filme
iMyFone Filme

An alternative for editing is also given for you all so that you can get your editing done within minutes!
Features
iMyFone Filme is one of the best software that you can use for any type of video or audio editing. Due to the professional results, this software is becoming the best alternative for many editing software and tools. Some of the best features of iMyFone Filme are given below, as we can't explain all of them in just one go.
-
This amazing software is an alternative to not only the AVS video editor but to almost all other editing tools.
-
This is an easy-to-use software that has made editing a cup of tea for Gen-Z.
-
There are built-in more than 20 fast video modes to be used by Instagrammers and Millennials.
-
There are more than 100 built-in transitions and filters to use and get your editing done within minutes.
-
They have more than 50 built-in audios that people can use if they don't want to use the original audio of the video clip.
Let's start with the steps to remove audio from a video clip and to add a new one:
Step 1: Import the Video and Audio Files
As always, the first step is to import the videos and audio that you want to mix. Once you have selected the audio and video files, click on 'Import,' and now you can see them in the library of the iMyFone Filme.

Step 2: Click on the 'Edit' Option
To bring the files in the editing panel, move your cursor on top of the thumbnails of the video and audio files in the library. Once you have the cursor on top of one of your files, you will see a 'Plus' sign on the thumbnail. Click on it, and it will show in the editing panel too. Now, do the same with the other file to bring it to the editing panel.

Step 3: Open the 'Video and Audio' Option
Once you have your desired files in the editing area, right-click the video-mix line and select the option on the 'Edit. A new panel will open on the side of the top-left corner. There will be video and audio editing options. Click on the 'Audio' icon and drag the dial of the 'Volume' to the very left to bring it to 'Zero.' This will remove the audio of the original video.
Step 4: Save the Final Changes
Now, you can go to the 'File' and save the video in whatever format you want to choose.
This was all for the iMyFone Filme, and all this has shown us that it is one of the best software out there for any type of editing. So, to save your time and space in your computer from all the different software for different editing, you can just download this one tool and get any type of editing you want.


