


You have taken a splendid that is perfect for your needs, but there the object in the background is ruining everything. In this case, you can make your picture stand out by removing these objects from your video. How can you do it? We have listed a few techniques to remove objects from video using desktops software, websites, and mobile applications as well.

Part 1. 1 Click To Remove Unwanted Objects from Video– MarkGo
iMyFone MarkGo is a complete watermark tool that one can use. It can also be used to remove objects from video. There might be something irritating in the background you want to remove. No worries, iMyFone MarkGo has got you covered. It is the easiest and simplest tool that you can find all over the internet. The user interface of iMyFone MarkGo is what makes it stand out from other watermark tools. Moreover, it is free to use. You just need to go to the website and download it.
Watch the video tutorial to remove watermark using MarkGo

Step 1: Firstly, if you do not have MarkGo installed, just go to the website and download it. After installation, simply open it, and it should look like the picture below. Now, if you want to remove any object from the video, then click on "Remove Image Watermark".

Step 2: On the center of your screen, you will see an option of "Add Video". Browse or drag and drop an image from which you want to remove any object.

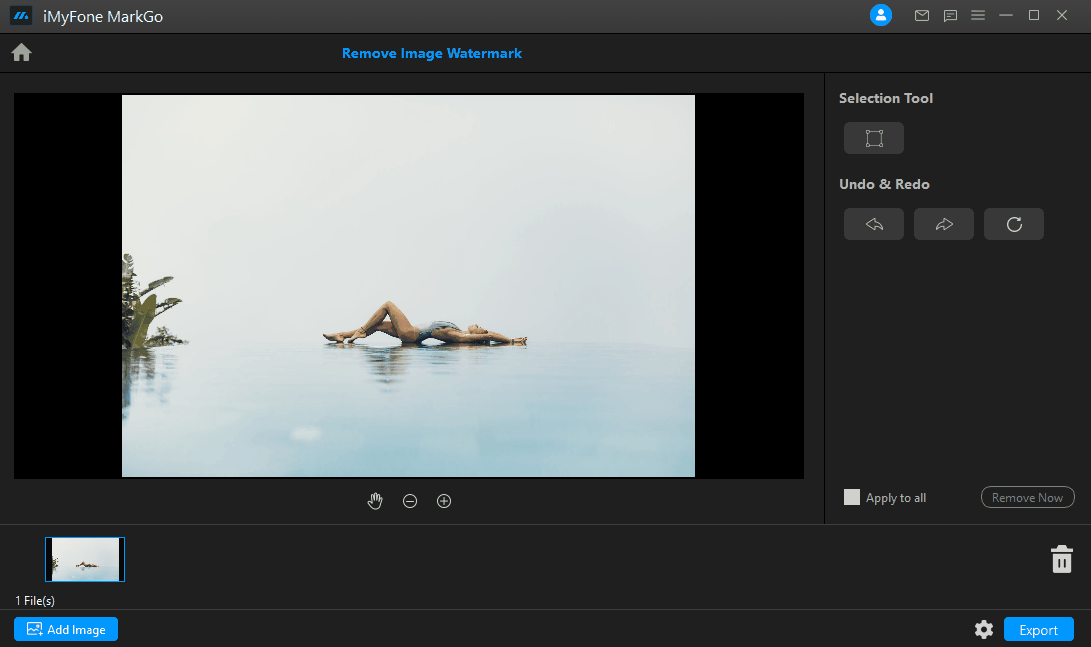
Step 3: After browsing the video, on the right side of your screen, you will see the option of "Selection Tool". This tool allows you to mark or select the object that you want to remove from the video. By clicking on it, a rectangular box will appear on the video, which you can drag, adjust, and position according to the size of the object you want to remove.

Step 4: You have successfully selected the particular area or object that you want to remove from the video. You will have an option of "Remove Now" on the bottom right of your screen. Click on it, and it will remove the object from the video.

Step 5: Now, this is the result after processing the video. The object is removed, and the background is blended with the video. This is MarkGo's smart processing. You can now save your video by clicking on "Export".

Part 2. Get Rid of Unwanted Objects from Photo Online - Fotor
If you want to use an online tool to remove unwanted objects from photos, then we have a solution as well. Out of all the tools that are available online, we opt to demonstrate to you one of the easiest and working tools. You can not only use this tool to remove objects from photos, but you can also blend in the background so that it looks real. If you use it correctly, then there is no chance that anyone can catch you for removing anything from the image. Let us see some simple steps and tools that you can use to remove objects from photos online.
Step 1: Go to the Fotor website. You will see many options like sign in, create, feature, etc., but you can choose not to sign in and straight away do your work. You will see an option of "Remove Objects Now". Click on it so you can remove objects from a photo.

Step 2: On the right side of your screen, you will have an option of "Import". Click on import to browse your photo, the photo from which you want to remove the object.

Step 3: Although there are many options to edit the photo, we specifically want to remove objects from a photo. Now, for that, you need to toggle on the left side, where there are multiple options for editing. Click on "Beauty" and select "Clone". This clone will copy the area you want and paste it on the object to blend it with the background. So, select the area carefully that matches with the things around the object so that it looks natural. In the pictures below, we have shared an example.

Step 4: The first circle is the area you want to copy, and the second circle is the area where the selected area will be pasted. For example, see the picture below.

Step 5: Now, you have seen what those complex words mean; it is not complex at all. If the object removed and blended with the background is satisfactory, then you can save your photo by clicking on "Download" at the top right corner.
Also Read:
Best 5 Photo Apps to Remove Unwanted Objects >>
Part 3. 3 Apps to Erase Object from Video On Mobile Phone
Removing objects from video using a mobile phone is not very difficult. You should just know the right apps, and they will do wonders for you. Here we have listed three apps that you can easily find and use to remove objects from video.
1) Picsart
Picsart is one famous tool that is used for picture editing all over the world. It contains multiple options, including different effects and frames. Along with that, you can use Picsart to remove any object from the photo. There is a smart tool that Picsart uses under the name of "blemishes". It just observes the selected area and blends it with the background. It is simply an amazing tool to use, and it eases the removal of objects from video that might be disturbing or irritating. Let us see simple steps which will show you how you can remove objects from video.
Step 1: Download the app from Play Store. Open it, and you will see a similar window shown in the image. At the bottom of the screen, you will see a "+" sign. Tap on it to browse the video from which you want to remove the object.

Step 2: After the video is imported, you will see different options on the bottom of your screen. These all are effects and art effects. Scroll the effects to the right until you see "Blemish Fix". It basically removes the object and blends the background such that it looks real.

Step 3: After tapping on "Blemish Fix", you will have a default size brush that you can resize. With the help of the brush, highlight the object that you want to remove from the video.

Step 4: Once you highlight the area and remove your finger from the screen, the object will be removed without pressing anything else. You can easily export the video by tapping on the "Export" option on the top right.

2) Snapseed
It is another editing tool that people use on their mobile phones. It is easier to remove an object from the video using Snapseed. See these simple steps to remove an object from a video.
Step 1: Download the app and open it. In the center of the screen, you will see a big "+" sign. Tap on it to import the video from which you need to remove the object.

Step 2: After importing the video, tap on "tools" at the bottom of your screen. Here you will see the option of "Healing". This is the effect you need to use to remove objects from video.

Step 3: With the help of the "healing" tool, highlight the object you want to remove. As soon as the area is highlighted, the object will be removed.

Step 4: The image below is the result of the processed "Healing" effect. Now, you can simply export the video by tapping on "Export" on the button on the bottom right.

3) Retouch
Retouch is unlike the two apps we have mentioned because they were editing tools that include the effect that enables them to remove the object from the background. In contrast, Retouch is specifically designed and programmed to remove objects. Its interface is very easy, and anyone can use it without any trouble.
Step 1: Download and open the Retouch app. You will see a similar window just like below. In the center of the screen, you will see an option of "Add Photos". Tap on it to import your photo.

Step 2: After importing the photo, you will see a list of different options. Because we want to remove an object, tap the first option, "Remove Objects".

Step 3: After tapping on "Remove Objects", you will see an option of "Restore". By tapping on it, you will get a brush to highlight the area of the object. Highlight the area.

Step 4: After highlighting the area of the object, tap "Erase" and then tap on "Go" to remove the object from the photo.
Step 5: This is the final processed photo that you can save on tapping on the top right option of "Export". It will give you options to export in different qualities as well.

Conclusion
We have discussed a few tools, along with different techniques that allow you to remove the object from the video without any trouble and worry. We have explained the step-by-step method of doing everything, so you won't have any problem removing the object. You can use any of the tools we have discussed, but we recommend MarkGo, which is specially created for removing various watermarks and objects. It is a desktop tool that has everything you need, and you can do the job with perfection.


