


This article shows you how to split a video into two or more parts using the top 10 free video splitters on the market. With this, you will also learn how to split large video files into smaller segments using the split and crop functions. Using the methods described here, you will also be able to split videos into 1 minute parts that are perfect for generating social engagement.

1. Filme
Filme is a robust video editing software to split a video into parts, edit it, add effects and filters, and do a lot more. The comprehensive splitting function allows you to choose specific sections of longer videos in order to create shorter clips that you can upload to YouTube, Instagram, and other social media platforms. You also have the option to crop the video to only display the main subject and remove unwanted edges and corners. Both methods are described below the Key Features section.

-
Free video splitter with trim and crop functions available
-
Accurate timeline-based video split option
-
Robust set of video editing tools
-
Extensive collection of filters and effects
-
Free music and audio collection to add to your videos
-
Multiple video export options
Key Functions:
How to Split a Video without Reencoding using Filme
-
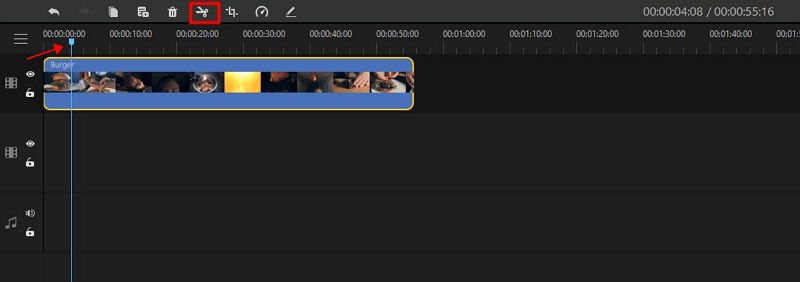
The split video function is easy to use. First, import the video into Filme so you can see it on the timeline.
-
Click and hold the playhead on the timeline and move it to the position where you want to split the video.
-
Click the Split icon (scissors icon) to cut the video at that part.

Simple, right? You can also crop a video to remove unwanted portions on the edges or corners of the video.
How to Crop a Video in Filme
-
When the video is imported and visible as a separate track, click the Crop icon in the main toolbar on top.
-
The Crop window will now appear, where you can drag the corners and edges of the crop area to select only the portion of the video you want to retain. You can also choose from the available preset ratios using the dropdown menus.

-
Click OK once you're happy with the selection. The entire clip will now be cropped to your specifications.

Both functions are very easy to execute, and you'll get a new video clip exactly the way you wanted it. Save it with a different name and export it for social media sharing or archiving purposes.
User Comment:
"All it took was a couple of clicks and less than a minute, and I was able to split my son's school concert video to just the part where he's singing. It came out great and its really racking up the Insta likes!" - Leslie
2. VLC Media Player
Many of us are familiar with this open-source application for video playback, but did you know that it also answers the 'how to split a video into two' question? Unfortunately, it's not a straightforward process to split a video. What you need to do is record the part of the video you want to separate from the rest and create a new video file out of that. Obviously, that means re-encoding the video as well. Nevertheless, it's possible to split a video into parts using this workaround method. You can also use VLC to rotate videos or do some other editing.

-
Powerful video playback features
-
Tons of settings and filters to process videos
-
Ideal for semi-professionals looking for a free video processor
Key Functions:
How to Split a Video using VLC
-
Use the File → Open Media option to import your video file.
-
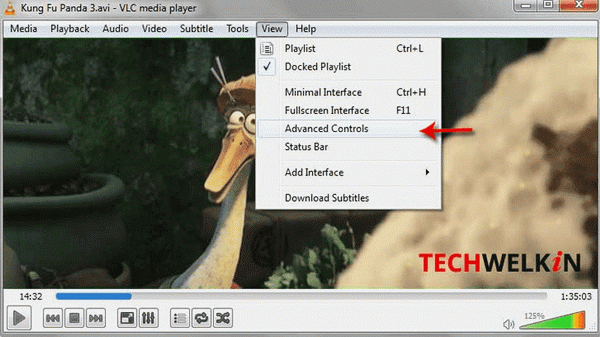
In the main toolbar, click View → Advanced Controls. Under Simple Preferences, select the tab called Input/Codecs. In this section, choose the target folder to save the processed video.
-
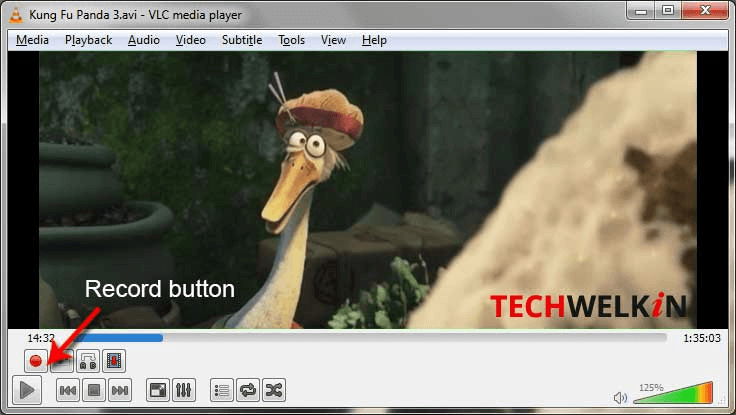
Click Save, then move the video slider to the point where you want to cut it, and hit the Record button.
-
Once you reach the end of the portion you want to keep, hit Record again. The new file can now be saved with a different name.


User Comment:
"The workaround for splitting videos works but it's not the ideal solution. Still, I've had VLC for years so it was the best option considering my urgency." - Keith
3. iMovie
iMovie is Apple's native Mac video splitting and editing tool. The split function is very easy to use and the software offers other simple editing features as well. The interface is very smooth and user-friendly, which is normal for a Mac application. One of the benefits is that it comes preinstalled in Mac computers, which means no additional download is required.

-
Native experience on Mac for video splitting and other functions
-
Reasonable video editing capabilities
-
Other options include trimming and cropping
Key Functions:
How to Split a Video in iMovie
-
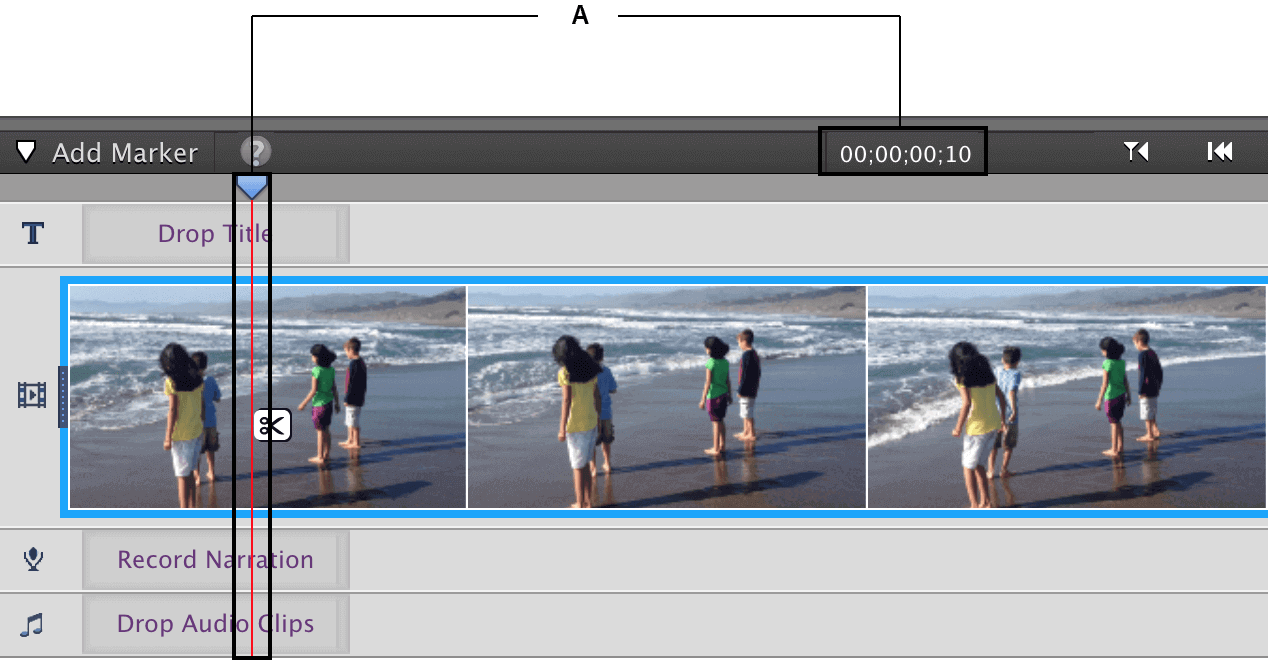
Once the video is open in iMovie, select the appropriate track.
-
Drag the playhead to where you want to split the video.
-
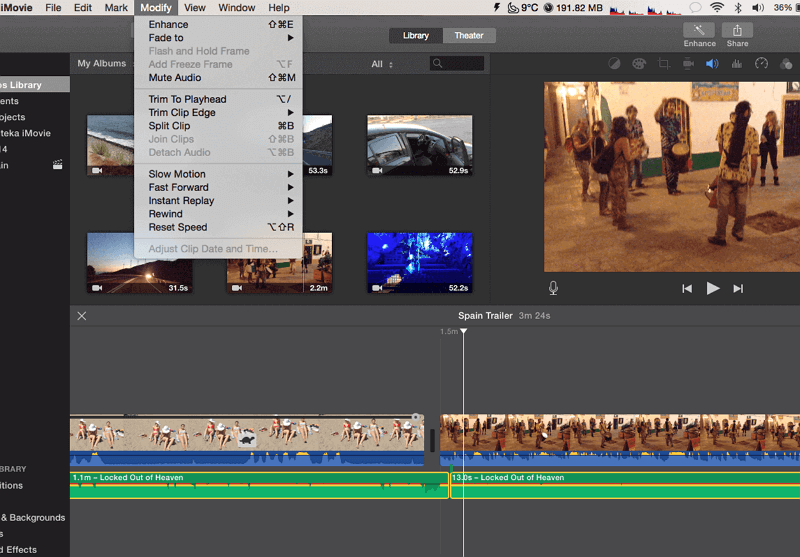
Go to the menu item called Modify and look for the option that says Split Clip. Click on it.

User Comment:
"iMovie has everything I need to clip my biking videos and upload them to my YouTube channel. Very user-friendly and most actions only take a few clicks." - Jefferey
4. Windows Movie Maker
Microsoft's version of a video editor is called Windows Movie Maker. The split function here is equally easy and the interface is clean and user-friendly. The ribbon-style toolbar, which is typical of many of Microsoft's applications allows easy navigation and is clearly grouped into sections, which makes it convenient.

-
Easy to split a video into two
-
Preview pane to see the results of the video split
-
Free for Windows users
Key Functions:
How to Split Videos in Windows Movie Maker
-
Import the video to be split using the File menu.
-
In the storyboard pane on the right side, move the vertical line to where the video should be cut.
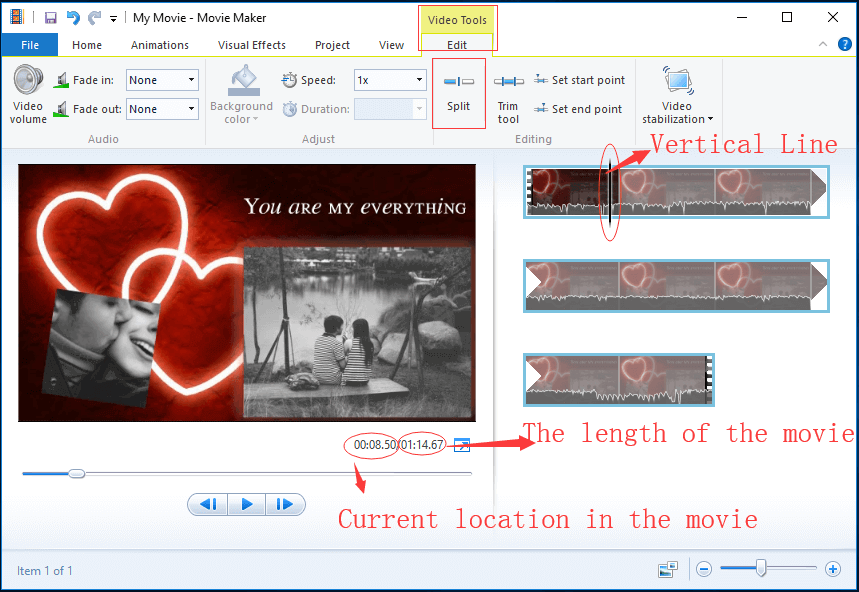
-
Go to the Edit tab and click the Split button in the Editing section.
-
Save the video to a target folder and you're done. You can also preview the change right after cutting the video.

User Comment:
"I used to love this application until the latest update. Now it crashes quite often and I can't uninstall it because the new version is not available for my OS version." - Vicky
5. Adobe Premiere Pro
Although this is a premium video editor, you can use the free trial to split a video without having to pay anything. Unfortunately, the trial is for a limited period only; after that, the functionality will revert to a very basic video playback tool rather than a full-fledged video editor. The split tool is really good, though, and it gives you a lot of control over timeline splitting.

-
Full-fledged performance during the trial period
-
Great tool to split video clips
-
Multiple split options
-
Easy to use without any confusing menus or complicated settings to deal with
Key Functions:
How to Split Videos in Windows Movie Maker
-
Use the Add Media button to import your video file.
-
Drag the playhead to the point where you want to split the video.
-
You will see a scissors icon next to the current-time indicator line. Click that to split the video at that point.

User Comment:
"I absolutely love this tool! It's got several splitting options and great editing features. But it's on the expensive side for sure. I didn't subscribe after my free trial expired but I might do it later since I have several projects coming up." - Maxwell
6. Quicktime
Although this is a premium video editor, you can use the free trial to split a video without having to pay anything. Unfortunately, the trial is for a limited period only; after that, the functionality will revert to a very basic video playback tool rather than a full-fledged video editor. The split tool is really good, though, and it gives you a lot of control over timeline splitting.

-
Multiple splits can be created on the same timeline
-
You can rearrange the clips with a simple drag and drop action
-
Slick interface that's user-friendly and highly functional
Key Functions:
How to Split Videos in QuickTime
-
Go to the Show Clips option under the View menu item.
-
Bring the playhead to the spot where the video needs to be split.
-
Click Split Clip under the Edit menu item.
-
Do this again if you need to further split the video, and click Done at the end. Save your clips with different names.

User Comment:
"QuickTime is one of the easiest video splitters I've worked with. Multiple splits in one session saves a lot of time. I can just save everything at the end when I'm done." - Paul S.
7. Movavi Video Editor
Movavi is a cross-platform video editor and video splitting/cutting utility that's easy to use and comes with a pleasing dark-mode theme. The timeline editing feature makes it convenient to split a video at a particular timestamp, giving you more control over your video splits.

-
Easy video split function
-
Multiple splits to remove all unwanted bits of your video
-
Robust features for video and audio editing
-
Lots of transitions and filters to choose from
Key Functions:
How to Split a Video in Movavi
-
Click the Add Media button to import a video or simply drag and drop in directly onto the timeline.
-
Bring the playhead to the required time using the red line.
-
If you want to remove a middle part of a video, repeat step 2 at the beginning and end of the unwanted portion. Then, simply bring the remaining parts together (you can also reorder them if you like) and use the Export function to save the video.

User Comment:
"This has been my go-to video splitter and merging tool for many years now. I love the interface and the simple actions that give you great results. Could do better with transitions, though. Starting to get boring!" - Mike Wells
8. Windows Photos
The misleadingly named Windows Photos app in Windows 10 is also a video editor that can be used to split a video into two. The interface as well as functions are fairly simple but quite effective if you're looking for a free and non-professional option.

-
Native Windows app, comes with Windows 10
-
Clean interface with basic controls
-
Easy to add custom audio and background music to your video clip
Key Functions:
How to Split a Video with Windows Photos
-
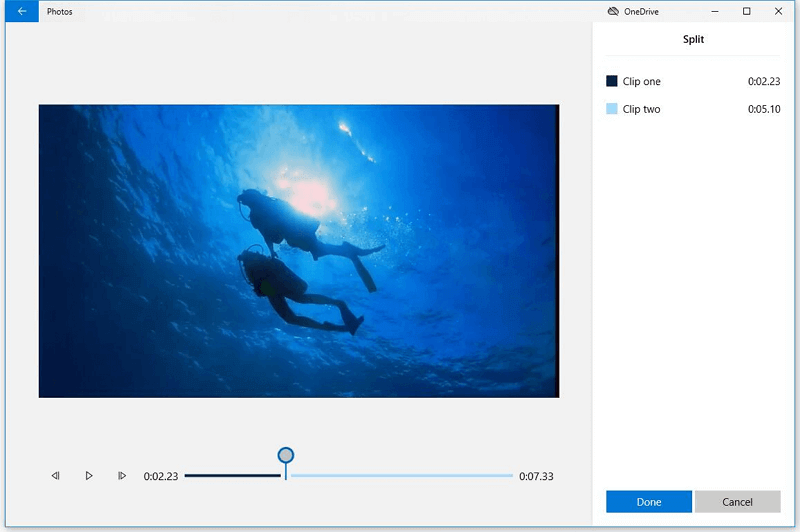
Create a new video project by going to the New Video tab and clicking the + symbol to import your clip.
-
Drag the clip and drop in on the Storyboard at the bottom.
-
Select the Split option from the extended menu (three horizontal dots …)
-
In the Split window, drag the playhead to the required time in the video.
-
Click Done to split and Finish to exit the Split window. Save the clips as two separate video files or discard the one you don't need.

User Comment:
"It's a great tool for social videos and stuff I upload, but not an ideal 'YouTube split video into parts' kind of application. Useful for sure, but very basic, imho." - Grace R.
9. Filmora
Filmora9 is a little on the 'beginner plus' side with its extensive features but it's great for newbies as well. It's not completely free but you can try it without having to pay for it, as long as you don't mind the accompanying restrictions. Nevertheless, it's got several great video splitting functions like splitting with auto scene-detection, lossless splitting, and multiple splits.

-
Different ways to split a video into parts
-
Intuitive video splitter with intelligent scene detection for automatic splitting
-
Split videos at the frame level vs. the timeline level
Key Functions:
How to Split Video in Filmora9
-
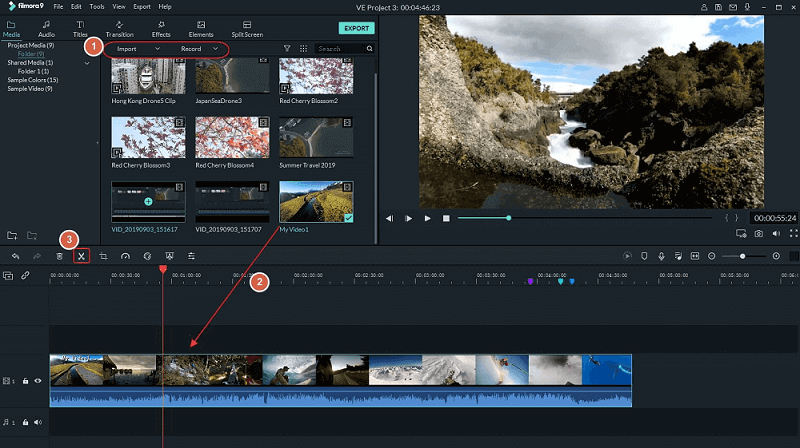
Drag your video and drop it into the timeline to import it. You can also use the Import button.
-
Move the playhead into position and use the Split icon in the icon bar to split your video. You can do this as many times as you need to in order to create smaller clips.
-
You can now export these clips as individual videos.

User Comment:
"Absolutely love this software and I use it regularly for my vlog uploads. A lot of times I have back-talk and unwanted visuals so I just cut them out and merge the clips with some cool transitions." - Cynthia
10. MP4Tools
MP4Tools is an open-source video editing application with two specific functions: join videos and split videos. The video splitter module is very easy to use and allows you to add several split points before processing the video split, which makes it convenient if you want multiple clips from the same long video.

-
Video splitting (cutting) and merging (joining)
-
No quality loss - no re-encoding involved
-
Simple to use and fast to work with
Key Functions:
How to Split a Video with MP4Tools MP4 Splitter
-
Click the Open Video button to import your long video.
-
Select a timeline point manually or use the counter-style control on the bottom left.
-
Click on Add Split Point to mark that position.
-
Repeat steps 2 and 3 until you've marked all the points where the video should be split.
-
Click the Start Splitting button on the bottom right. Save your clips as separate videos.

User Comment:
I was a little hesitant about installing an open-source application on my new PC but it worked like a charm. I love the multi-split function to make several clips at the same time. Great job!" - Michael L.
Related Articles:
6 Solutions to Split up Long Videos for Instagram >>
Tips to Split a Video into Small Parts without Quality Loss
Social media sites like YouTube and Instagram have specific requirements for uploading videos to your account. In addition to following those guidelines, you can also use these tips to help you split a video into smaller parts in a lossless manner.
-
Avoid using a video splitting tool that re-encodes your clips after the split
-
Split a video instead of compressing it if you want to reduce the file size - compression inevitably leads to quality loss, and your video might not be deemed suitable for publication
-
If you're removing unwanted parts, make sure you use attractive transitions to avoid sudden jumps between scenes
-
Leave some buffer when moving the playhead for video splitting - you can always add a fade-out effect at the end to avoid abruptly stopping the video
These tools and tips will help you create stunning clips that are sure to garner likes and thumbs ups on major social media portals like Instagram, Facebook, and YouTube. If you're looking to be a professional vlogger or an influencer, then these tools are an absolute must.


