Cropping an image in Adobe Illustrator can seem like a daunting task if you're new to the software, but don't worry – we've got you covered. Here, you will find out “how to crop an image in Illustrator” in three easy-to-follow methods.
But we’re not limiting ourselves to just image cropping. Later, you will also learn how to trim audio just by using VoxBox.

So, after reading this guide, you will be an expert in both image and audio cutting.
Part 1: Reasons For Cropping An Image On A Mac
Whenever we have to crop image in Illustrators, we do this in three ways. These are: Using the crop tool, Trying clipping masks, Using Opacity Maskz.
Let’s see the details.
Method 01: Using the Crop Tool in Adobe Illustrator
Out of the three methods we’re discussing in this guide, the easiest one is using the Crop tool. You can get the idea from its name that its main function is to crop the images for you.
Step 1:Choose Your Image and Open Illustrator.
First things first, decide on the image you want to crop. Illustrator works well with various formats like .jpg, .png, .eps, etc. So, pick your favorite picture and open it in Adobe Illustrator without any hassle.

Step 2: Position Your Image
Now, it's time to get your image onto the artboard, which is your workspace in Illustrator. Here, you can also adjust the image size using the Selection Tool (the black arrow in your toolbar).
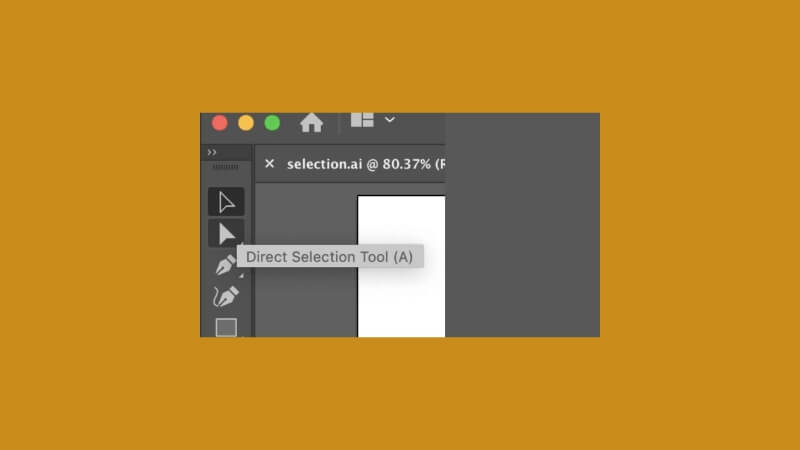
A Tip: To keep the proportions while resizing, press and hold the "Shift" key as you drag a corner of the image.
Step 3: Select the Image
With your image sized and positioned, it’s time to select it. This step is crucial. Click on the image using the Selection Tool. You'll know it's selected when you see a border of anchor points around it.
Remember, the Selection Tool is your friend here, and you can activate it quickly by hitting the letter "V" on your keyboard or selecting it from the toolbar.
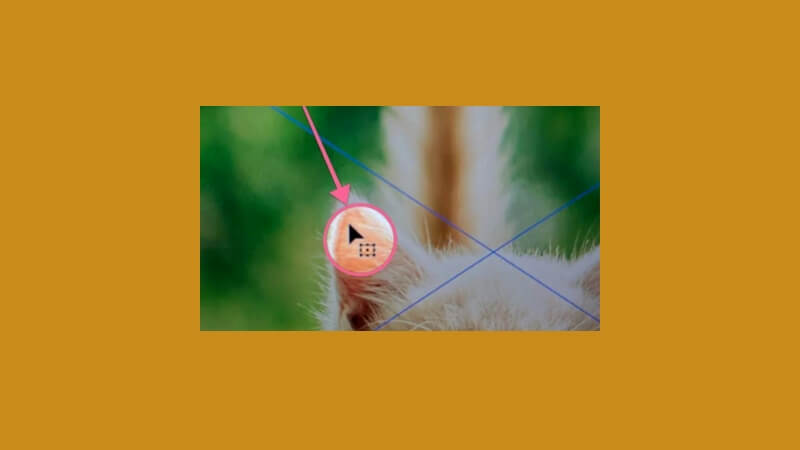
Step 4: Access the Crop Tool
Once your image is selected, head over to the top menu bar. Click on “Object,” and from the dropdown menu, choose “Crop Image.” It’s pretty straightforward.
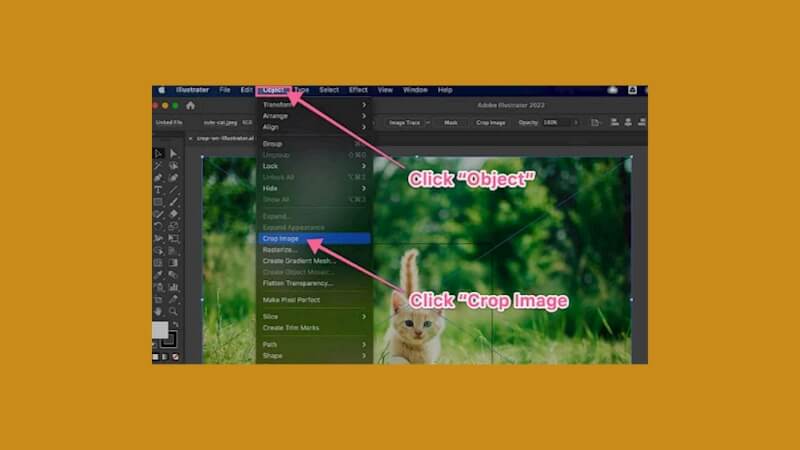
A dialogue box might pop up, giving you a heads-up that your image will be embedded after cropping. Don't fret; this just means that your original image file will stay intact while the version in Illustrator will get cropped.
Step 5: Define Your Cropping Area
After clicking "Crop Image," you'll see your image surrounded by a box with dotted lines. This box defines your cropping area. Adjust this box to crop your image. You can do this by dragging the corners or the sides of the box.
Step 6: Apply the Crop
Happy with how your image looks inside the crop box? Great! Now, simply click the “Apply” button. That’s it! You've successfully cropped your image.
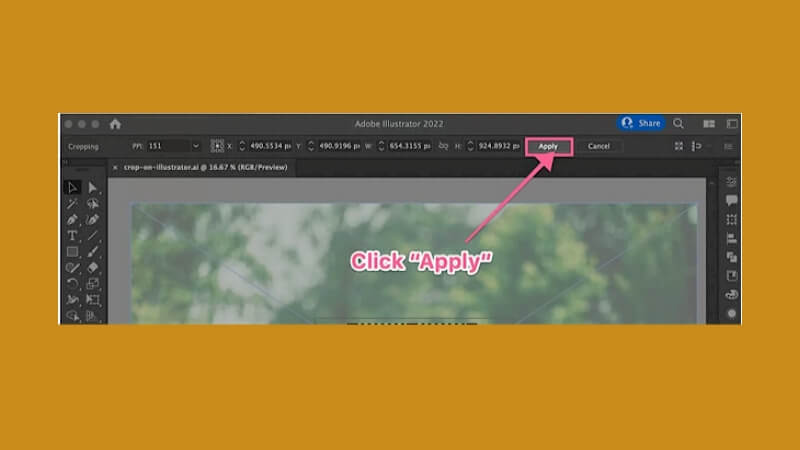
Step 7: Save Your Work
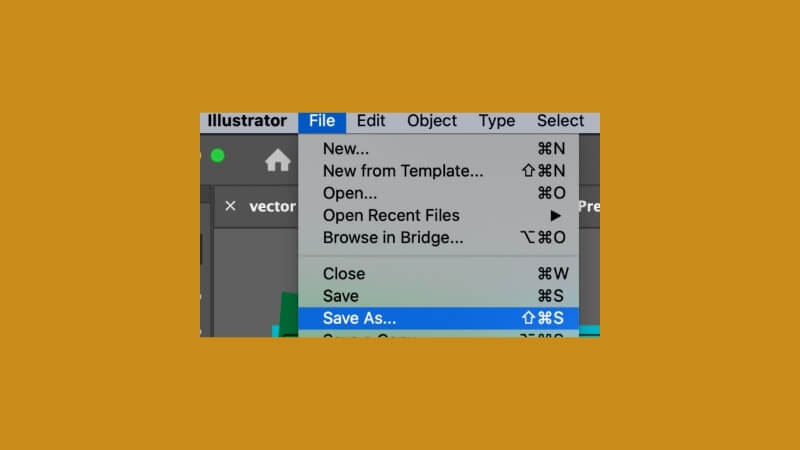
Don't forget to save your work. There are two ways:(1)Go to File > Save; (2)Use the shortcut Ctrl+S (Cmd+S on a Mac).
Method 02: Using Clipping Masks in Adobe Illustrator
The second “crop image Illustrator method” is the Clipping masks. It can be a bit complicated for newbies, which is why we are describing it step-by-step.
Step 1:Select Your Image and Shape
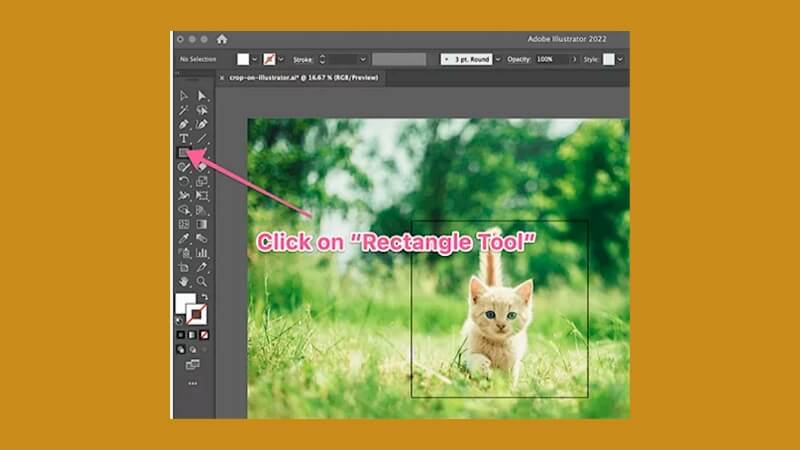
Open the image you want to crop in Illustrator and decide on the shape in which you want to crop it. Luckily, the Shape Tool in Illustrator offers various options like rectangles, circles, etc.
Step 2: Draw the Shape Over Your Image
In the next step, draw the shape directly over your image by clicking on the shape tool. This shape will act as a “mask”. Here’s an example:
Step 3: Create the Clipping Mask
Now, create the Clipping Mask. First, you need to select both the image and the shape. You can do this by clicking on one, holding down the "Shift" key, and then clicking on the other.
Alternatively, use the Selection Tool to click and drag a selection box around both items.
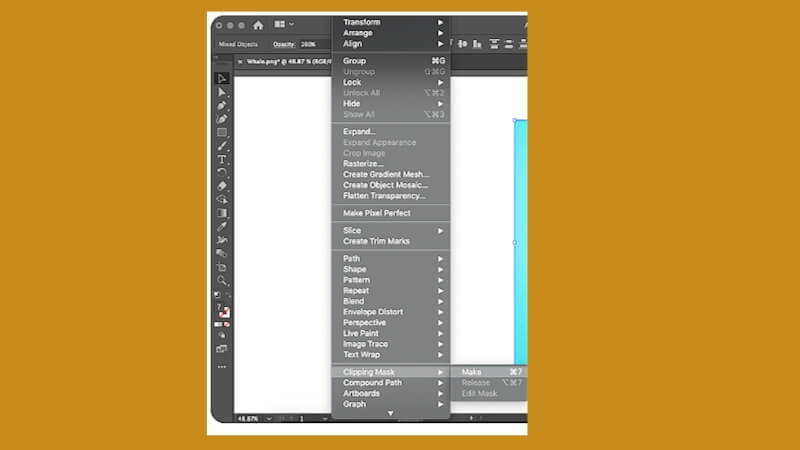
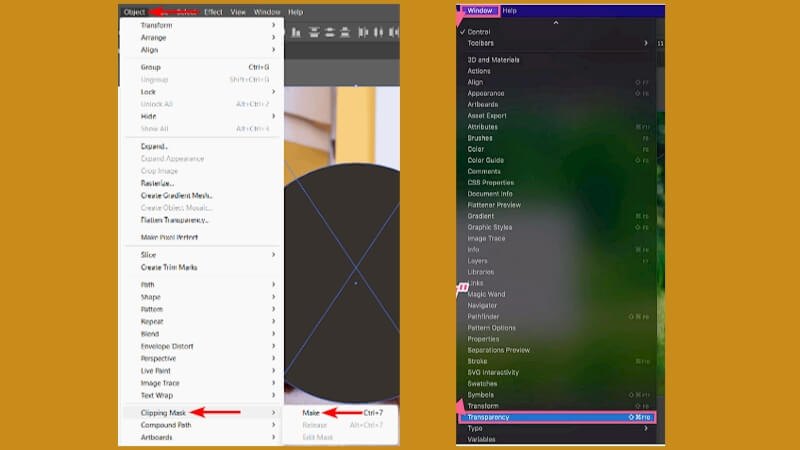
Next, head to the top menu, click “Object,” then navigate to “Clipping Mask” and select “Make.” And just like that, your image is cropped to the shape you selected.
Step 4: Adjust if Necessary
Sometimes, you might not get it perfect on the first try, and that's okay! If you need to adjust the position of your image within the shape, simply double-click on the Clipping Mask to enter Isolation Mode. Here, you can move the image around until it's just right.
Click outside the mask to exit Isolation Mode when you’re satisfied.
Step 5: Save Your Cropped Image
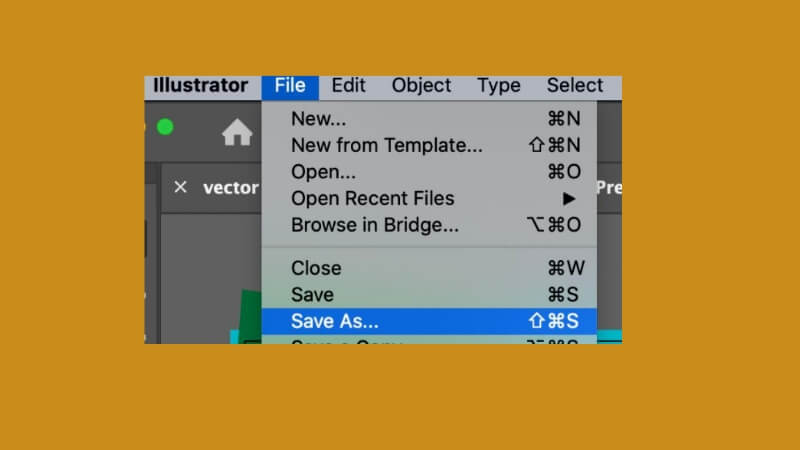
Finally, don't forget to save your newly cropped image. Go to File > Save As, choose your format, and pick a save location.
Method 03: Using Opacity Maskz in Adobe Illustrator
The last “Illustrator crop image” method we have for you is Opacity Maskz. It sounds a bit tricky, but you can easily do this if you follow these steps.
Step 1: Choose Your Image
Start by opening the image you want to crop in Illustrator. Keep in mind that Opacity Masks are particularly effective for: Creating artistic effects or Focusing on certain elements of your picture.
Step 2: Draw Your Desired Shape
Next, decide on the shape you want to use for your mask.
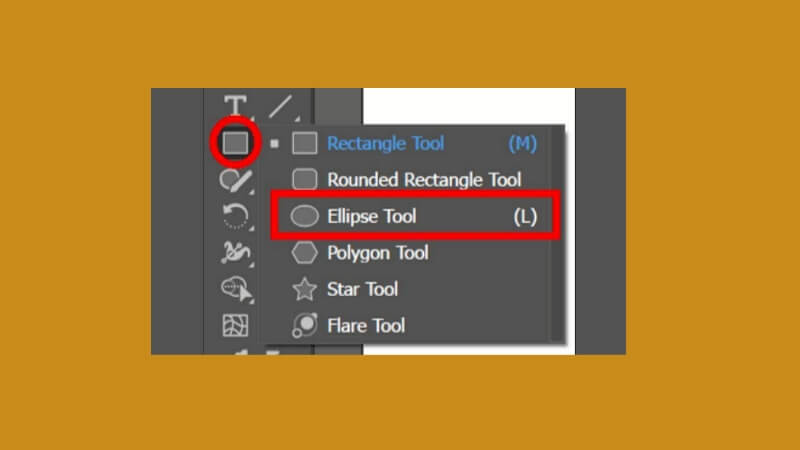
Let's say you decide on a circle for a clean look. Select the Ellipse Tool (or any other shape tool you prefer) and draw the shape over your image.
Step 3: Apply the Opacity Mask
Now, select both the shape and the image. You can do this in two ways: (1)By holding down the "Shift" key and clicking on both; (2)By using the Selection Tool to drag a box around them.
Once you select both, go to the “Window” menu and choose “Transparency.” This will open the Transparency panel. In the panel, click on the “Make Mask” button, and ensure the “Clip” option is checked.
Step 4: Adjusting the Mask
If you want, you can adjust the opacity levels in this step. Fortunately, you can do this directly in the Transparency panel. To edit the mask, just click on the mask thumbnail in the Transparency panel.
Once you’re happy with your cropped image, don’t forget to save your work.
That’s all about how to crop image in Illustrator.
Part 2: Bonus - Best Tool To Trim Audio Easily For Your Project VoxBox
Knowing all about how to crop images is not enough. No matter what the project is, we also have to edit audio clips at some point.
That’s why everyone should know how they can trim audio files as well. Luckily, it is now easier than ever and the reason is VoxBox.
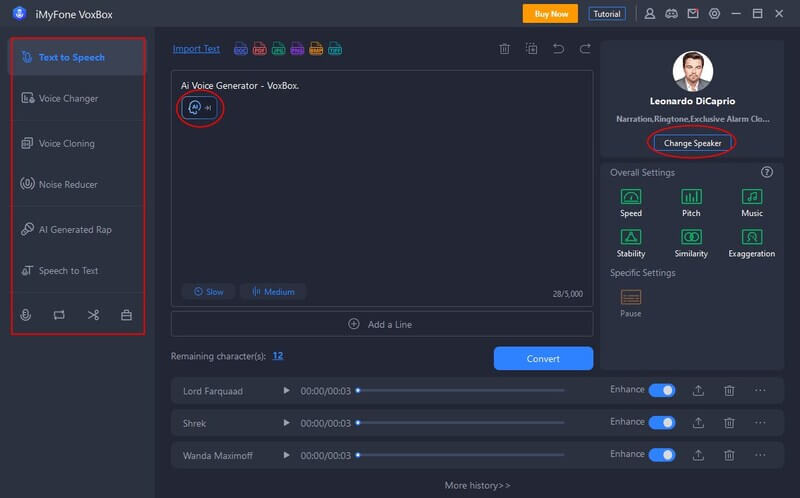
VoxBox is a revolutionary AI tool that you can use to generate and edit audio with simple clicks. You can simply upload the sound clip and adjust the duration to trim it. The whole process won’t take more than a minute.
There are a lot of reasons why you should use VoxBox every day. Here are its key features to give you the idea:
VoxBox Features:
-
VoxBox is super fast, and the reason is the state-of-the-art AI models.
-
It is perfect for content creators because it can generate audio clips with over 3200 voices.
-
You can merge the trimmed audio clips into one just with a single click.
-
If you want, you can also adjust the tone, speed, and many other settings of your audio file.
-
It also supports real-time voice recording, which you will find really handy for your projects.
-
VoxBox is secure, and you don’t have to worry about data theft or any other issues.
Bonus Tips
Watch This Video to Know More About VoxBox!How to use VoxBox to Crop Audio
Step 1: Download and Open the VoxBox app .
Step 2: Click on the edit button located on the left side.
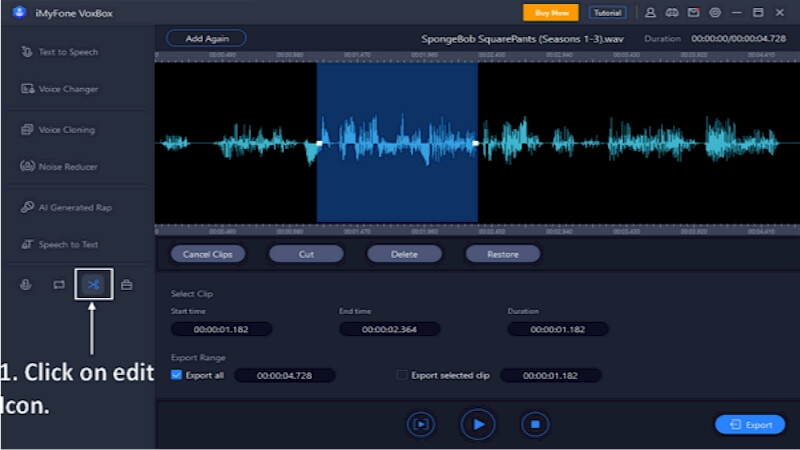
Step 3: Drag the slider to select the starting and ending points.
Step 4: Click on the "Export" button to finish the audio cropping.

So, keep both Illustrator and VoxBox installed on your device.
Part 3: FAQs About How to Crop Image in Illustrator
1. How to Crop an Image in Illustrator Using a Pen Tool?
●Load your image into Adobe Illustrator.
●From the Tools panel, choose the Pen Tool.
●Use the Pen Tool to draw a path around the area of the image you want to keep. You can create anchor points and adjust the handles to match the shape you desire.
●After this, ensure that your path is closed by connecting the end point to the starting point.
●With the path still selected, shift-click on the image to also select it. Then, go to Object > Clipping Mask > Make. This will crop the image to the shape of your path.
2. How to Crop Vector in Illustrator?
●Open Your Vector File: Load the vector graphic you want to crop.
●Select the Pen Tool: From the Tools panel, choose the Pen Tool.
●Draw a Shape for Cropping: Use the Pen Tool to create a shape over the area of the vector you want to keep.
●Create a Clipping Mask: With the shape still selected, shift-click on the vector to also select it. Go to Object > Clipping Mask > Make.
Conclusion
In this ultimate guide, we discussed the top three ways about how to crop an imagein Illustrator. You can try any method to edit your picture.
But that’s not enoughwe always have to trim audio clips as well.
For this, we recommend downloading VoxBox from the iMyFone website. Why? Well, the main reason is you can easily edit your audio files or voice notes with this single tool.
Moreover, if you want, you can record your own voice here as well. But if you’re shy, then don’t worry. Simply type your script and it will generate audio clips from this text in over 3000 voices. So, don’t think twice - try VoxBox now!


