You need to edit and make your video engaging by adding effects and transitions. It should be attractive and appealing to the user. There are many video editing tools and software that you can use to edit videos. But we are going to talk about a Mac video editing tool, which is Final Cut Pro. It is a professional editing tool that allows you to add different transitions to videos. We will talk about some free Final Cut Pro transitions that you can download without any cost.
Besides Final Cut Pro, we will also talk about iMyFone Filme, which is an alternative video editing tool that can also help you to add transitions to your videos easily. You can try it out first! Download it below and check how easier it is!
Part 1: Top 10 Free Final Cut Pro Transitions
1- Light Transitions
Light transitions are creative, bright, and colorful. You can use this transition to move on to the next frame. It will create a bright-light effect with fast movement that will move you to the next clip with an innovative effect. It has different types of light transitions that you can add to your project.

2- Plexus Transitions
If you are editing a trailer or promo video, then this plexus transition will work well for you. It creates an effect of geometric shape animation, which moves across the screen and gives it a nice abstract touch. There are different shapes in which you can add plexus transition to your video.

3- Bad TV Transition
This is an old-school transition and takes us back to the retro years. It creates a glitch effect which is just like a bad TV connection. This transition pack has over 15 transitions that are like recording from an old camcorder. If you want to re-enjoy the old days, you can use these transitions.

4- Zoom Transition
Zoom transition is the most common type of transition that you can find on the internet. It has a wide range of collections that you can choose from. It zooms in and zooms out of the video in different ways making your video look interesting. Every zoom transition is different because it has different animation and zoom effects.

5- Slide Transition
Slide transition is the best transition if you want to show any event. It will display the video clips with slide transitions in which different clips will be shown during the transition. It creates a dynamic and fast-moving effect between the clips and beautifully portrays the video. This transition has different types of sliding effects which can enhance your video in a good way.
6- Split Transition
It is a creative transition that splits the video into four different frames and moves on to the next clip. This transition pack has different splitting transitions. It splits the video into two parts up to 4 parts. You can combine this transition with appropriate music to make your video indulging.

7- Bounce Zoom Transition
This transition is not a part of the zoom transition; it is a separate transition. It zooms in and zooms out of the video with a bouncy effect. It is perfect for presentations and promo videos. Using this transition is kind of fun, and it makes the video look interesting.

8- Glitch Transition
It is a funky yet colorful pack of transitions. It creates a glitch effect with multiple colors and makes the video bright and vibrant. This transition looks good in any type of video that you add to it. You have more than 20 types of glitch transitions in the glitch transition pack, so you can easily explore the glitch transition.

9- Cinematic Transition
This pack of transitions allows you to add film-reel effects to any video. It makes the video look cinematic hence the name. This pack has eight cinematic transitions that can improve the look of your video. Moreover, it has a somewhat retro look to it. It can be added to any type of video that you want, even commercial.

10- Split Transitions (RGB)
RGB is trending nowadays. You can transform your transition with a multi-color effect along with the split transition. This pack splits your video into two parts and adds RGB effects to it. This transition pack has 16 transitions that are different in color grading and speed.

Part 2: How to Insert Transitions in Final cut Pro
Here, we will talk about how to insert a transition in a video using Final Cut Pro. It is a simple process that you use to make your video creative and eye-catching.
Steps to Add Transitions in Final Cut Pro
Step 1: Upload the media files (videos or pictures) in Final Cut Pro. Make sure that the videos are dragged on the timeline where you can add effects to them.
Step 2: As we want to add the transition to the video, there is a transition icon on the center-right of the Final Cut Pro window. Click on it, and different transitions with folders will appear on it.
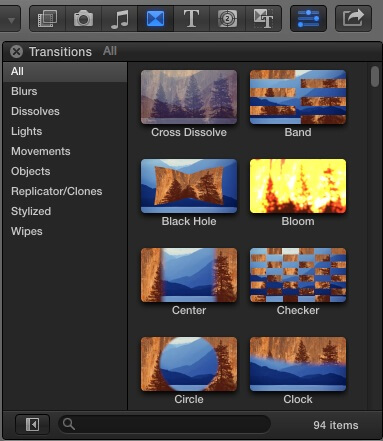
Step 3: You can select a transition from this set of collections or even import other transitions if you want. We will talk about importing transitions to Final Cut Pro later in the discussion. You can hover over the transition to see what it looks like on your video clip. There is also a search bar where you can search for the specific transition you are looking for.
Step 4: Once you have decided which transition you are going to use. You can simply drag the transition on the timeline where you want to place it. You can either add the transition at the start of the video, at the end of the video or even in the middle of two clips.
If you want to add a transition in between the clips, then make sure there is sufficient media beyond the edges of the video. You can check it by double-clicking on the timeline, and the precision editor view will open where you can observe the whole length of the media. If the media exists beyond the handlebars, then the transition can easily be added between the clips.
Otherwise, if it does not have sufficient media, it will give an error to create space between the clips. If you still add the transition to it, then it will cut your media’s length to fit the transition in between.
Related Tips:
4 Ways to Add Video Transitions in Final Cut Pro >>
Part 3: We Also Recommend iMyFone Filme to Add Video Transition - Faster and Easier
Although Final Cut Pro is an easy tool to add transitions to video, we have another easier method to add transitions. iMyFone Filme is a video editing tool that is compatible with both Windows and Mac. You can easily download and use it. It has a smaller file size than Final Cut Pro and can be downloaded in a few minutes.
Let us see how we can add the transition to video with iMyFone Filme.
Steps to Add Transitions in Filme
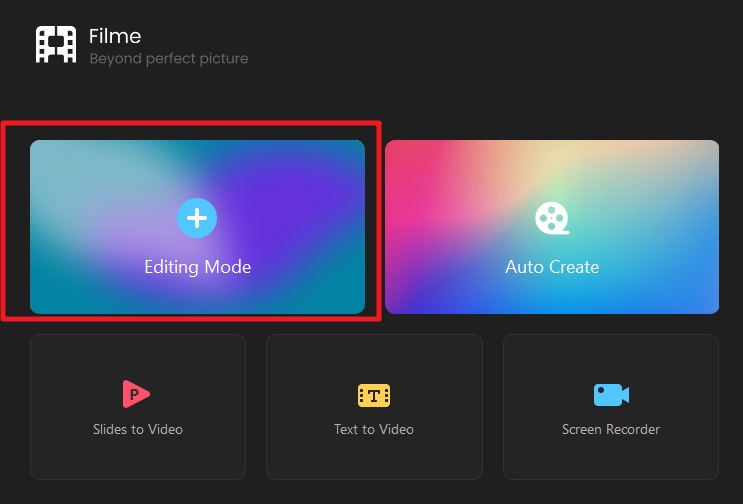
Step 1: To add the transition to video, you need to have iMyFone Filme on your PC. Download the application. Open it. It has many options out of which you need to select the “Editing mode”. This mode will open up an editing window that will allow you to edit the video according to your requirement.
Step 2: Here, you will need to create a new project. One of the most important things about your project is the aspect ratio. It defines the window size in which your video will be edited and displayed after the edit. So, select the aspect ratio accordingly.
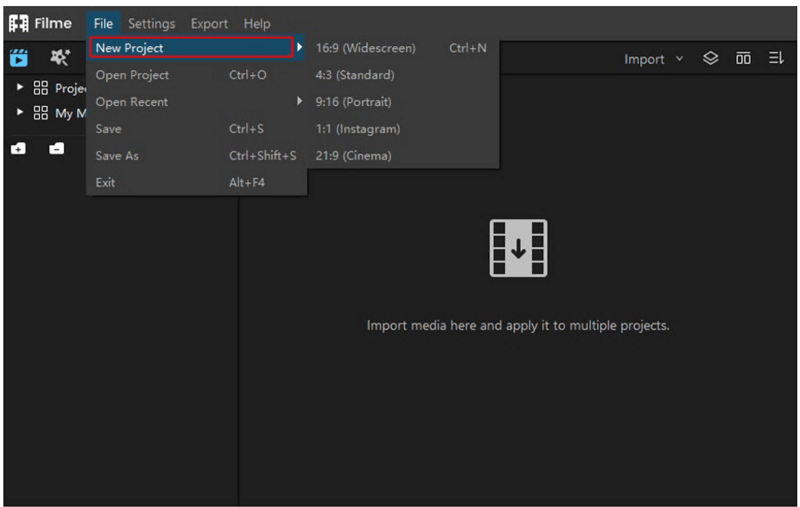
Step 3: Go to the import window and browse the media that you want to edit and want to add the transition to. Once the media is imported, drag it down to the timeline so that you can add transitions and effects to it.
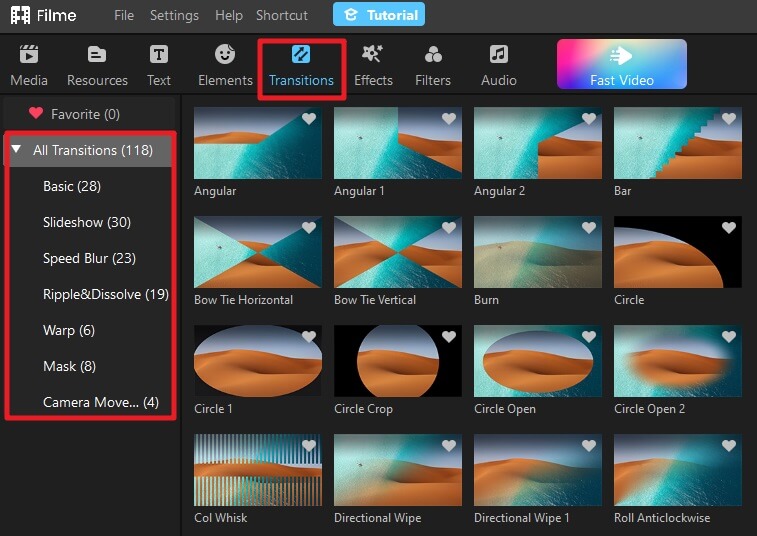
Step 4: As you want to add transitions to the video. Go to the top menu bar, and you will see the icon of transitions. Click on it, and it will display a list of transitions from which you can choose. iMyFone Filme has 118 transitions to add creativity to your video. You can select the appropriate transition which suits your video.
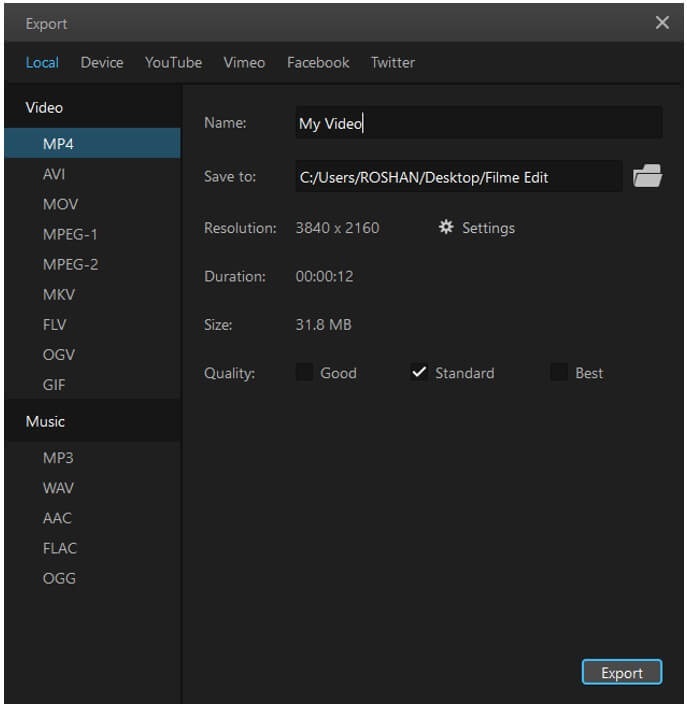
Step 5: Once you have added the transition to the video, you can export it to your desired location with your desired setting. iMyFone Filme allows you to edit the video up to 4K resolution and export it in this resolution. You can change the format of the video and audio and then export it.
Other Outstanding Features of Filme
Filme is a comprehensive tool with basic to advanced editing features - trim, crop, scale, adjust speed, rotate, add effects, edit text and more.
The Fast Video mode of Filme helps creating quick slideshow video in a clicj.
You can transform your PowerPoint presentation into video easily.
Filme also comes with various voice effects for you to change your audio of video.
You can also add mask to your video and make it more interesting.
Conclusion
Final Cut Pro is a Mac tool that is used to edit videos of any kind. You can also add transitions to the video to make it look cool and entertaining. There are different types of transitions available in the library of Final Cut Pro by default. You can either use them or add additional transitions by importing them.
iMyFone Filme also allows you to add transitions to the video. It has many transitions from which you can choose. It is very easy to add the transition to video. Just select the transition which you want to add and drag it to the video which is on the timeline. The transition will be added in no time.


