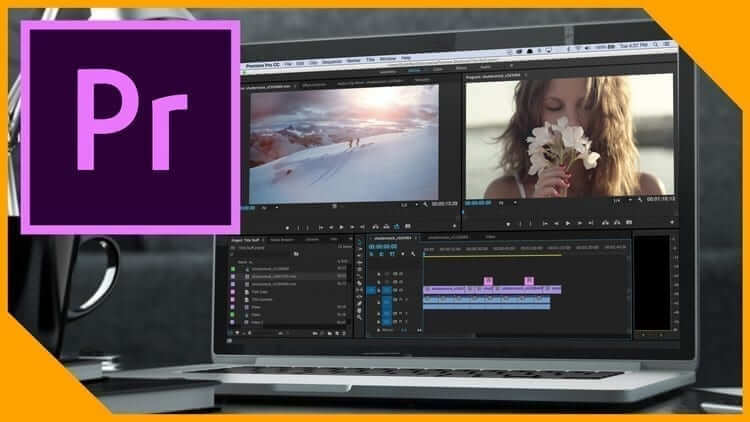
Adobe premiere pro is the best video editing software on the market! With both free and paid versions available in the market for download, the program brings a variety of valuable features that can instantly make anyone a pro at video editing! Upload videos, add visual and sound effects, trim and edit individual clips, adjust colors with the Lumetri color panel and take full advantage of many more features that the software has to offer! Elevate your video editing skills to an entirely new level!
Keeping all this in mind, it's essential to first learn how to use its features properly to utilize its full potential. So, today we will demonstrate how to export and make loop gifs and create loop videos on premiere pro!
Part 1. How to Create Loop GIF in Premiere Pro
Gifs are 2-3 second video files that can deliver reactions or information on the web. They're convenient to use since they're essentially concise videos that don't consume time or need to be played but can convey the message one is trying to convey. A loop gif consists of a series of images being replayed repeatedly as in being "looped."
A good loop gif ends the same way it started, so it looks like the gif never ends and keeps going on repeatedly. It makes it hard to tell the starting and ending apart, which induces visual satisfaction and adds a hypnotic affect.
How that it's clear what a loop gif is, here's how to make loop gifs on premiere pro
Step 1: Upload Your Content
To first get started with creating a gif, you have to upload your footage to adobe premiere pro. You can do that by click on the file button and then import button.
Step 2: Start a New Sequence
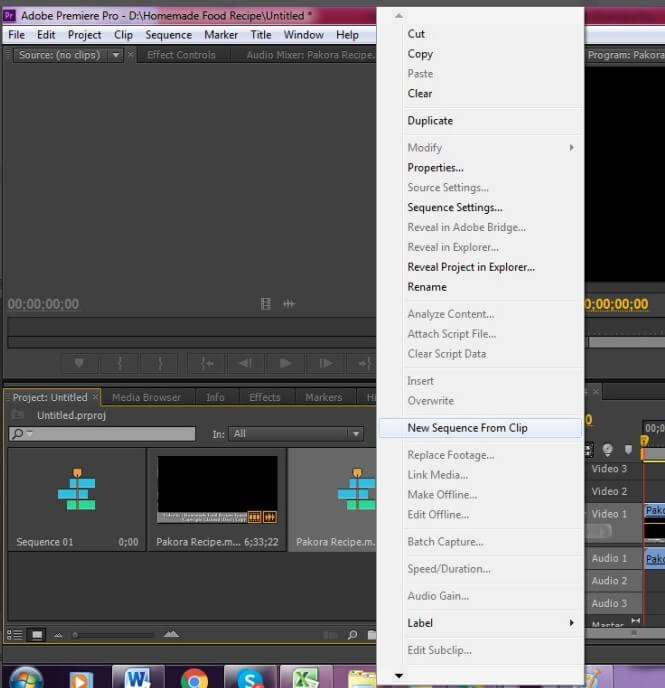
Once you've imported it, you can move on to the next step. You can either drag it to "drop media" to create a new sequence or right-click on your footage and select "create a new sequence." It has to be on video layer one if that's where you want your gif to start.
Step 3: Adjusting Sequence Settings
After you've started your sequence, you can begin editing your gif. If it has any audio, you can unlink it before you work on the footage.
Go to the sequence bar at the top left and then go to "sequence settings."
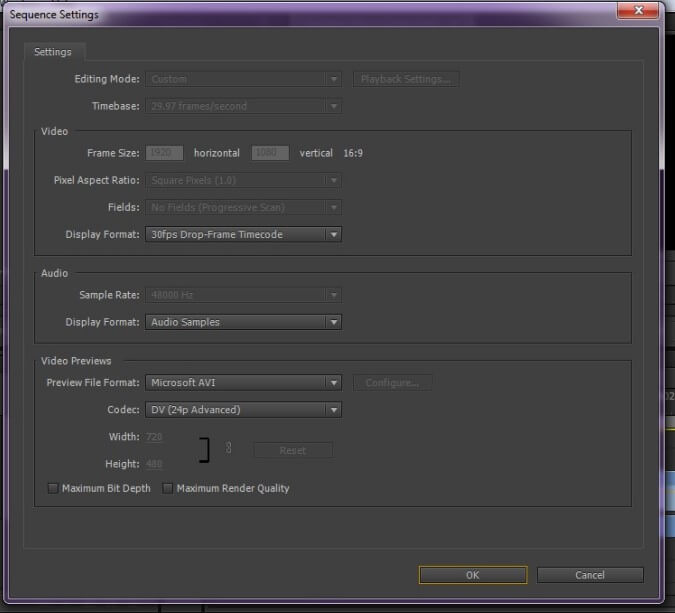
From there, you either select from one of the given settings or make your custom settings adjusting and position your gif however you want.
Once you're happy with that, you have to decide where you want your gift to start and end. Cut out the parts you don't want.
Step 4: Loop the GIF or Video
Once you have your basic file ready, you can loop it by duplicating it and then going to the speed duration of the replicated file to reverse it. Once it is switched, you can see that it ends at the same point where it started and is now looped.
Press the loop button on your panel to keep it playing on repeat. Make sure the button is blue, so you know it's activated. If you do not have the loop button, click the plus button on the right end of your panel and drag and drop the loop button on the panel. Click 'ok' and then loop your gif.
Part 2. How to Export Loop Video in Premiere Pro
Once you have finished editing the video or gif and are happy with the outcome, you can move on to the final step. The final stage of creating loop gifs is to export them. Worry not; all you are left with now is the easy part. By exporting it, you can download it on your computer and then use it however you deem necessary. Your video or gif can be used in blog posts, chats, social media, etc., wherever you want.
Now, how to export loop video? Follow these steps!
Step 1: Opening the "Export Settings" Window
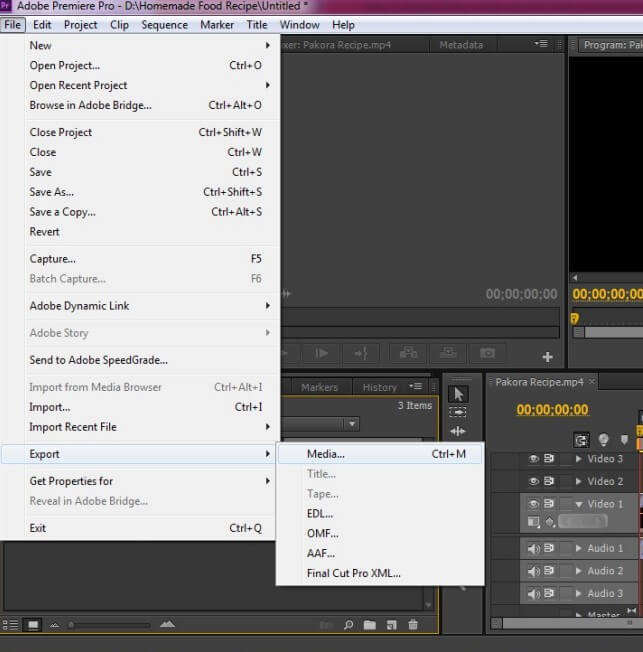
Press the ctrl or command key along with the 'M' key together, or you could go to "file" on the top right, and click "export," and then click "media." A window should pop up on the screen. This is the "export settings" window. From here, you can adjust how you want your file to be exported. You can select its format, name, quality, width, height, etc., etc.
Step 2: Adjusting the Export Settings
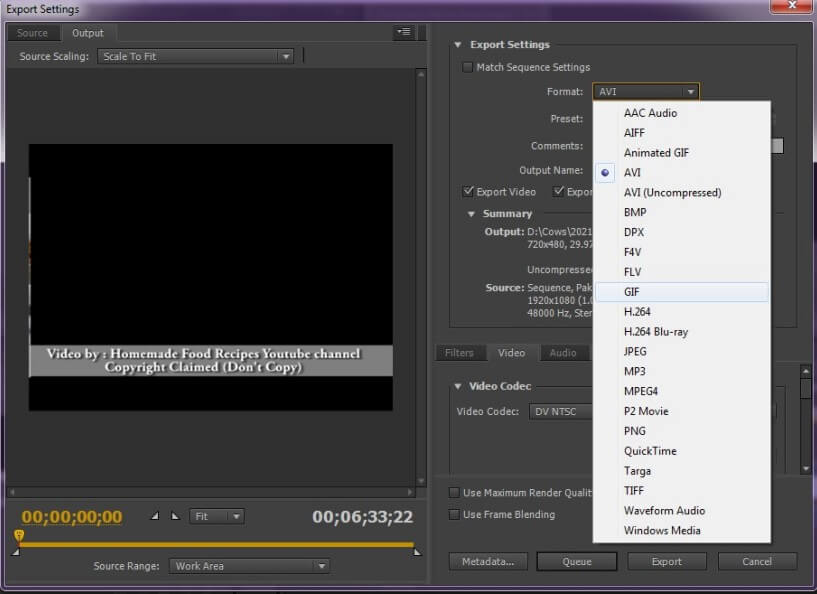
Once the "export settings" window is open, you can change the format of your footage.
Accomplish this by choosing the "format" option on the right side and clicking the downward arrow. A list of available formats should appear. This will allow you to select how your exported product will be presented, whether it be an image, audio, video, gif, or anything else. To export in gif format, you have to select "Animated Gif" or "GIF" options.
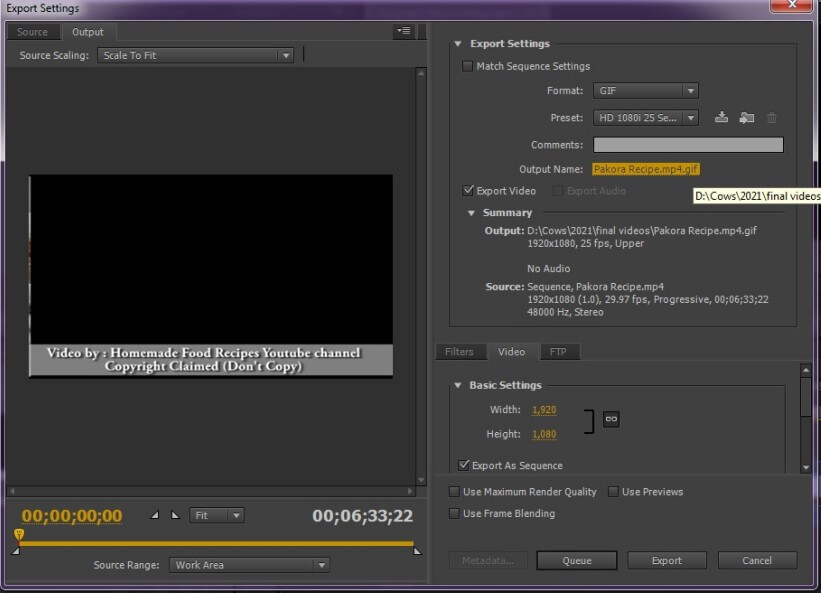
Next, you can select to export only video in your gif by checking the "export video" option.
You can add other effects or captions if you want
In the Video tab on the window, you can check "render at maximum depth."
You can adjust the quality bar however you want. It will not affect the size of the file.
The size ratio can also be altered as you please.
Step 3: Export and Name the File
Click on "output name," and a "Save As" window should open up. You can write the name you want or keep the default name. Once you're done, click Save, and voila! You have now successfully exported the gif or video.
Part 3. Best Alternate Video Editor to Export Gif - iMyFone Filme
For those who cannot afford premiere pro or, for whatever reason, want to use another editing program, Filme is the best option on the market. Edit with ease using Filme and hone your skills.
It's a great starting point for beginners trying to develop their editing abilities step by step. It is perfect for day-to-day editing on social media, school work, business projects, and other media outlets.
Steps to Export Gif with Filme
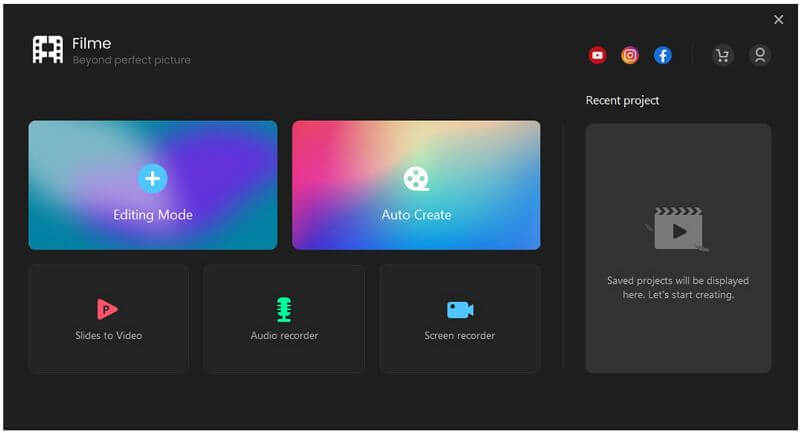
Step 1: Open Filme on your computer, you will have the following window on your screen, click on the editing mode.
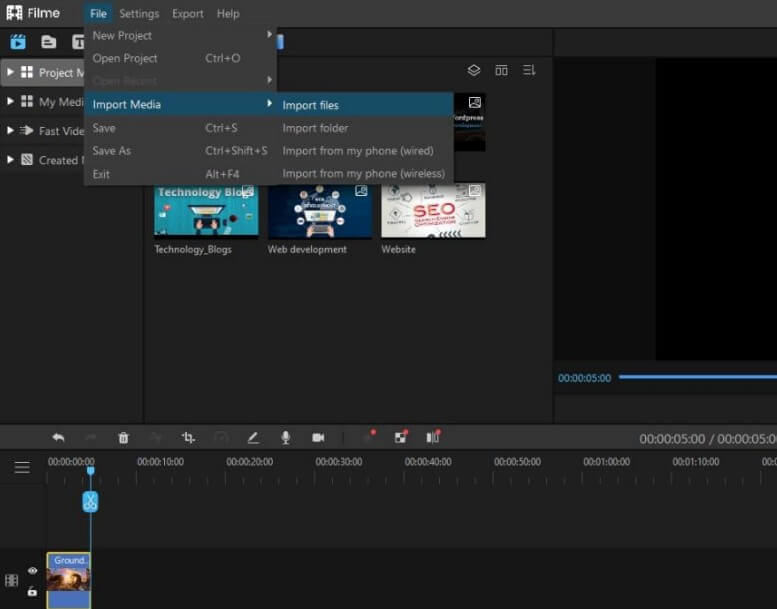
Step 2: Now. You have to import a file. Click on the option Import Media>Import Files and select a gif or video.
Step 3: Now select the video and drag it on the timeline.
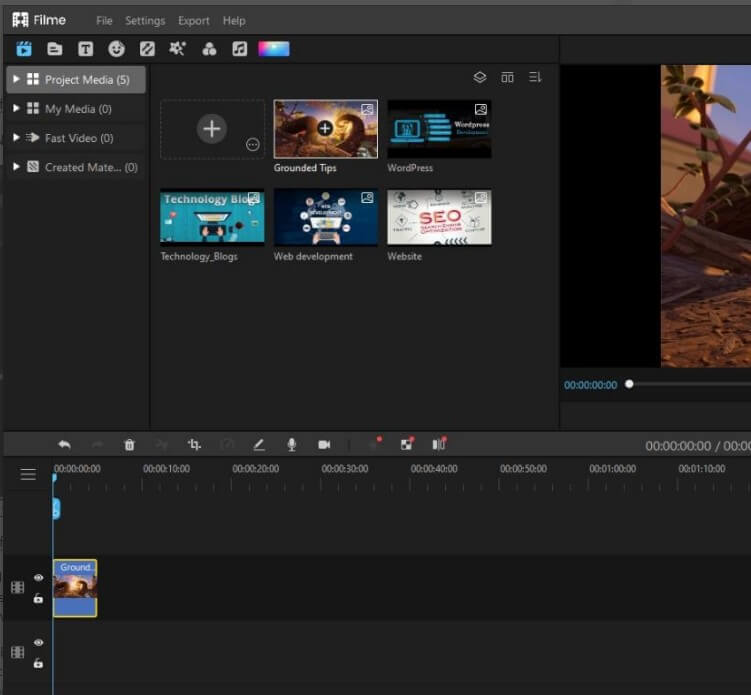
Step 4: Now, you can edit the video. If you want, you can crop it, increase the duration and adjust the video as per your requirements. You can also add effects and text on the footage which is quite easy. Once everything is done move on to the next step.
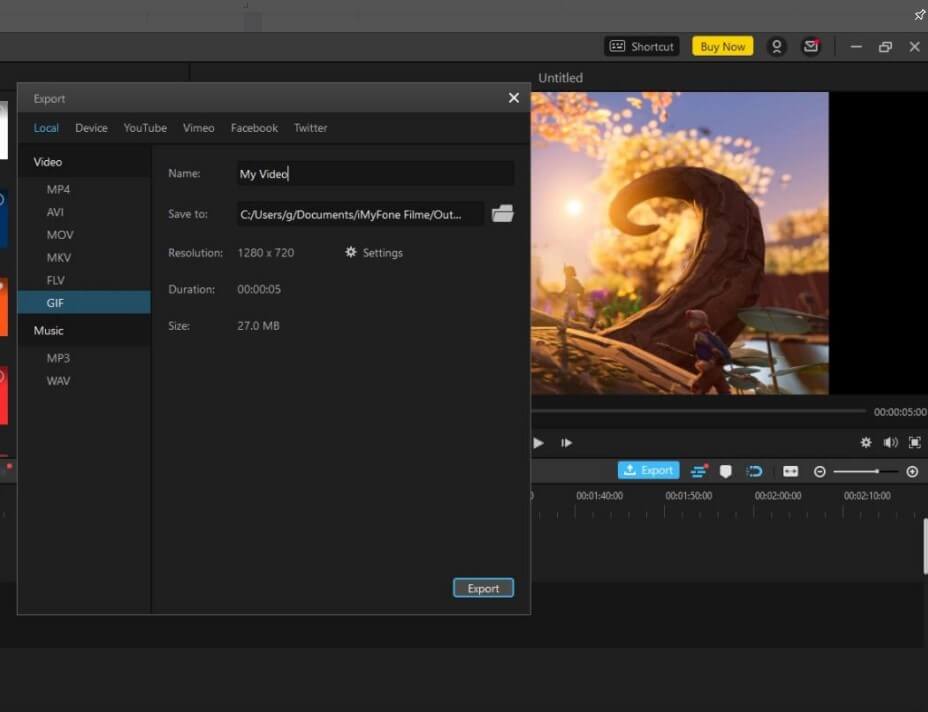
Step 5: Since, the video is completed. You have to now export it as a GIF. To do that, click on the export button. Select the GIF option, name the video and set the location where you want to save your video. Click on export. That's it. Play the GIF.
Why is iMyFone Filme the Best Option?
Filme allows you to:
1. Make multiple edits at the same time
Edit multiple audio and video clips simultaneously. You can play these audios simultaneously, too, to get a grasp of how the final product would sound.
2. Switch up the pace of your files
Adjust the speed, cut clips, loop videos however you see fit to mesmerize your audience.
3. Become the master of smooth transitions
Create seamless transitions with great expertise.
4. Hide anything you don't want to show
Blur out or put mosaic designs on sensitive information or parts.
5. Add or remove audio and text to create a masterpiece
Extract and attach audio wherever you want in the clip. You can do the same with text and titles too!
6. Access all kinds of filters and effects
Add effects and different filters to enhance the product and beautify the product. You can change the color scheme, highlight specific colors, and much more.
7. Filme GIF editing
You can use Filme to edit and make loop gifs and videos as well! With filme, you can easily duplicate your clips and then download them as gifs to share!
Part 4. FAQs about How to Loop Video/Gif on Premiere Pro
Q. Where is the loop button in Premiere Pro?
If you don't already have the loop button on your program panel, you can access it by pressing the plus button on the bottom right corner of the panel. Once you press it, a pop-up should open with lots of icons on it. The loop button is the one with the small triangle on the rectangle. Drag and drop it onto the program panel. Activate it by pressing (it should become blue), and you're done. If you want to stop the video from looping, just deactivate it by pressing it again (it should turn white again).
Q. What does loop playback mean?
Loop playback allows you to replay your clip-on premiere from start to end endlessly.
Q. What is the minimum loop length required for loop playback?
The minimum time required for a loop playback is about 5 seconds.
Q. How can I cut clips in Adobe premiere pro?
There are two ways to adjust the length of a clip. You can either
Click the edge of a clip and then drag it to shorten or lengthen it.
Place your cursor over the clip where you want to shorten it, and when the red arrow appears, you click and drag it inwards to the length you want.
Q. How do I change video playback speed?
Many people complain about the playback speed being too fast, and if you're one of them, you can adjust it to your liking. You just have to go on the video and tap it, tap playback speed, and then change the default speed to the rate you require.
Conclusion
Knowing how to properly loop your gifs and videos is an essential skill to have as an editor. Apps like Adobe premiere pro or Filme can conveniently help to edit videos however one desires. They can make many modifications changing colors, adjusting the speed and length of files, adding audio and text, putting effects and filters, and allowing transitions in videos.
They are ideal to use not only for casual editing but also the professional kind for experts. You can simply upload your files, edit them and then export them to use the improved product.


